

Import a menu or customer list
You don’t have to type your menu in. Import it from what you already have, check it on one screen, and add it to your menu in one step. Nothing goes live until you’ve checked it and confirmed the allergens.
Before you start: you need permission to edit the menu (owner, admin or manager). Importing customers needs an owner or admin. Open Menu → Import, or go to Import from the menu tabs.
This page goes into every route in detail. For the short version during setup, see Import your menu in the setup path.
Pick a route
Section titled “Pick a route”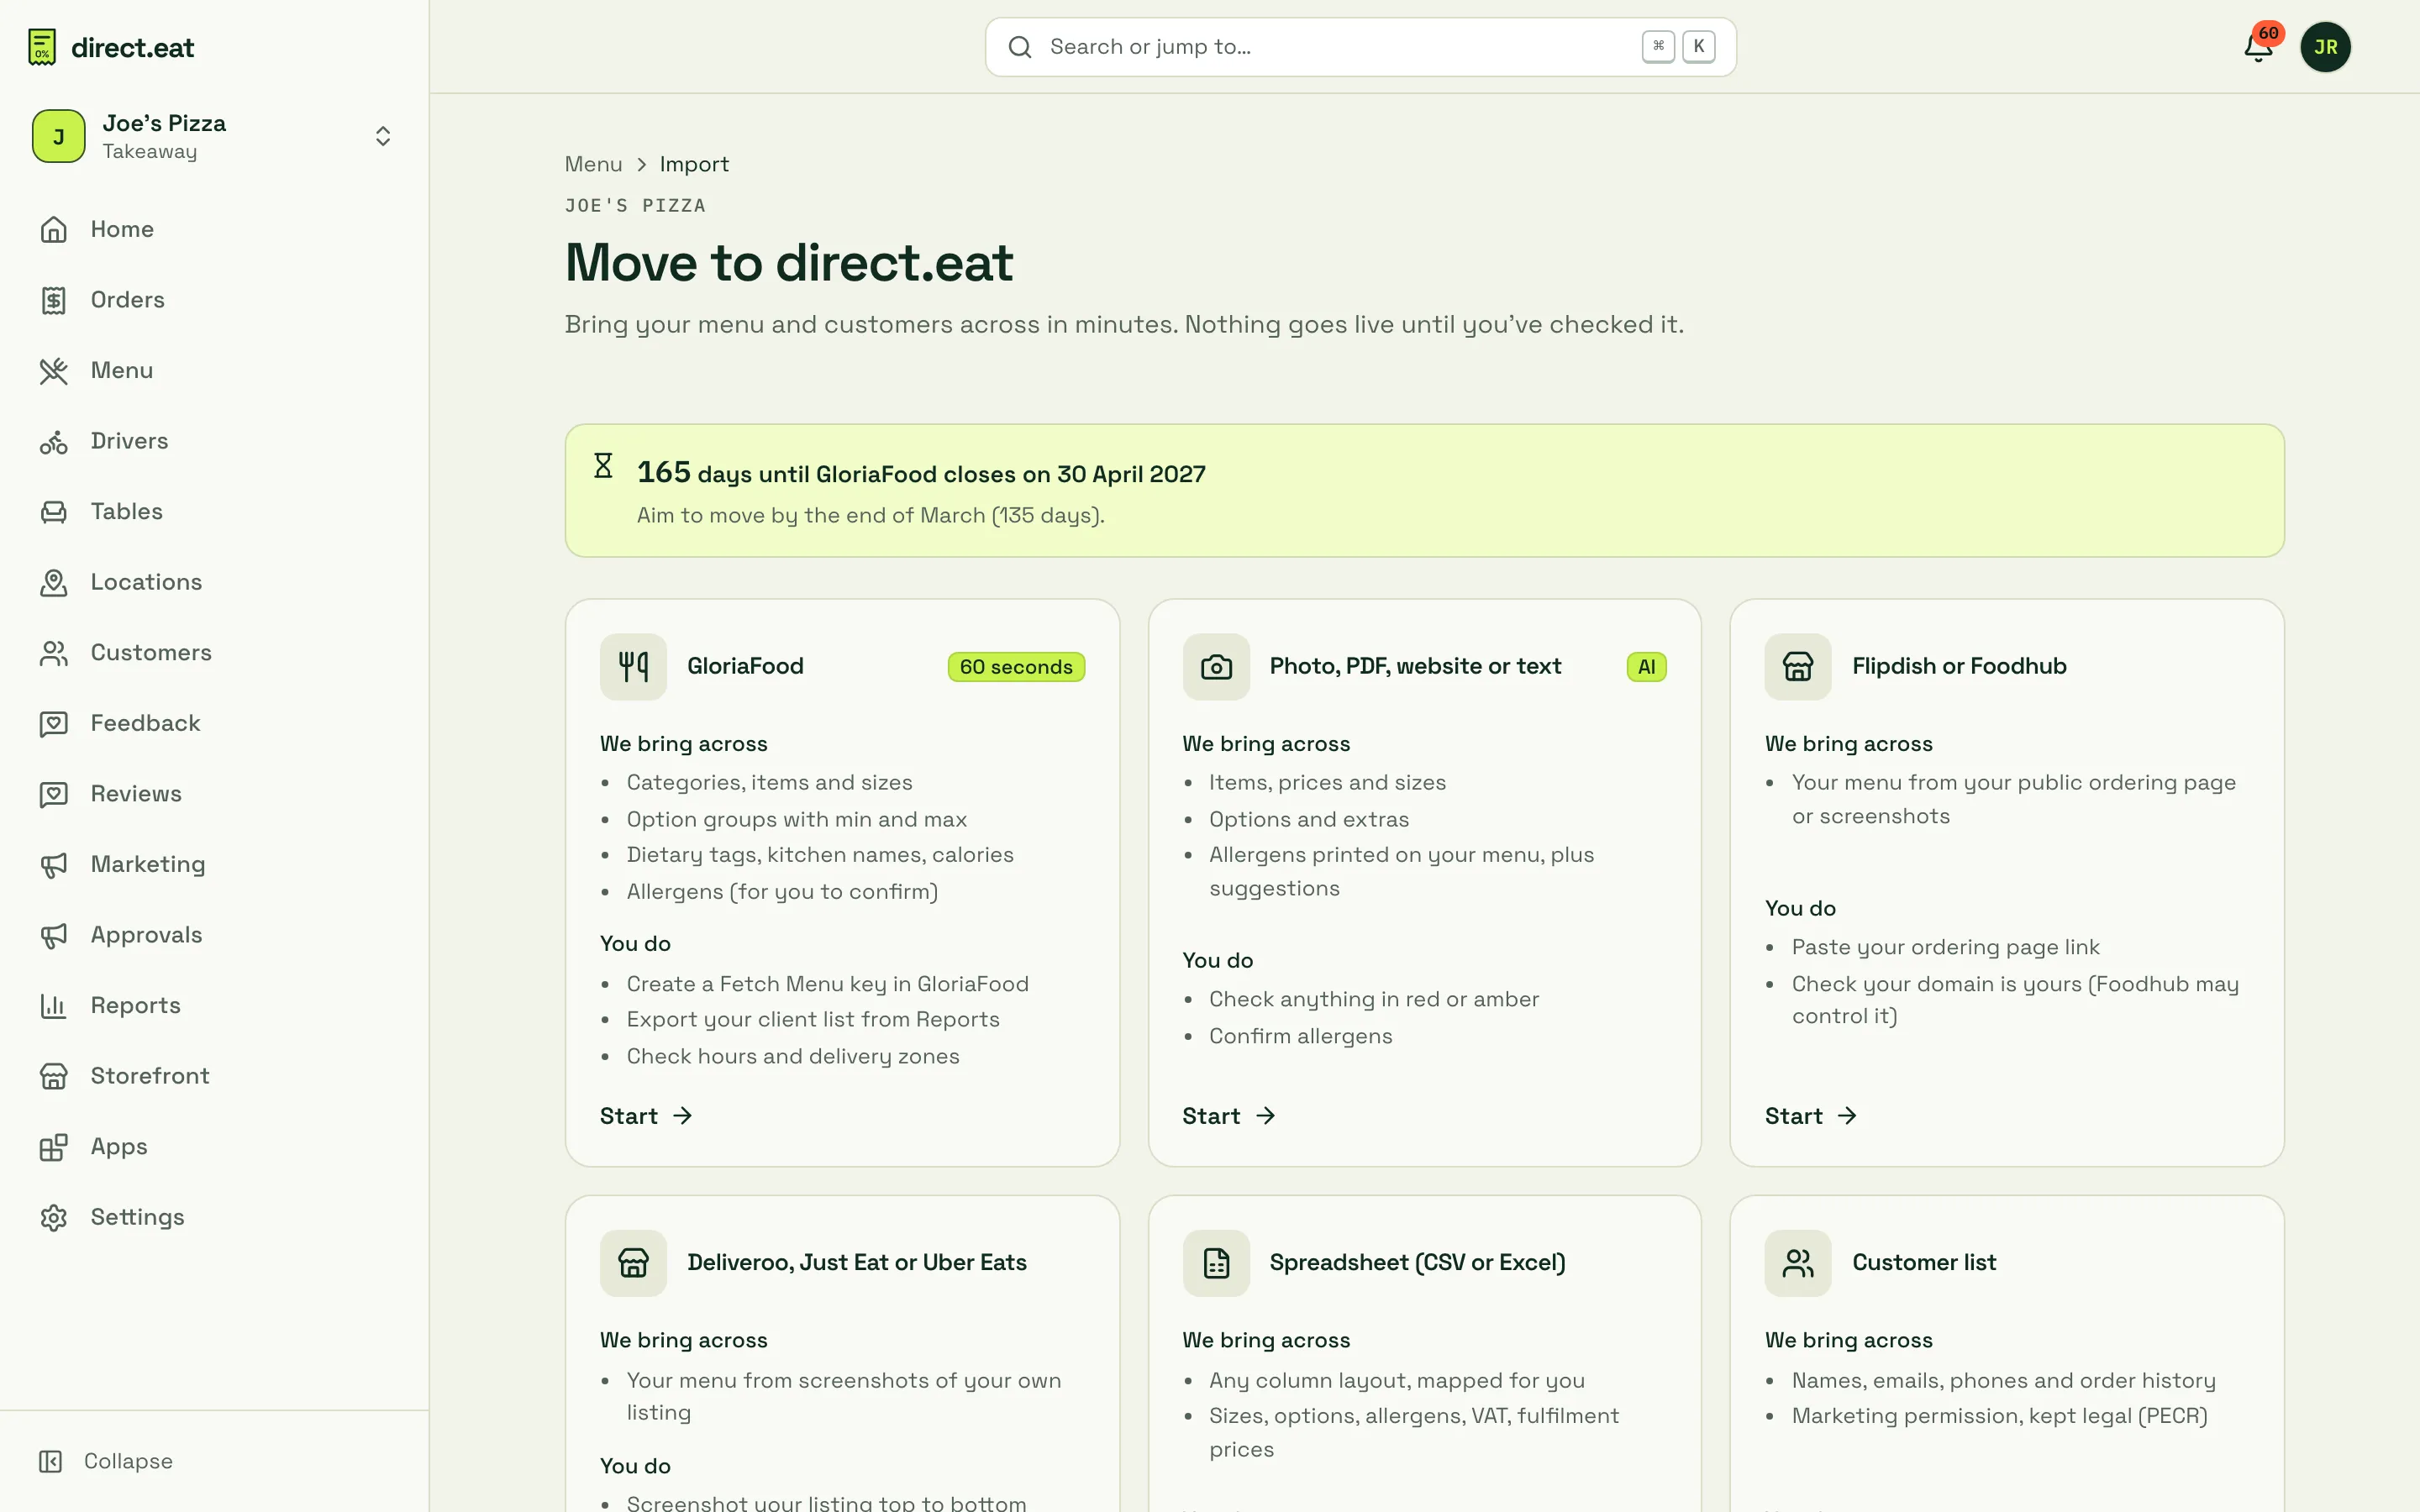
Each tile says honestly what comes across (“We bring across”) and what’s left for you (“You do”).
| You have | Use | What comes across |
|---|---|---|
| A GloriaFood account | GloriaFood | Categories, items, sizes, option groups with min and max, dietary tags, kitchen names, calories, allergens (for you to confirm) |
| A printed menu, PDF, website or text | Photo, PDF, website or text | Items, prices, sizes, options and extras, allergens printed on your menu, plus suggestions |
| Flipdish or Foodhub | Flipdish or Foodhub | Your menu from your public ordering page or screenshots |
| Deliveroo, Just Eat or Uber Eats | Deliveroo, Just Eat or Uber Eats | Your menu from screenshots of your own listing |
| A spreadsheet or till export | Spreadsheet (CSV or Excel) | Any column layout, mapped for you: sizes, options, allergens, VAT, order-type prices |
| A customer list | Customer list | Names, emails, phones and order history, with marketing permission kept legal |
| Square | Square (coming soon) | Until then, export your Square items to CSV and use Spreadsheet |
Photo, PDF, website or text
Section titled “Photo, PDF, website or text”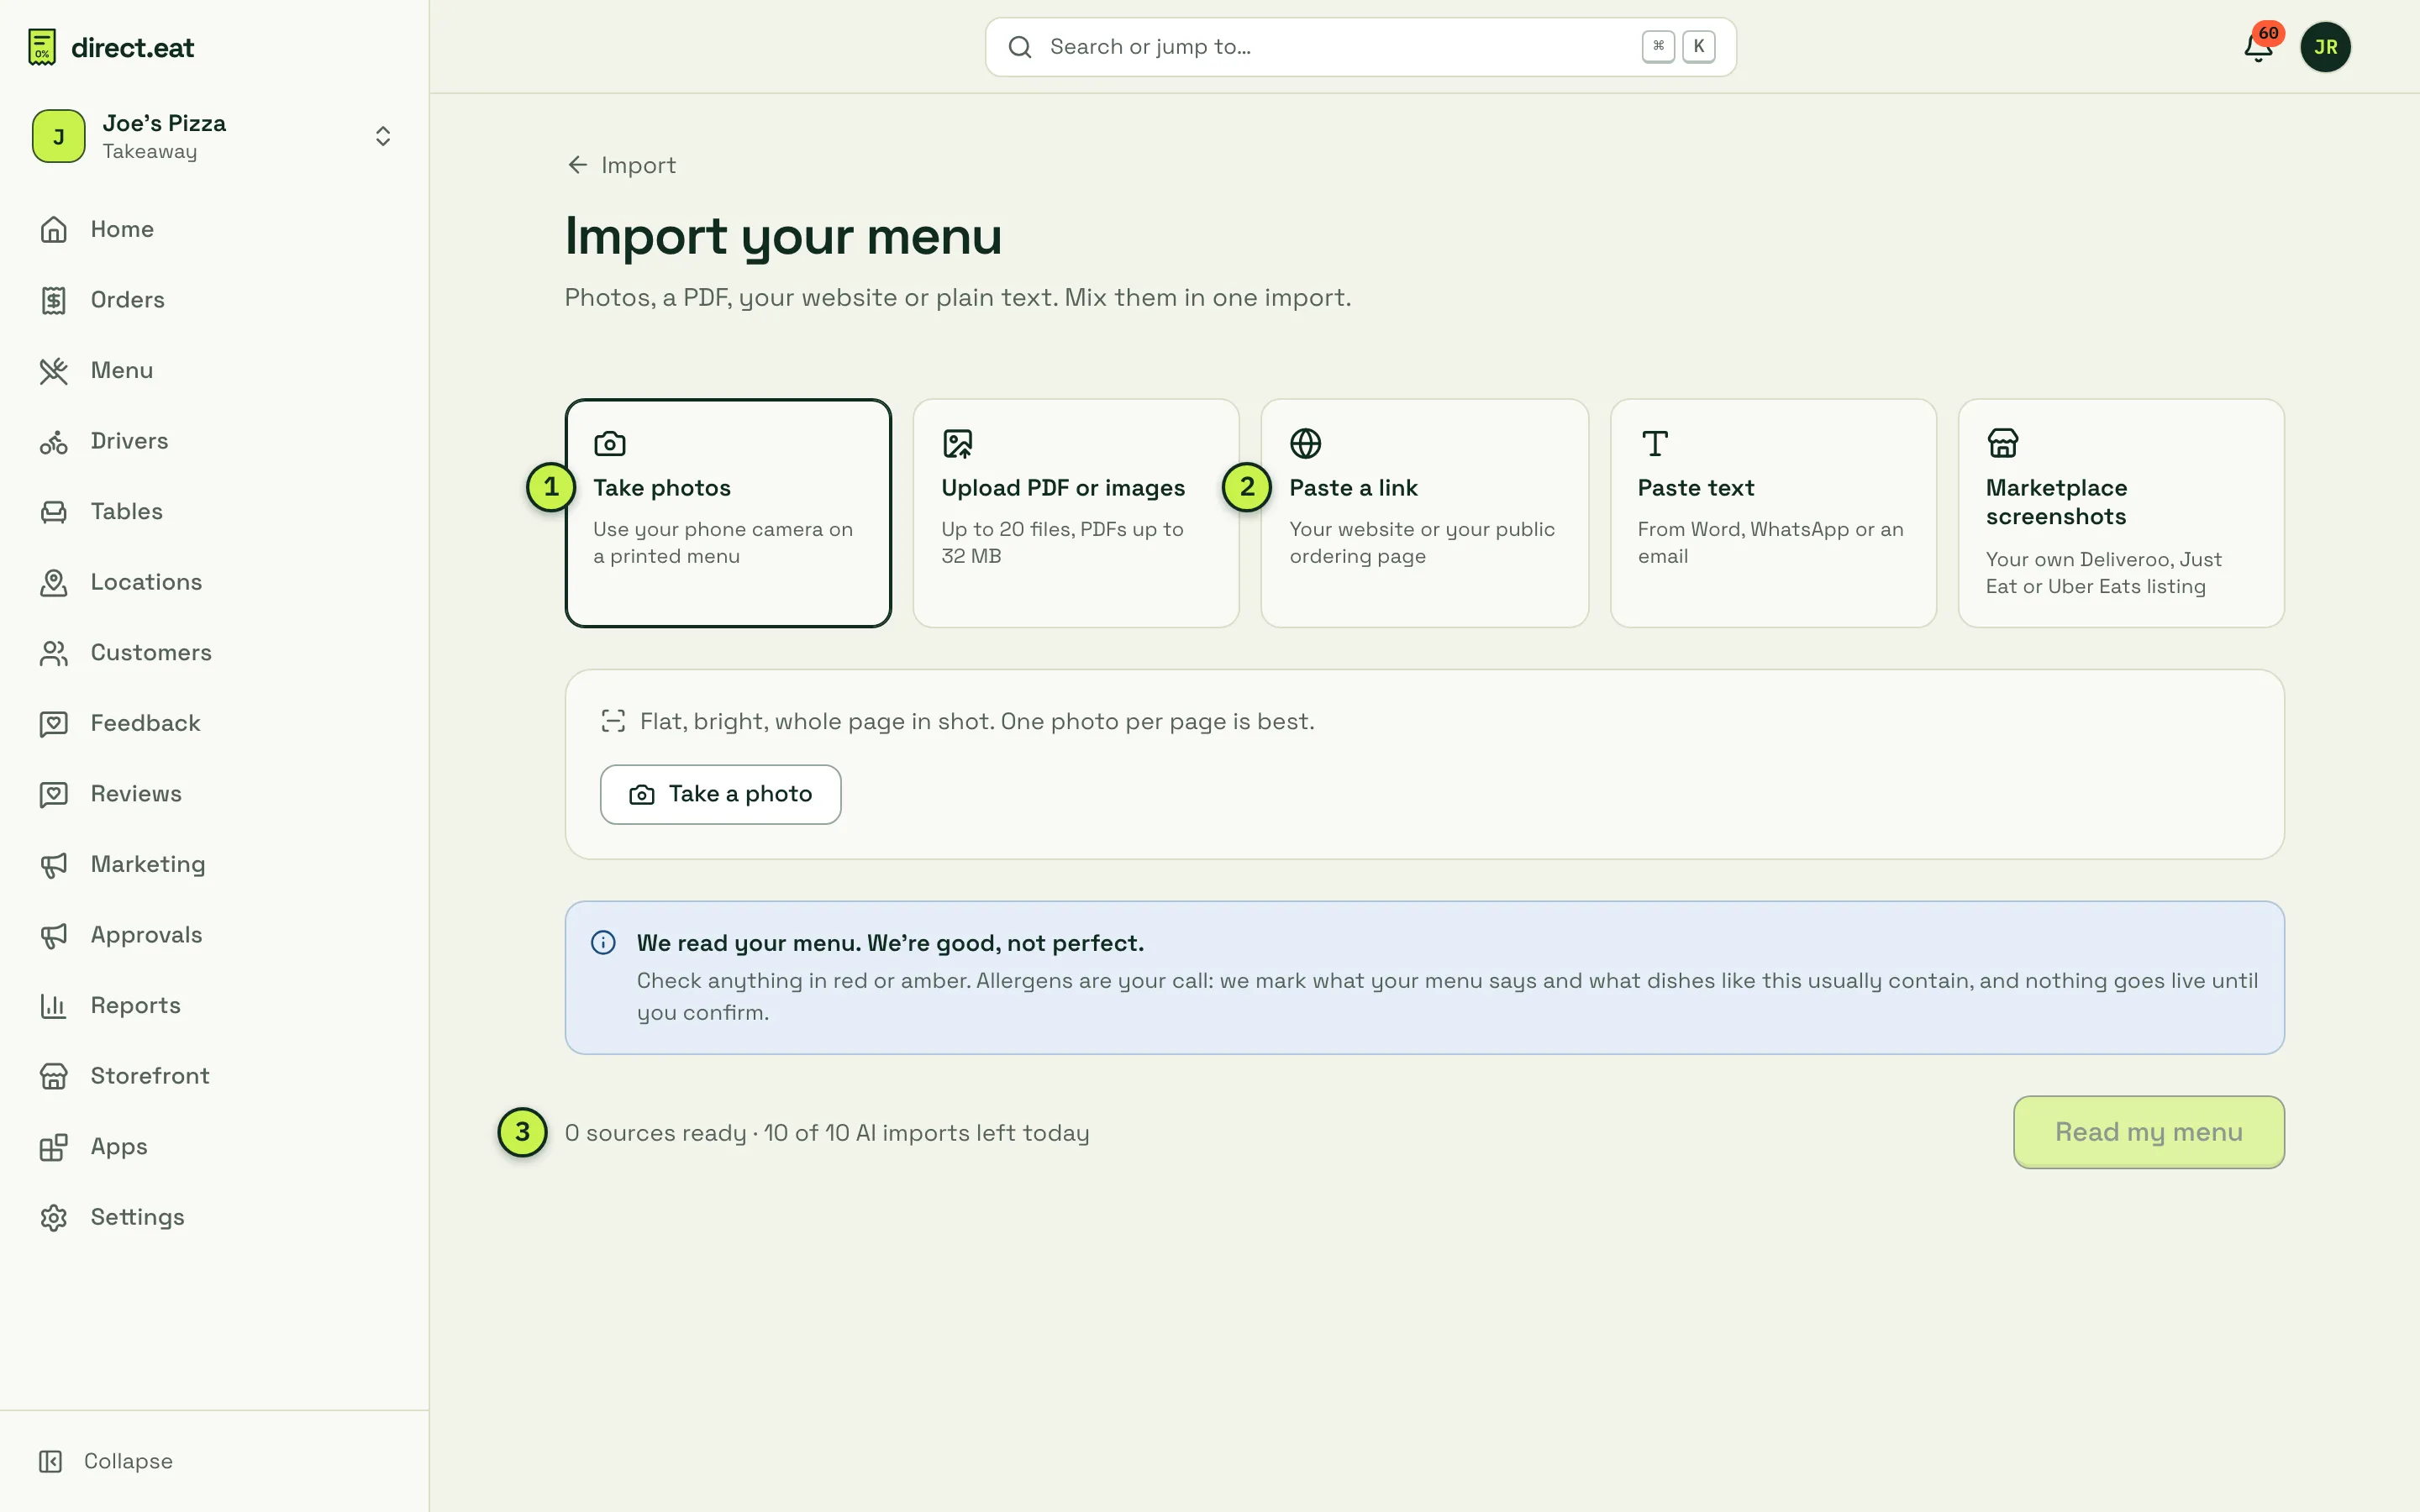
- Take photos: use your phone’s camera on a printed menu. Flat, bright, whole page in shot, one photo per page.
- Paste a link: your website or your public ordering page. We read the page, including menu data some sites publish for Google.
- Daily allowance: you can run 10 AI imports a day per shop.
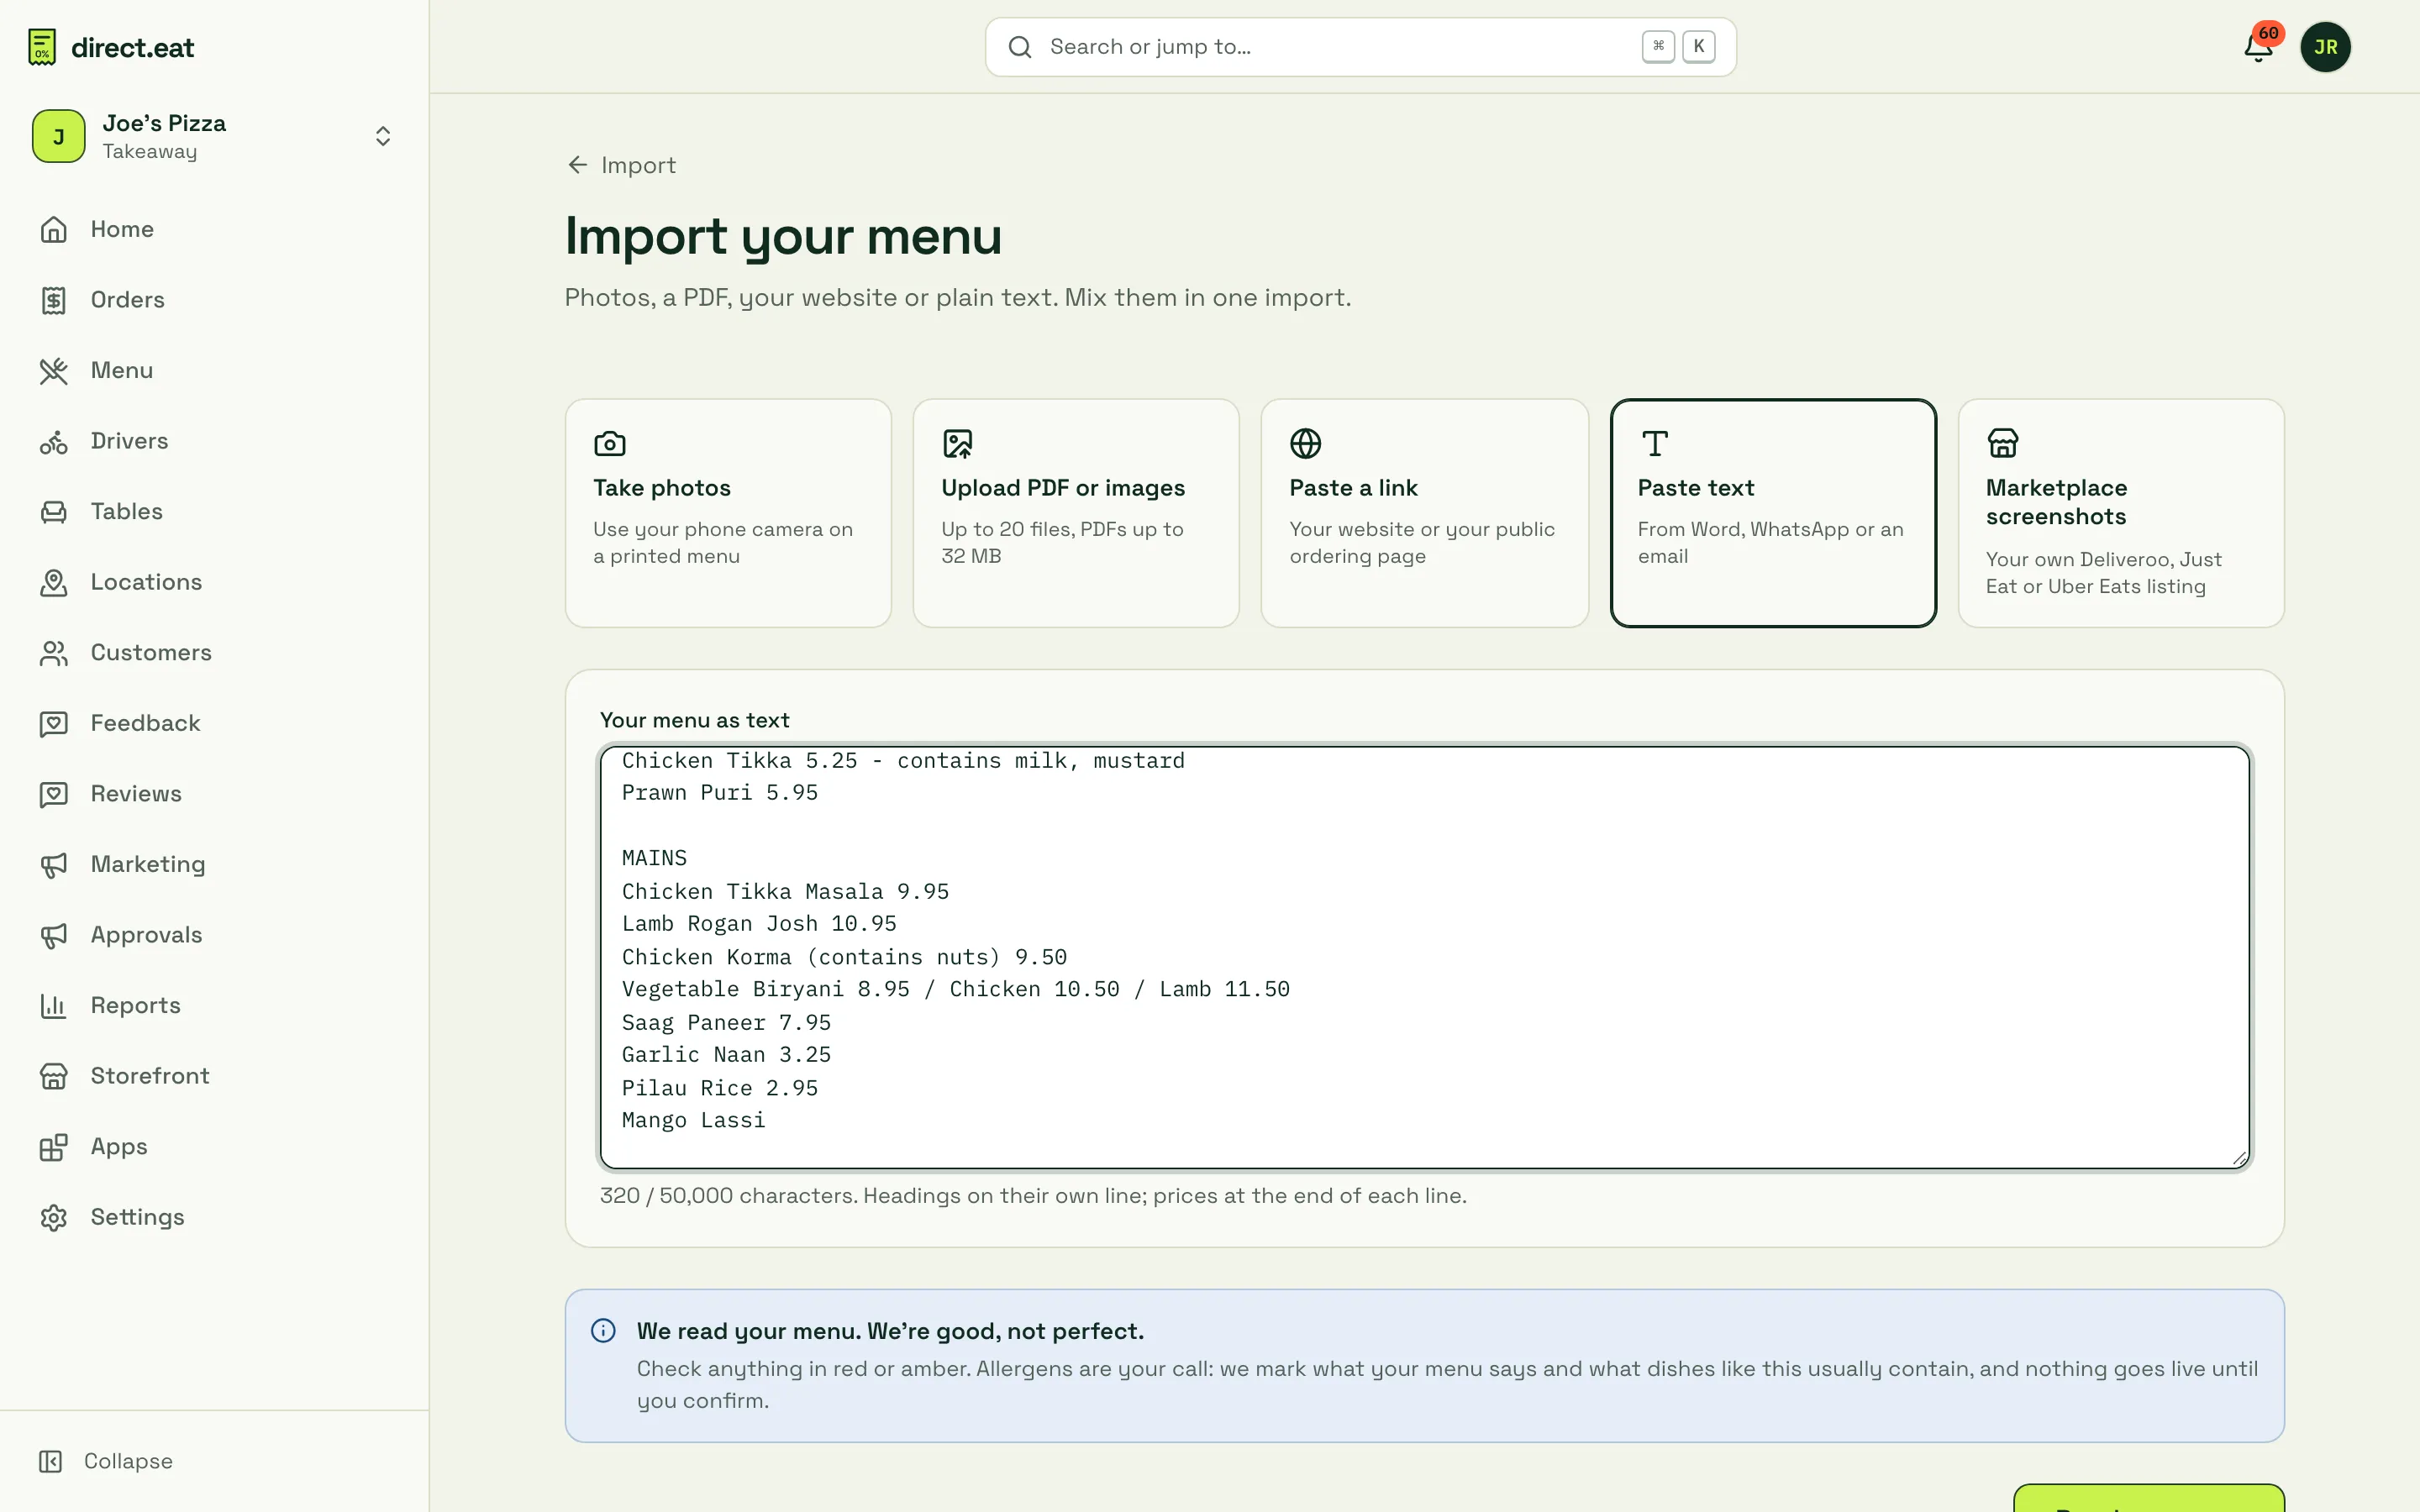
The other sources: Upload PDF or images (up to 20 files, PDFs up to 32 MB), Paste text (from Word, WhatsApp or an email; headings on their own line, prices at the end of each line) and Marketplace screenshots (your own Deliveroo, Just Eat or Uber Eats listing, top to bottom). You can mix sources in one import, for example photos of the menu plus a pasted list of specials.
- Add your sources. Photos are checked in your browser first: if one is blurry, too dark or under 800 pixels wide, you’re told before uploading so you can retake it.
- Click Read my menu.
- You’re taken to the import page. It shows progress for each source and then the review screen. If a source can’t be read, you’re offered other ways in (retake, paste text, or spreadsheet).
The review screen
Section titled “The review screen”Every route except customers ends on the same screen: Check your menu.
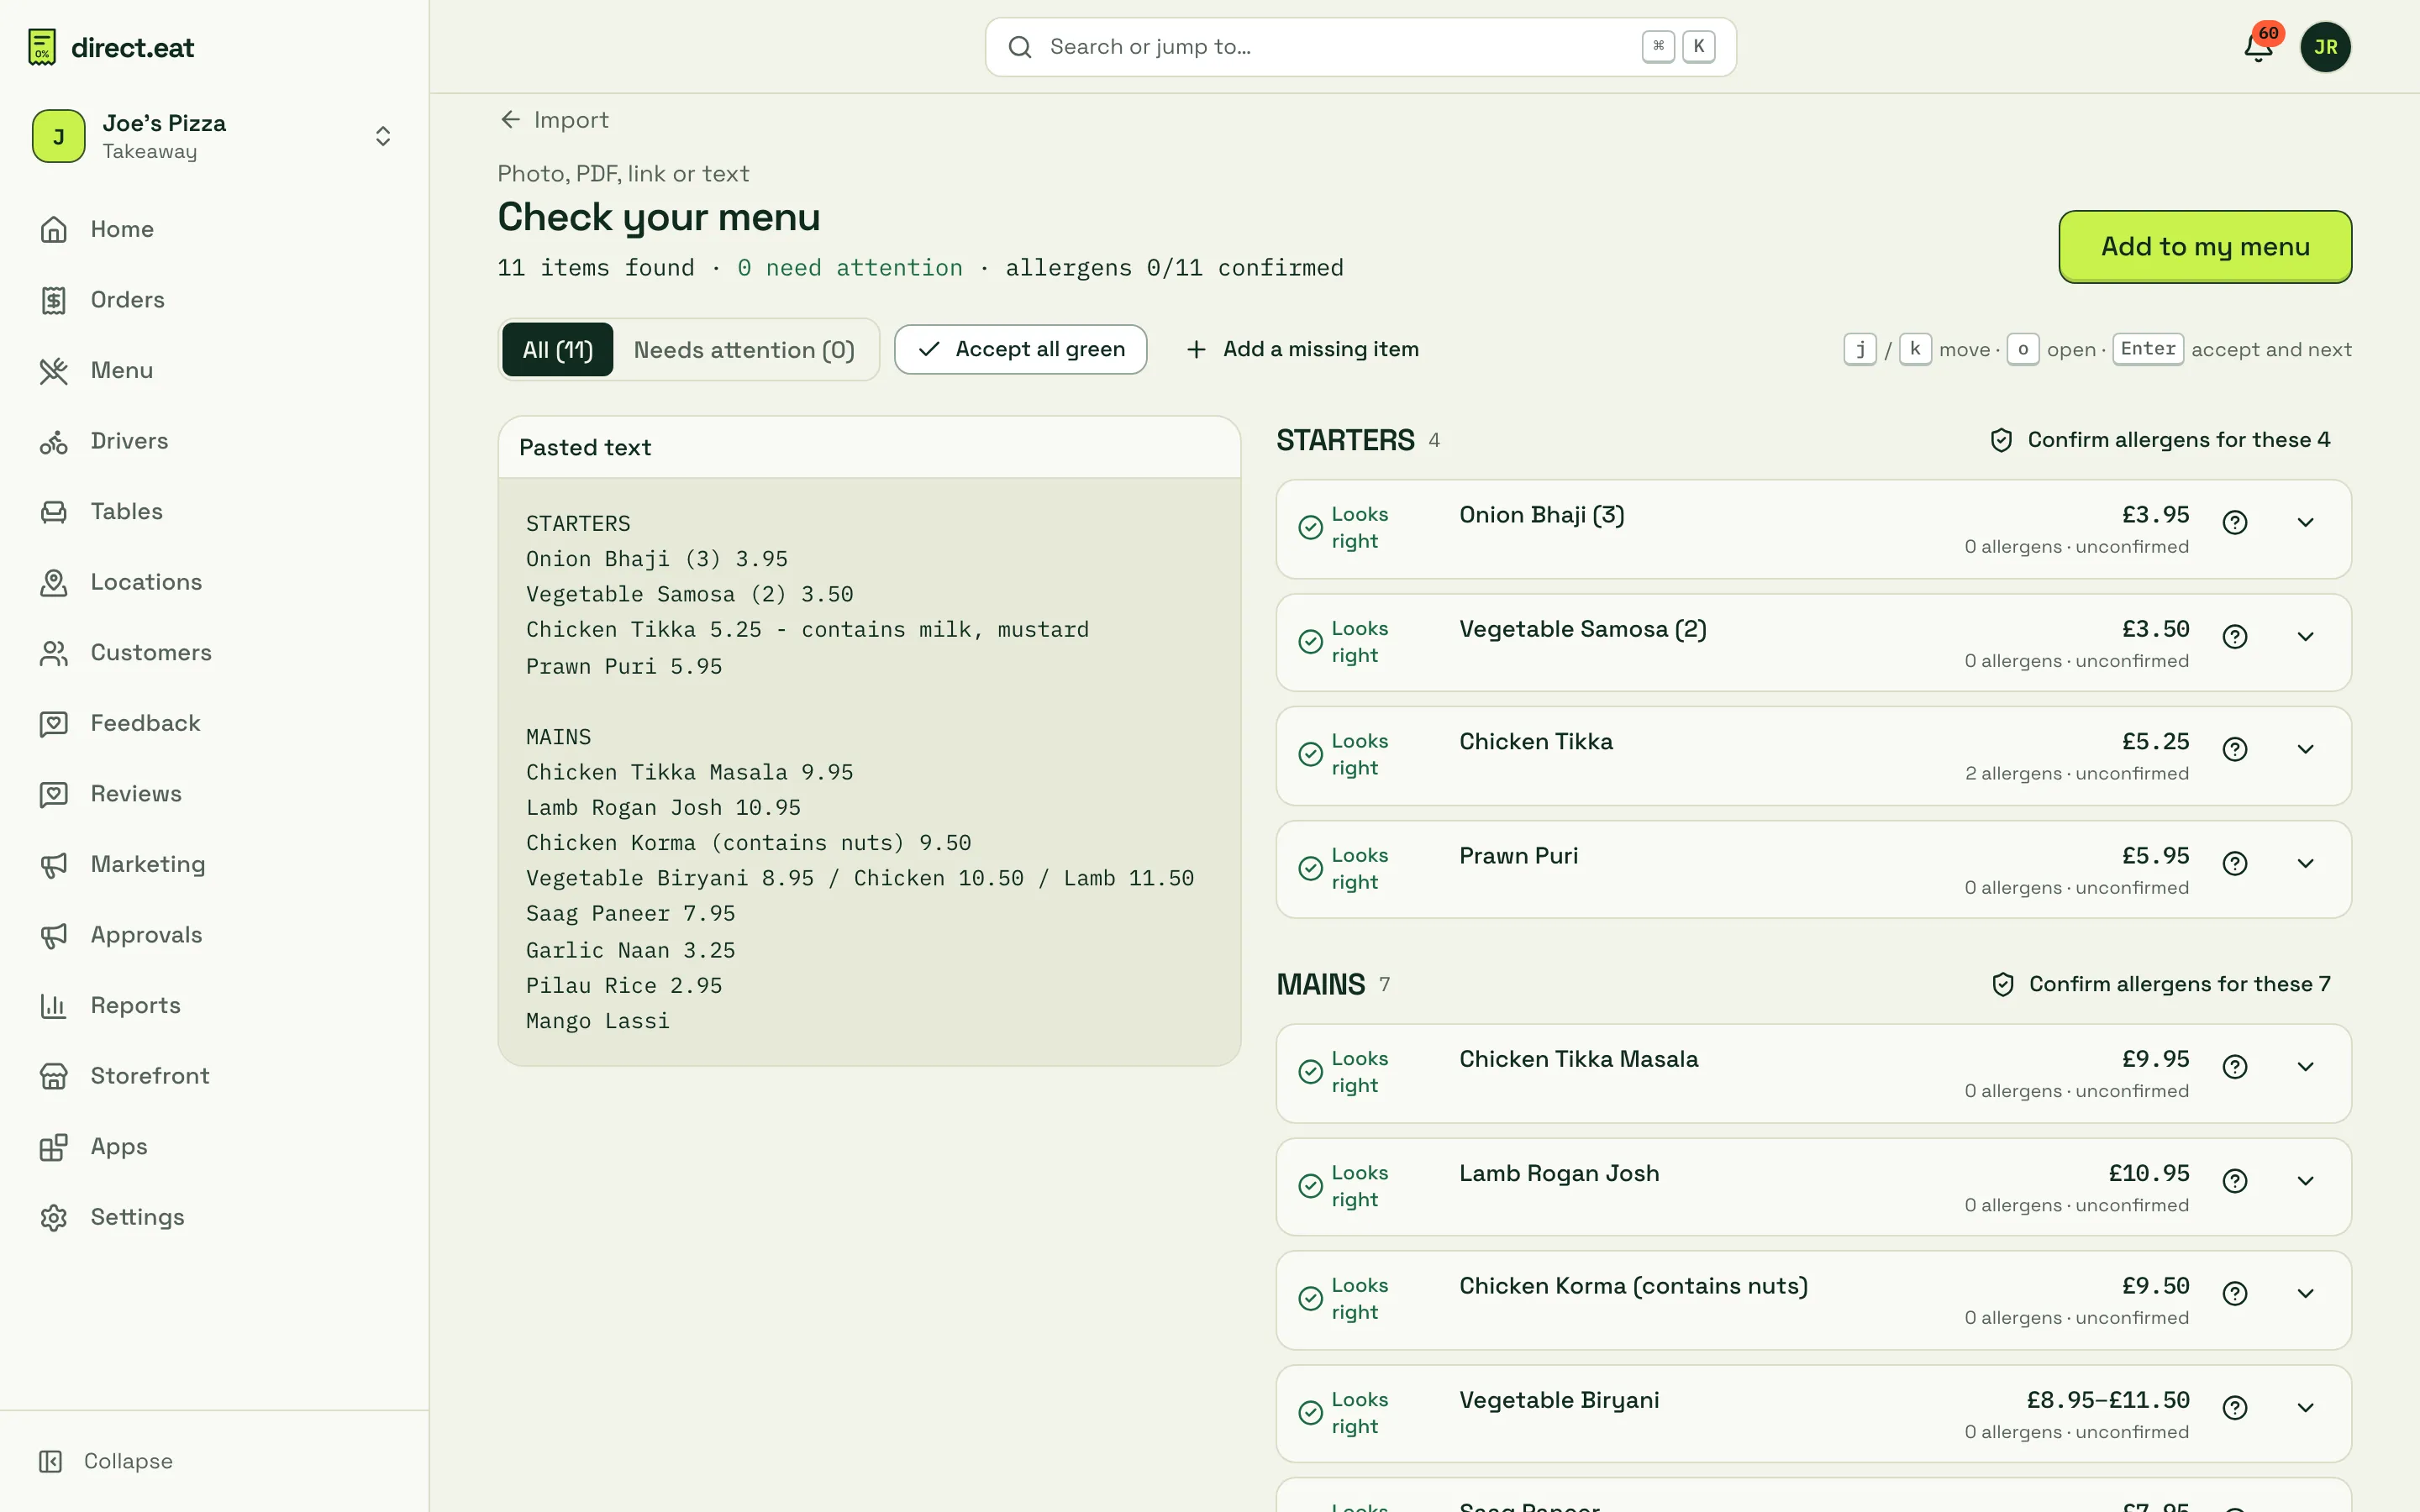
- Your source is on the left (photo, PDF page or text), the items we read on the right. On a phone, tap Show source. Click ? on an item to highlight where we read it in the source.
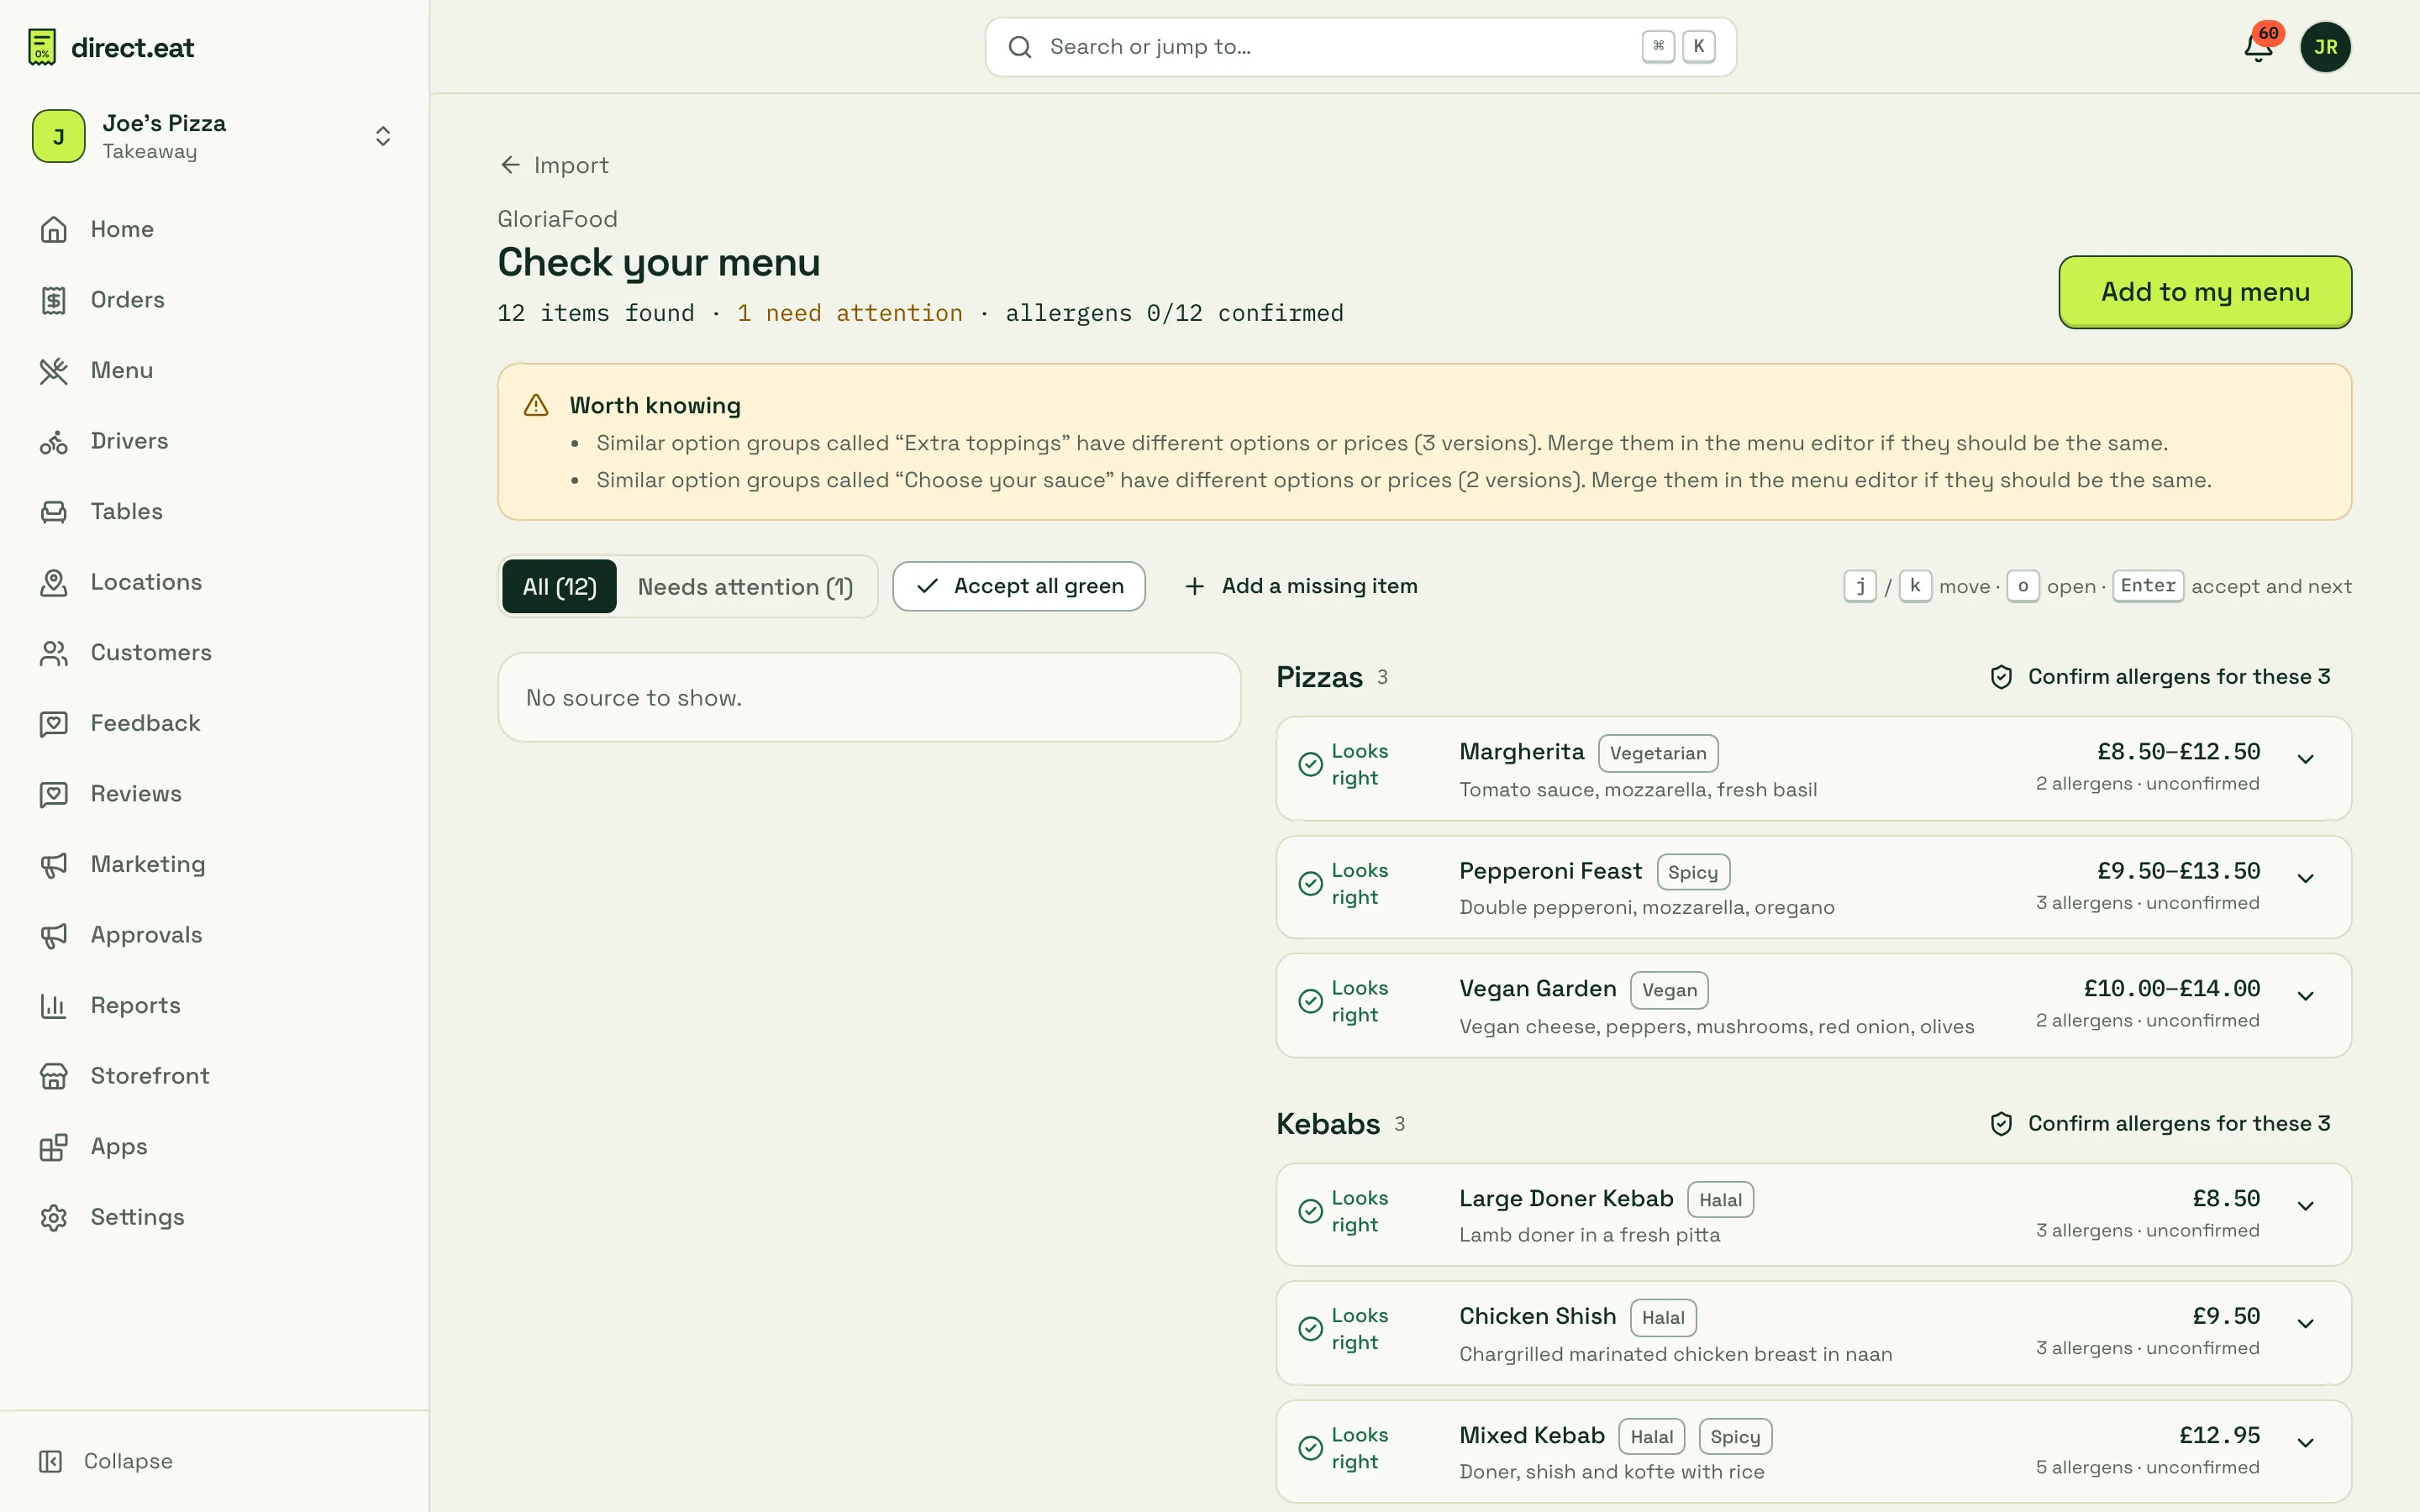
- Every item has a status, in words and an icon, never just a colour:
- Must fix (red): for example “Price missing: add it before this can go live”, or “We couldn’t find this item in your source: check it’s real”.
- Check (amber): for example “Price looks very low”, “Price is over 3× others in this category”, “Size prices don’t increase with size”, “Possible duplicate”.
- Looks right (green).
- Needs attention filters to red and amber items only.
- Accept all green accepts every green item in one go. Red items are never accepted in bulk.
- Add a missing item if we missed one.
- Keyboard:
JandKmove,Oopens an item, Enter accepts and moves to the next.
Open an item (click the arrow) to edit the name, category, description, price and dietary tags. Split into sizes turns “Vegetable Biryani 8.95 / Chicken 10.50 / Lamb 11.50” into one item with sizes. Merge with another item or Merge as sizes with… joins two items we read separately.
Allergens on imported items
Section titled “Allergens on imported items”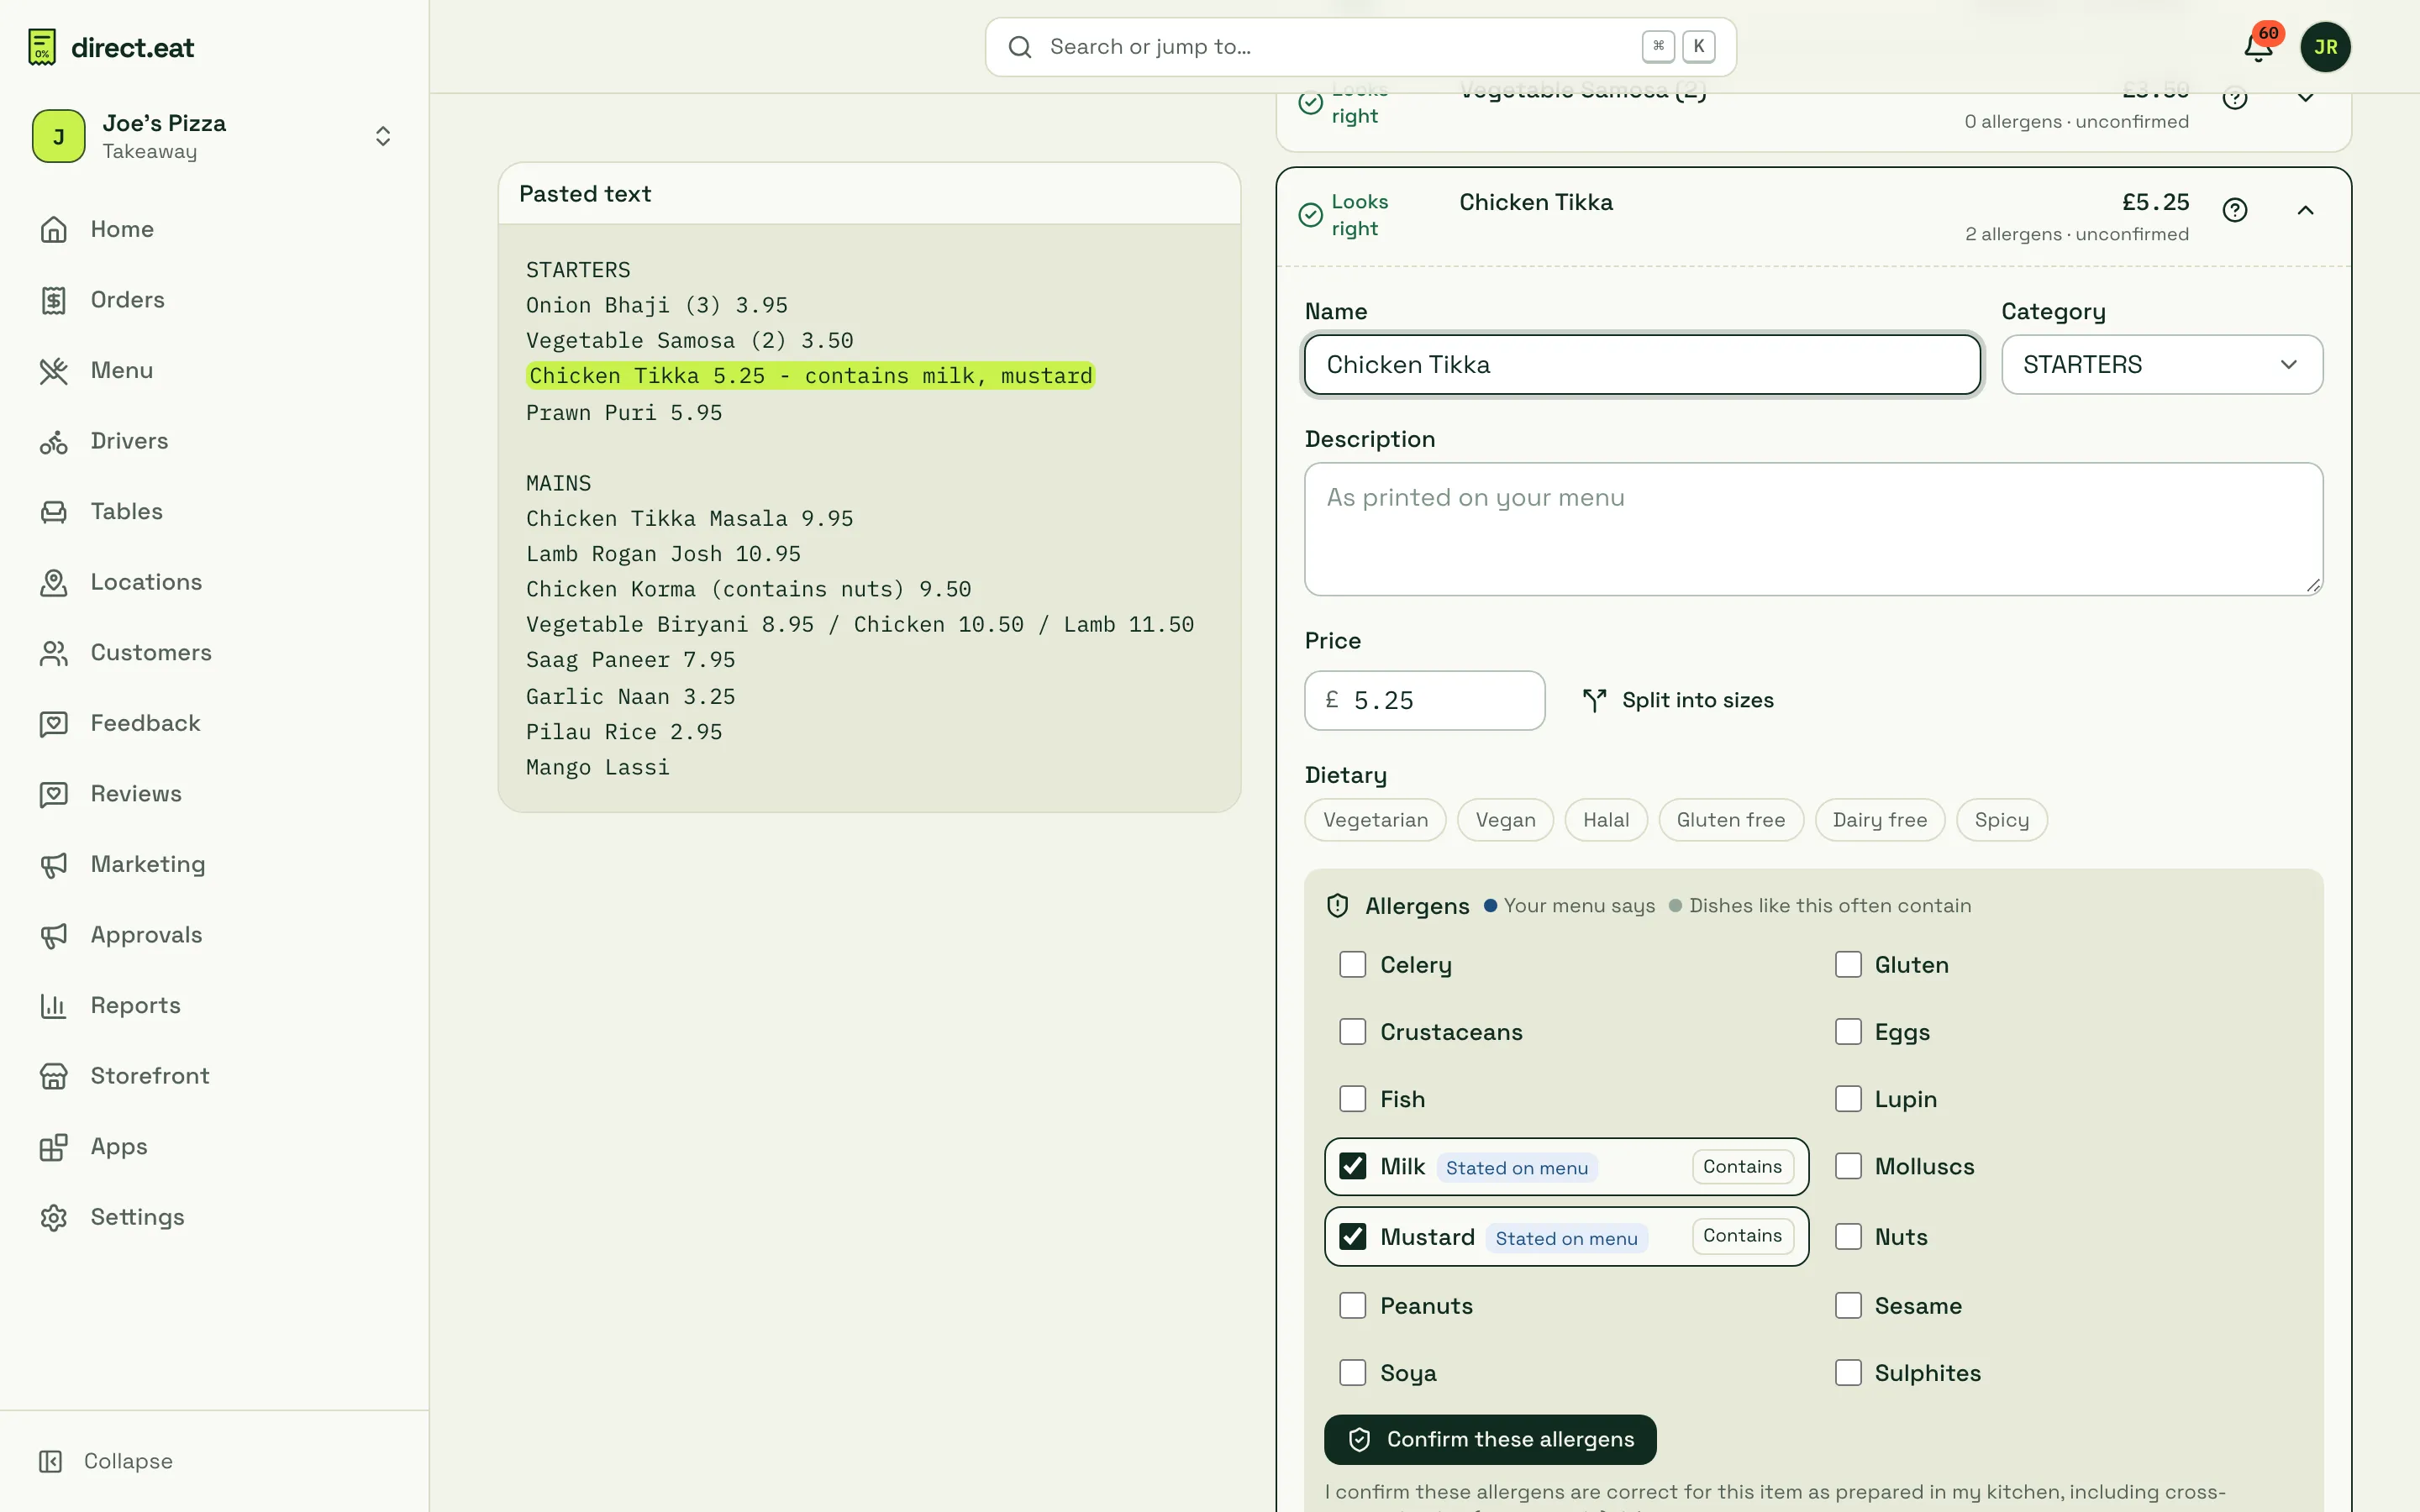
Allergens come in two kinds, shown differently:
- Your menu says (blue, “Stated on menu”): the allergen was printed on your menu or in your file.
- Dishes like this often contain (grey): a suggestion based on the dish, for you to check. We never mark anything as “free from”.
Tick or untick, then Confirm these allergens for one item, or Confirm allergens for these n on a whole category. Until confirmed, imported items are added to your menu but stay off your storefront. More in Allergens and dietary tags.
Marketplace prices and deals
Section titled “Marketplace prices and deals”- If you imported from Deliveroo, Just Eat or Uber Eats, you’re asked “Are these your marketplace prices?” and can lower them all by a percentage, since there’s no commission on direct orders.
- Deals we found lists meal deals and offers we spotted. Deals across several items work best as promotions, so Create promotion takes you to Offers and promotions.
Add to my menu
Section titled “Add to my menu”- Click Add to my menu.
- Choose Create a new menu (keep it separate, for example a lunch menu) or Merge into a menu (matching categories are combined). You see how many items, new categories and merged categories before you confirm.
- Everything is added in one go. If it’s not right, undo the whole import with one click: “Import undone. Your menu is back as it was.”
Your past imports are listed on the Import page under Recent imports, so you can come back and finish checking later.
GloriaFood
Section titled “GloriaFood”GloriaFood closes on 30 April 2027 (some sources say 31 March). Aim to move by the end of March so you’re not doing it in the last week. The Import page shows a countdown.
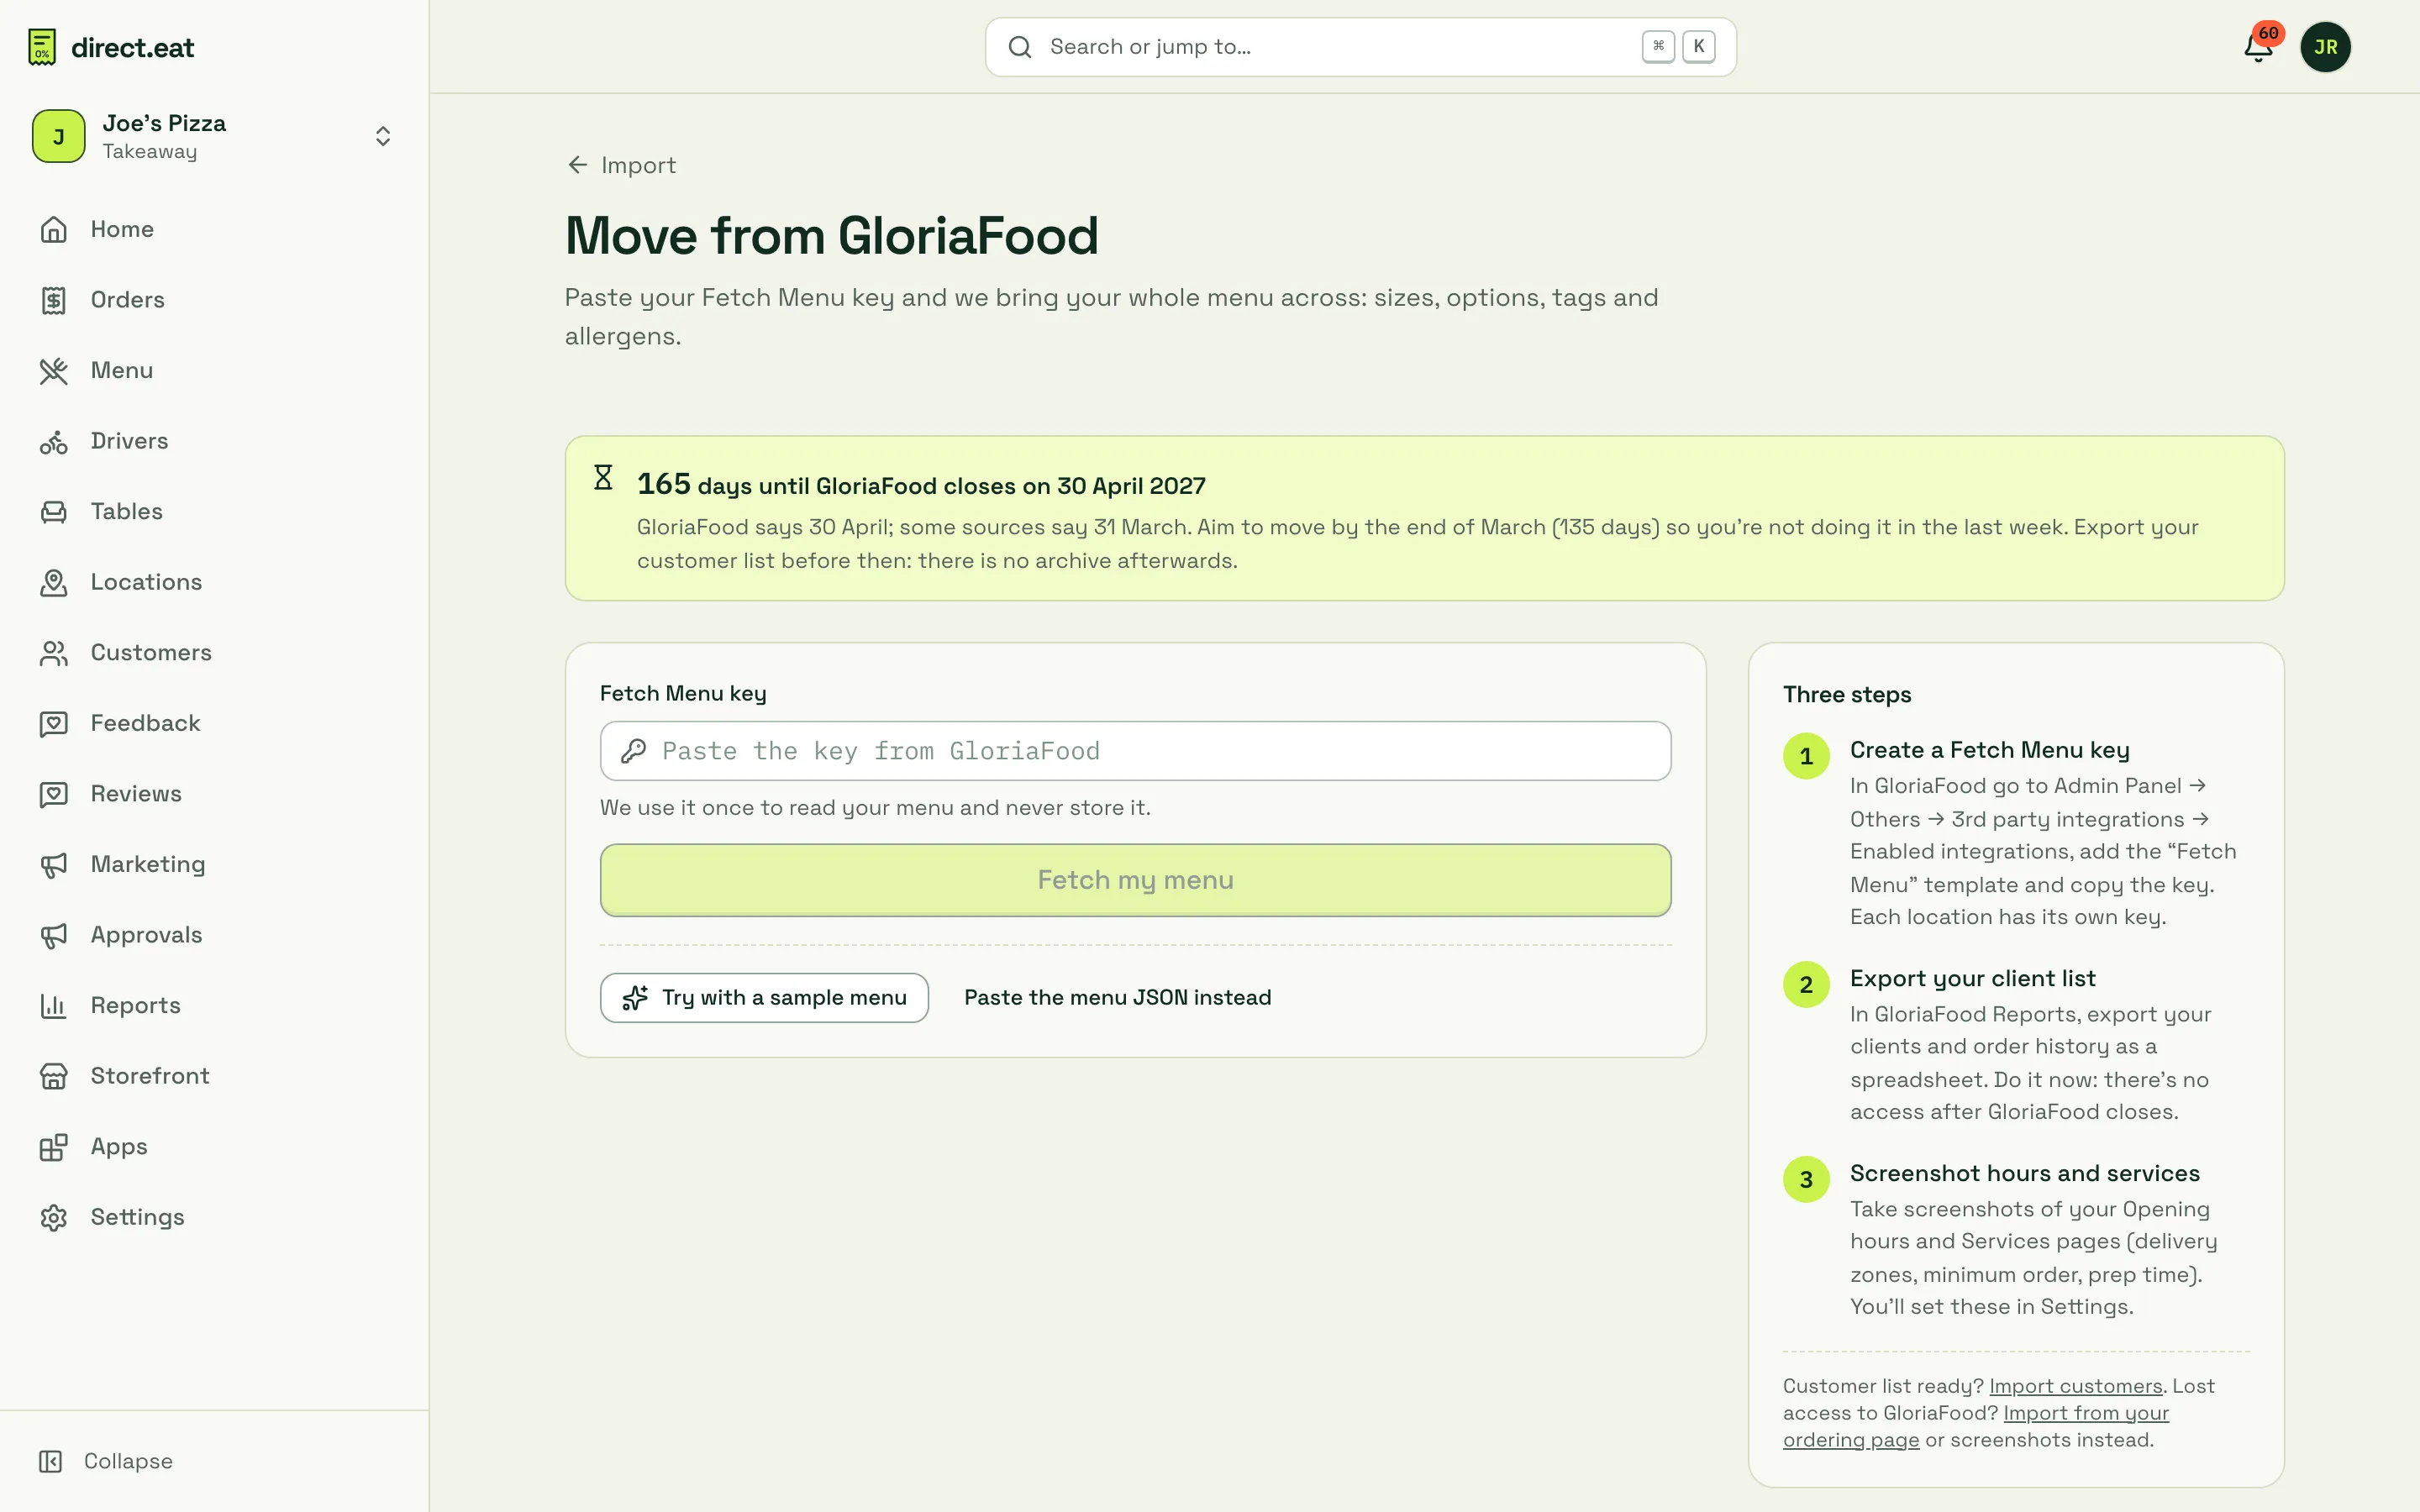
- In GloriaFood, go to Admin Panel → Others → 3rd party integrations → Enabled integrations, add the Fetch Menu template and copy the key. Each location has its own key.
- In direct.eat, open Import → GloriaFood, paste the key into Fetch Menu key and click Fetch my menu. We use the key once to read your menu and never store it.
- Check your menu on the review screen. GloriaFood menus come with sizes, option groups, tags and allergens. A Worth knowing panel points out things like similar option groups with different prices, which you may want to merge.
- Add to my menu.
Before GloriaFood closes, also:
- Export your client list from GloriaFood Reports (clients and order history as a spreadsheet), then import your customers. There’s no access after GloriaFood closes.
- Screenshot your Opening hours and Services pages (delivery zones, minimum order, prep time) and set them up in hours and slots and delivery.
- Replace your GloriaFood link on Google: it stops working when GloriaFood closes. See Go live.
Lost access to GloriaFood? Use your ordering page link or screenshots with the Photo, PDF, website or text route. Try with a sample menu shows the whole flow with a made-up menu, and Paste the menu JSON instead accepts a menu file if you have one.
Flipdish, Foodhub and marketplaces
Section titled “Flipdish, Foodhub and marketplaces”- Flipdish or Foodhub: paste your public ordering page link, or upload screenshots. Check your domain is yours: if Foodhub registered it for you, they may control it. See Connect your own domain.
- Deliveroo, Just Eat or Uber Eats: screenshot your own listing top to bottom and upload the screenshots. Use photos only if you own them.
Spreadsheet (CSV or Excel)
Section titled “Spreadsheet (CSV or Excel)”Good for till exports, Flipdish and Foodhub exports, or if you’d rather type the menu in Excel.
- Optional: download the Excel template, CSV or Modifiers CSV. One row per item or size; option groups go on a second “modifiers” sheet.
- Under Upload your file, choose a CSV or Excel (.xlsx) file. Excel’s Windows encoding and semicolon-separated files are handled.
- Match your columns: we match what we can. Category, item name and price are required. Everything else is optional: size, description, collection, delivery and dine-in prices, option groups, allergens (contains and may contain), dietary, calories, VAT category, item number, kitchen name, photo URL.
- Check the preview of the first 20 rows and fix any rows with errors.
- Continue to the review screen, then Add to my menu.
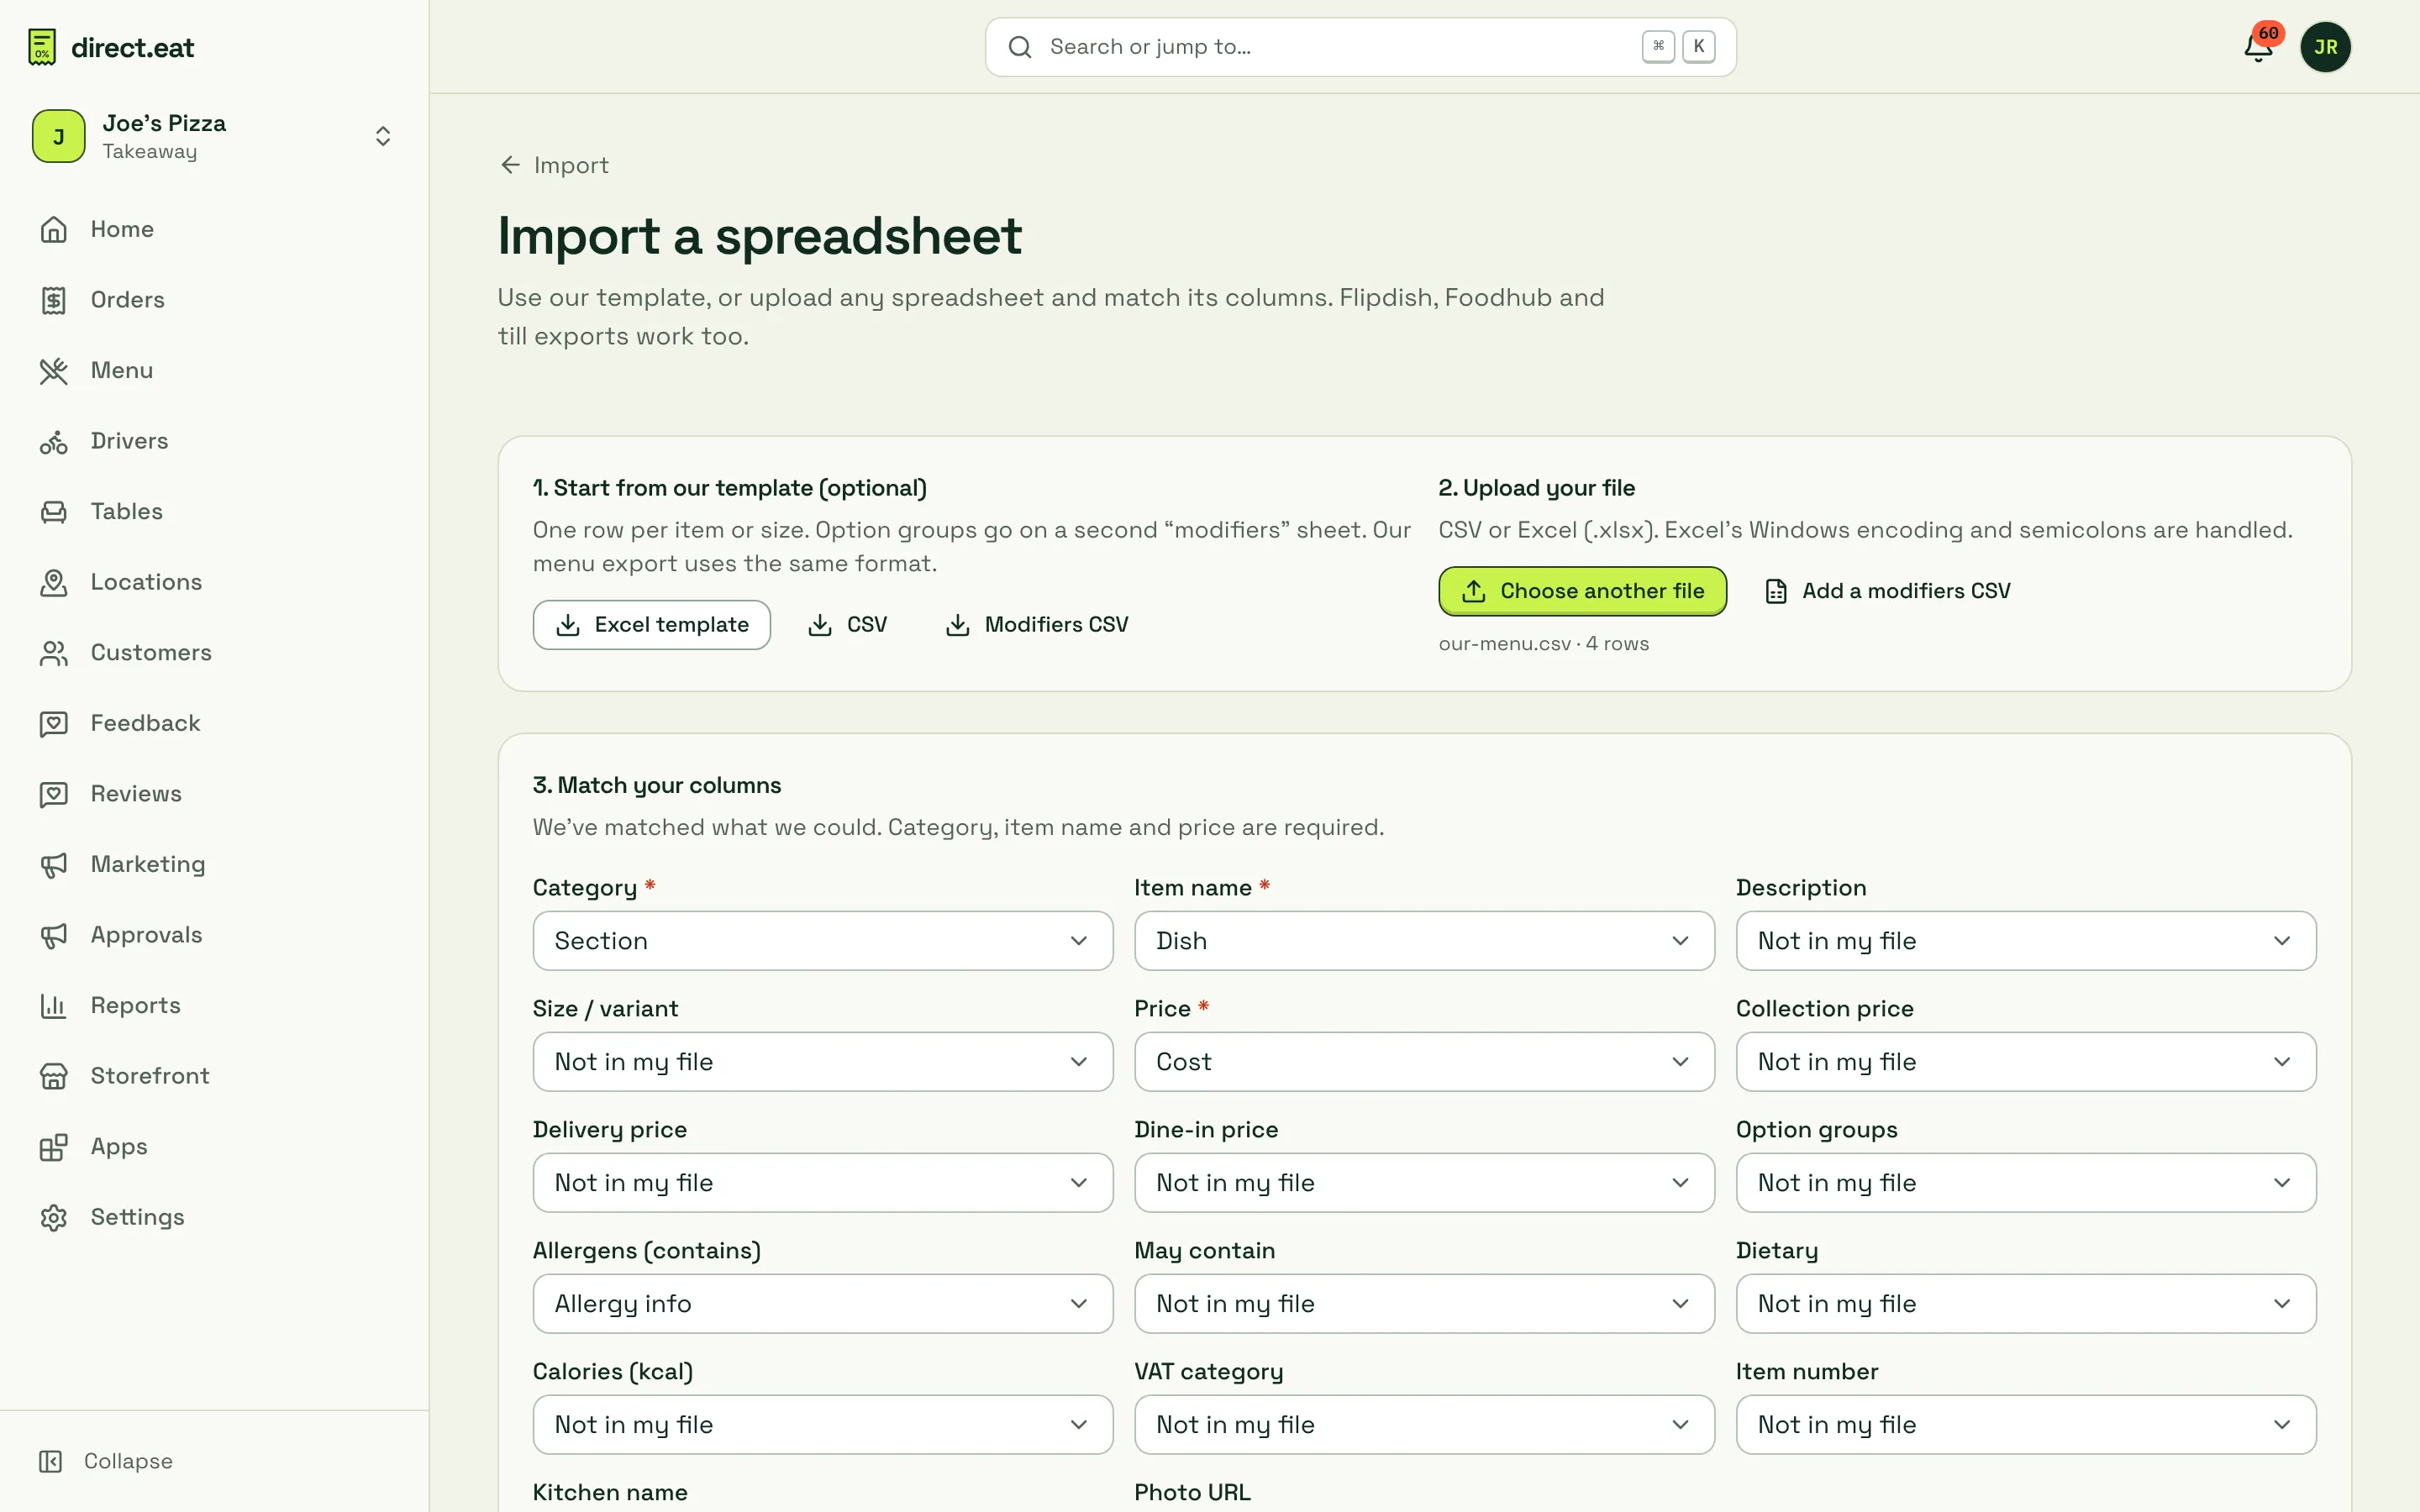
Allergens in a spreadsheet can be words like “gluten, milk” or “wheat; dairy”: we map them to the 14 allergens. They still need confirming.
Customer list
Section titled “Customer list”Bring your regulars with you, from GloriaFood, Square, your till or a mailing list. Everyone on the list can keep ordering. Only people who agreed get offers.
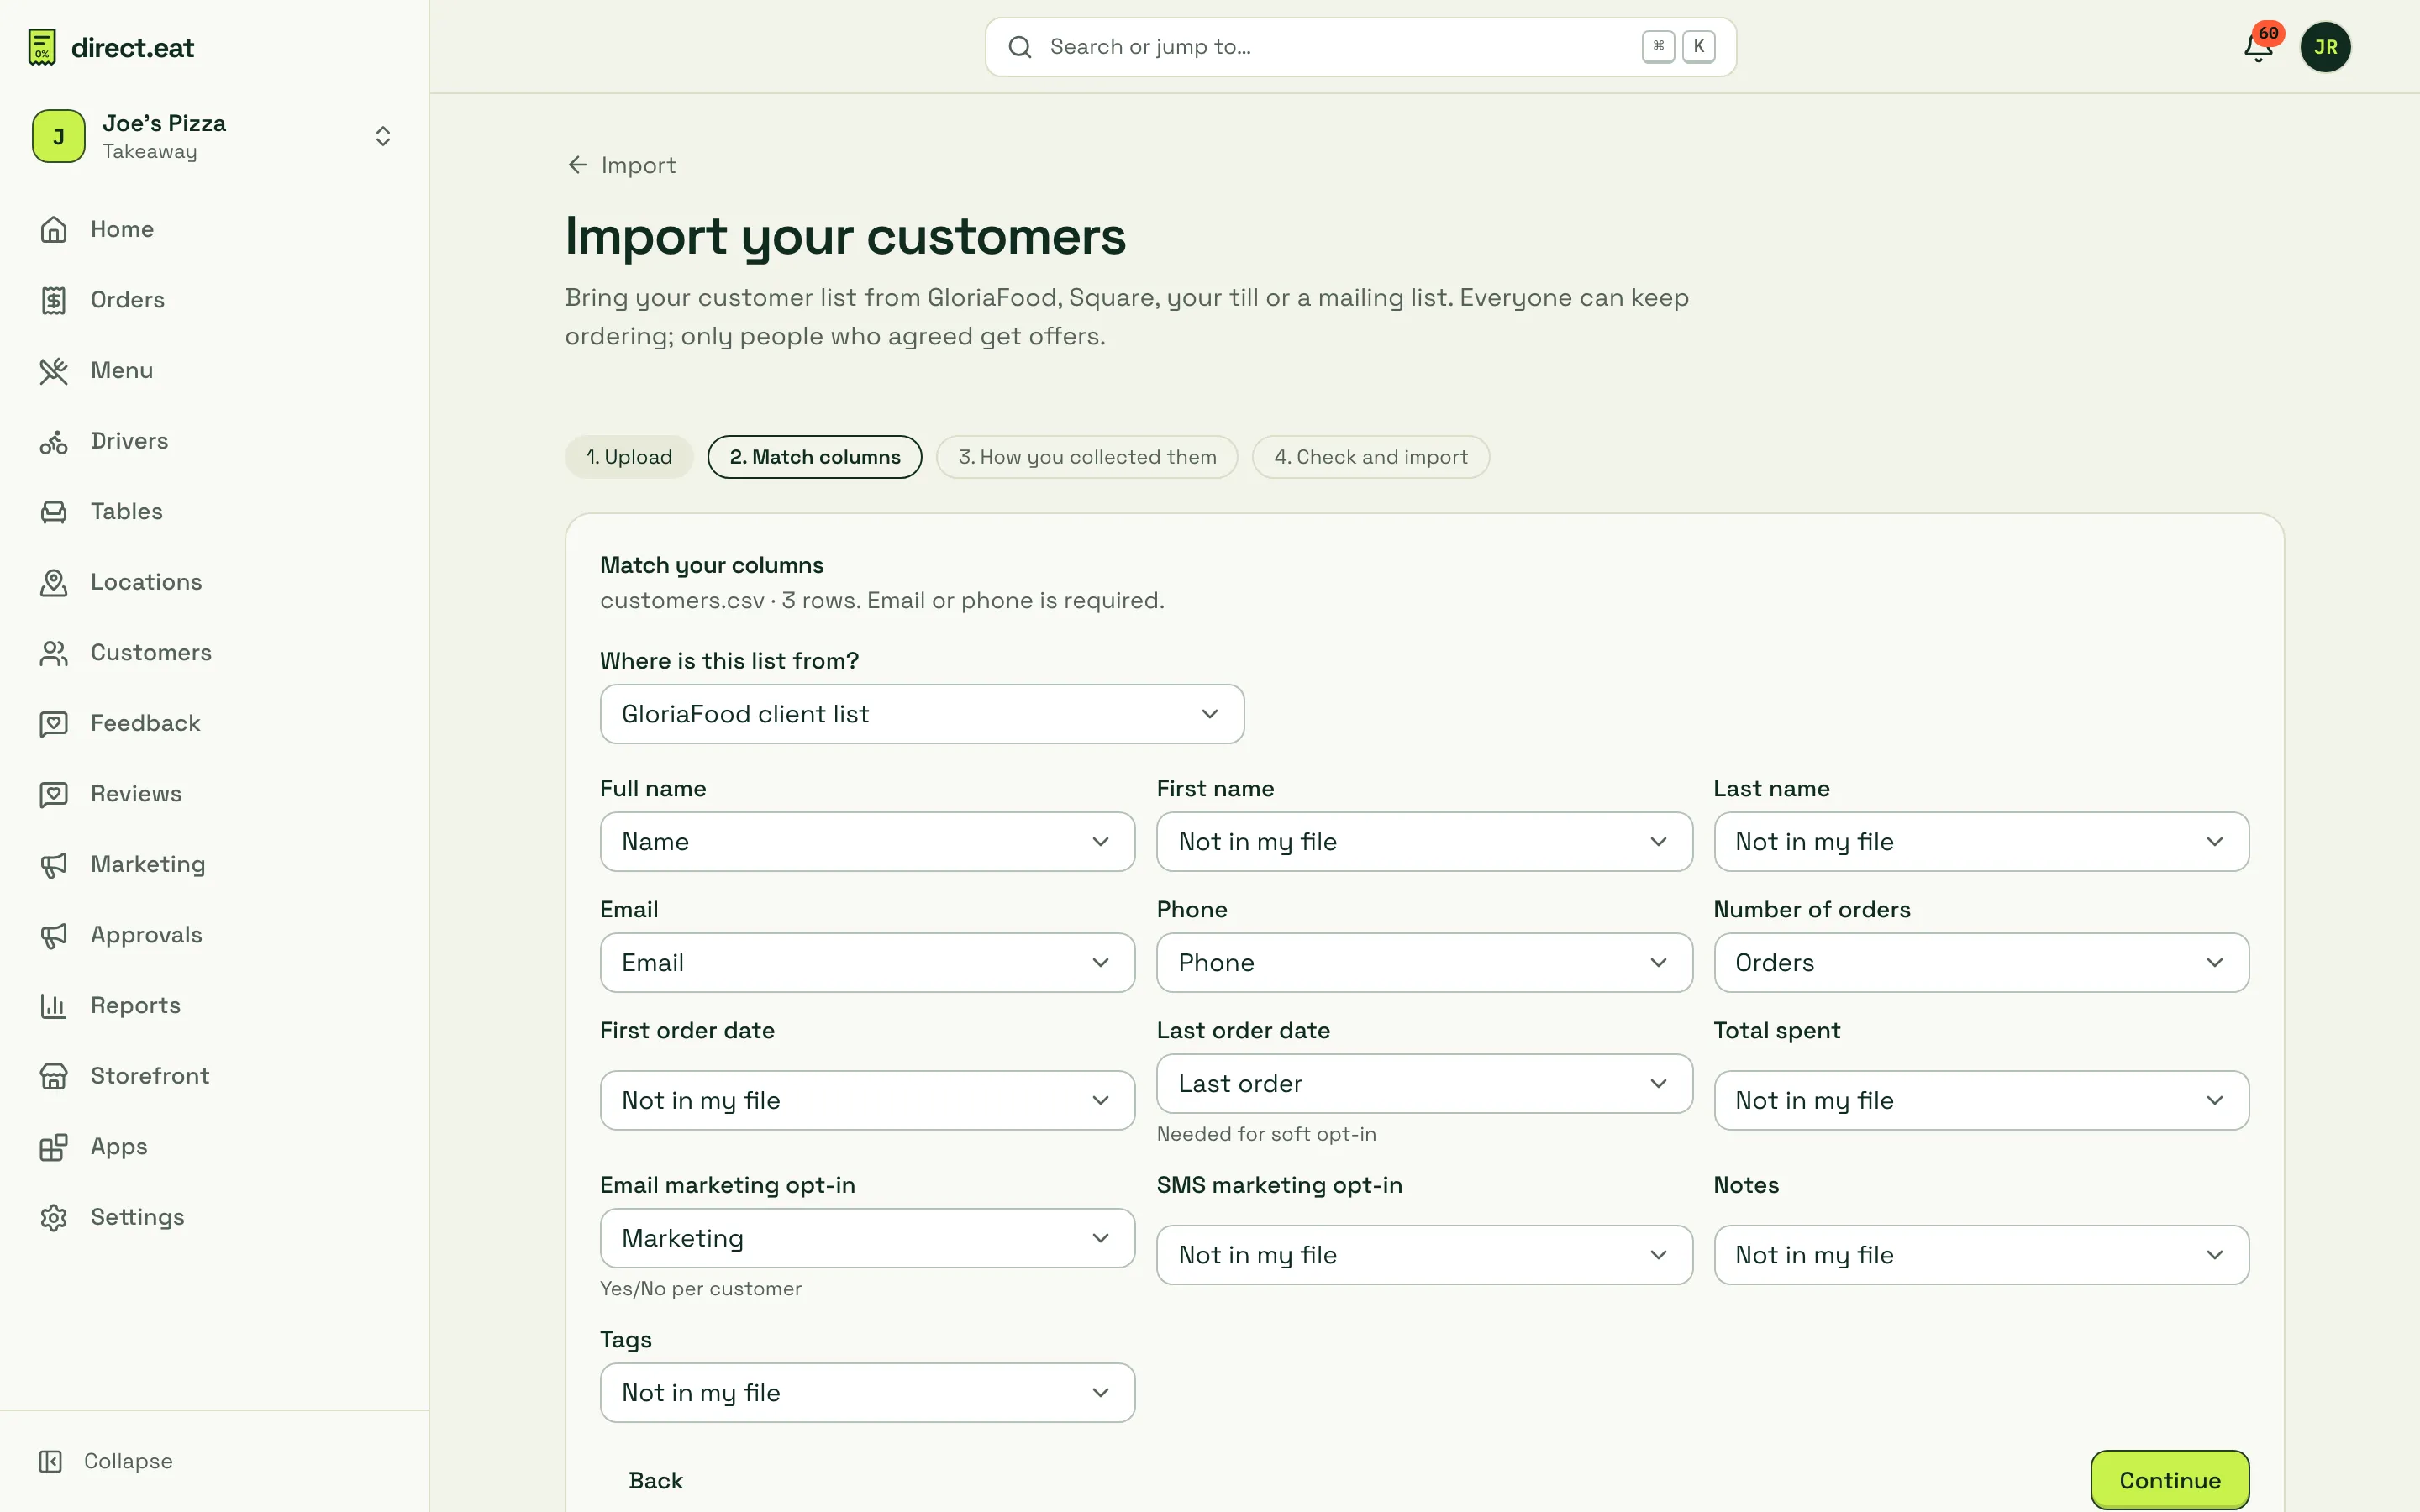
- Upload: a CSV or Excel file. It’s read in your browser first; nothing is saved until you confirm.
- Match columns: say where the list is from, then match name, email, phone, number of orders, first and last order date, total spent, email and SMS marketing opt-in, notes and tags. Email or phone is required for each customer.
- How you collected them: choose the statement that’s true (below).
- Check and import: see the counts (how many will import, how many can get offers, any rows skipped) and import. Large lists import in batches of 1,000.
Who you can send offers to
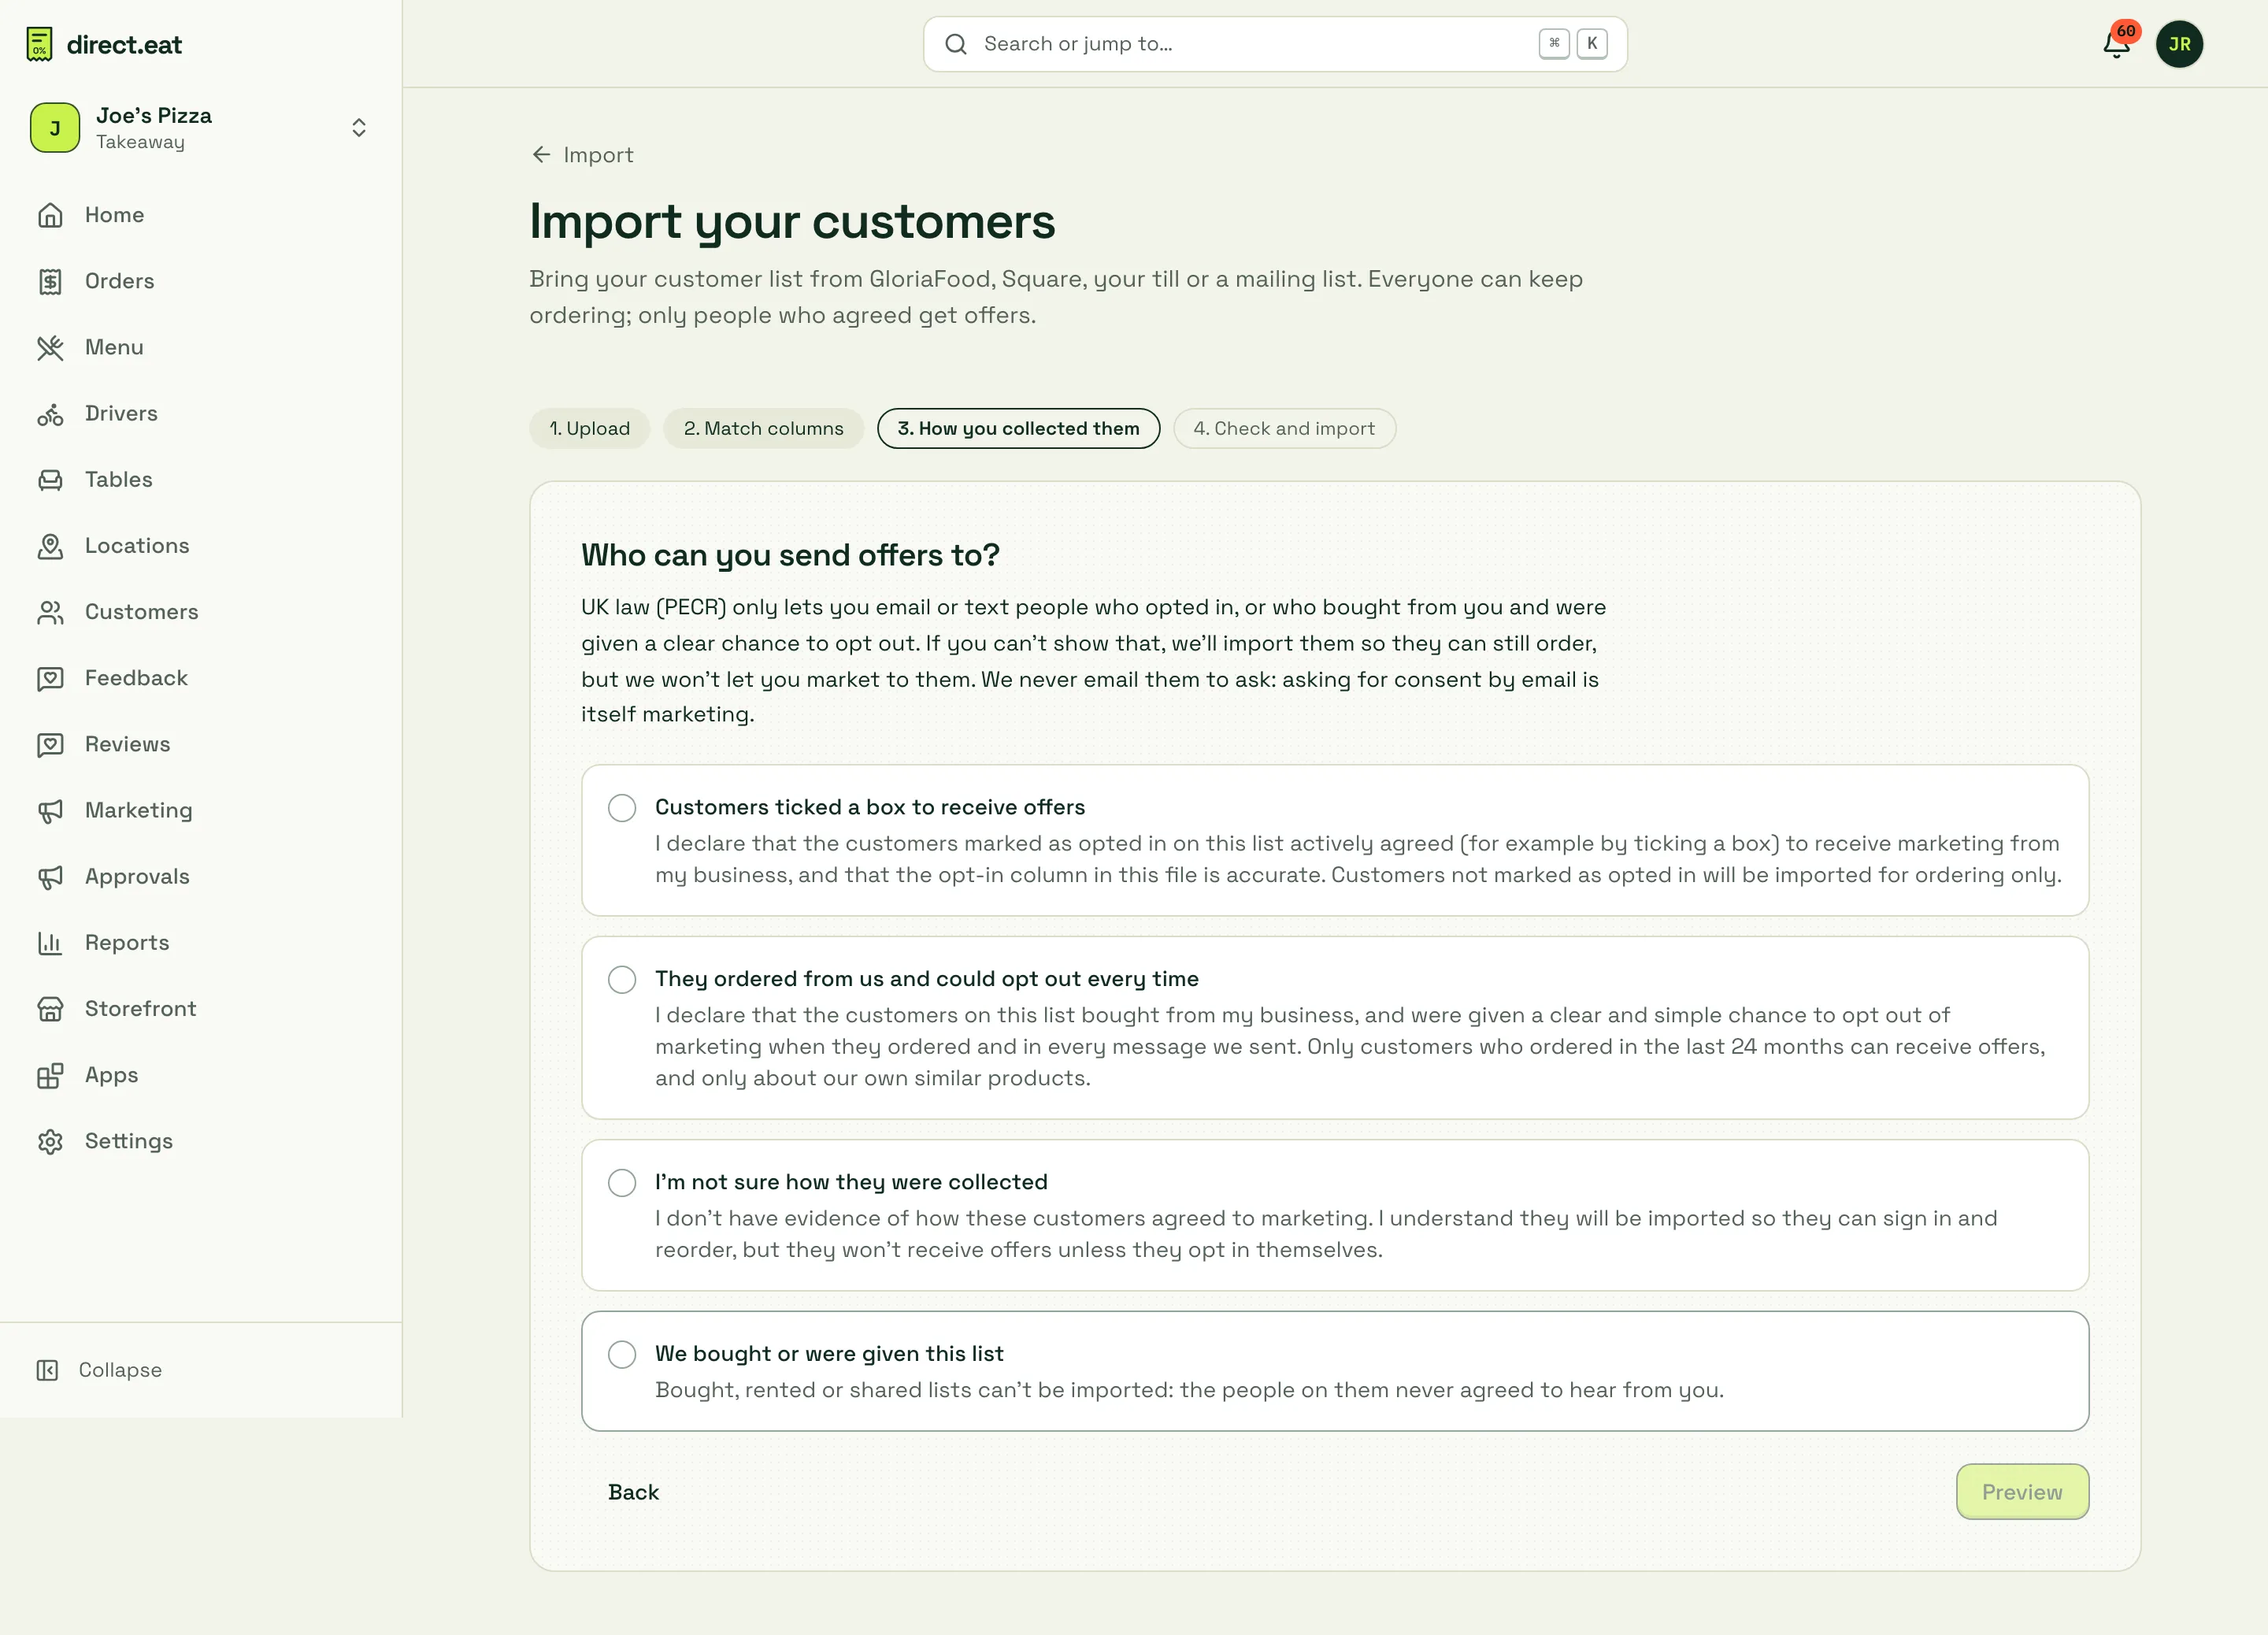
Section titled “Who you can send offers to”UK law (PECR) only lets you email or text people who opted in, or who bought from you and were given a clear chance to opt out. The import asks how the list was collected:
| Choice | What happens |
|---|---|
| Customers ticked a box to receive offers | People marked as opted in on your list can get offers. Everyone else imports for ordering only. |
| They ordered from us and could opt out every time | Customers who ordered in the last 24 months can get offers about your own similar products. |
| I’m not sure how they were collected | Everyone imports so they can sign in and reorder, but nobody gets offers unless they opt in themselves. |
| We bought or were given this list | Can’t be imported: the people on it never agreed to hear from you. |
Your choice is recorded as a declaration, with who made it and when. We never email imported customers to ask for consent: asking by email is itself marketing. See Campaigns and consent.
Track your switch
Section titled “Track your switch”Track a switch (on the Import page) gives you a checklist for moving from your old platform: menu, hours, settings, customers, promotions, links, first order, and switching the old platform off. It includes a kit for updating your links and a checker for up to 10 of your old pages, so you can find links that still point to your old ordering site.
Related
Section titled “Related”Was this page helpful?