

Set up delivery zones and drivers
Only do this step if you deliver with your own drivers. Collection-only shops can skip straight to step 9. You can switch delivery on later at any time.
direct.eat delivery is built for your own drivers: you decide where you deliver, what it costs and who takes it. There’s no commission on delivery orders and no live GPS tracking of drivers. Diners see a fee and an arrival range as soon as they type a postcode.
Time: about 10 minutes for zones, plus 1 minute per driver.
Before you start
Section titled “Before you start”- You need to be the owner, an admin or a manager to change zones (Settings → Delivery). Staff can assign drivers but can’t change zones.
- Delivery is included on every plan, with unlimited zones (up to 20) and unlimited drivers.
- Have your prices ready: a fee per zone, a minimum order, and whether you want a free-delivery threshold.
1. Add your zones
Section titled “1. Add your zones”Go to Settings → Delivery.
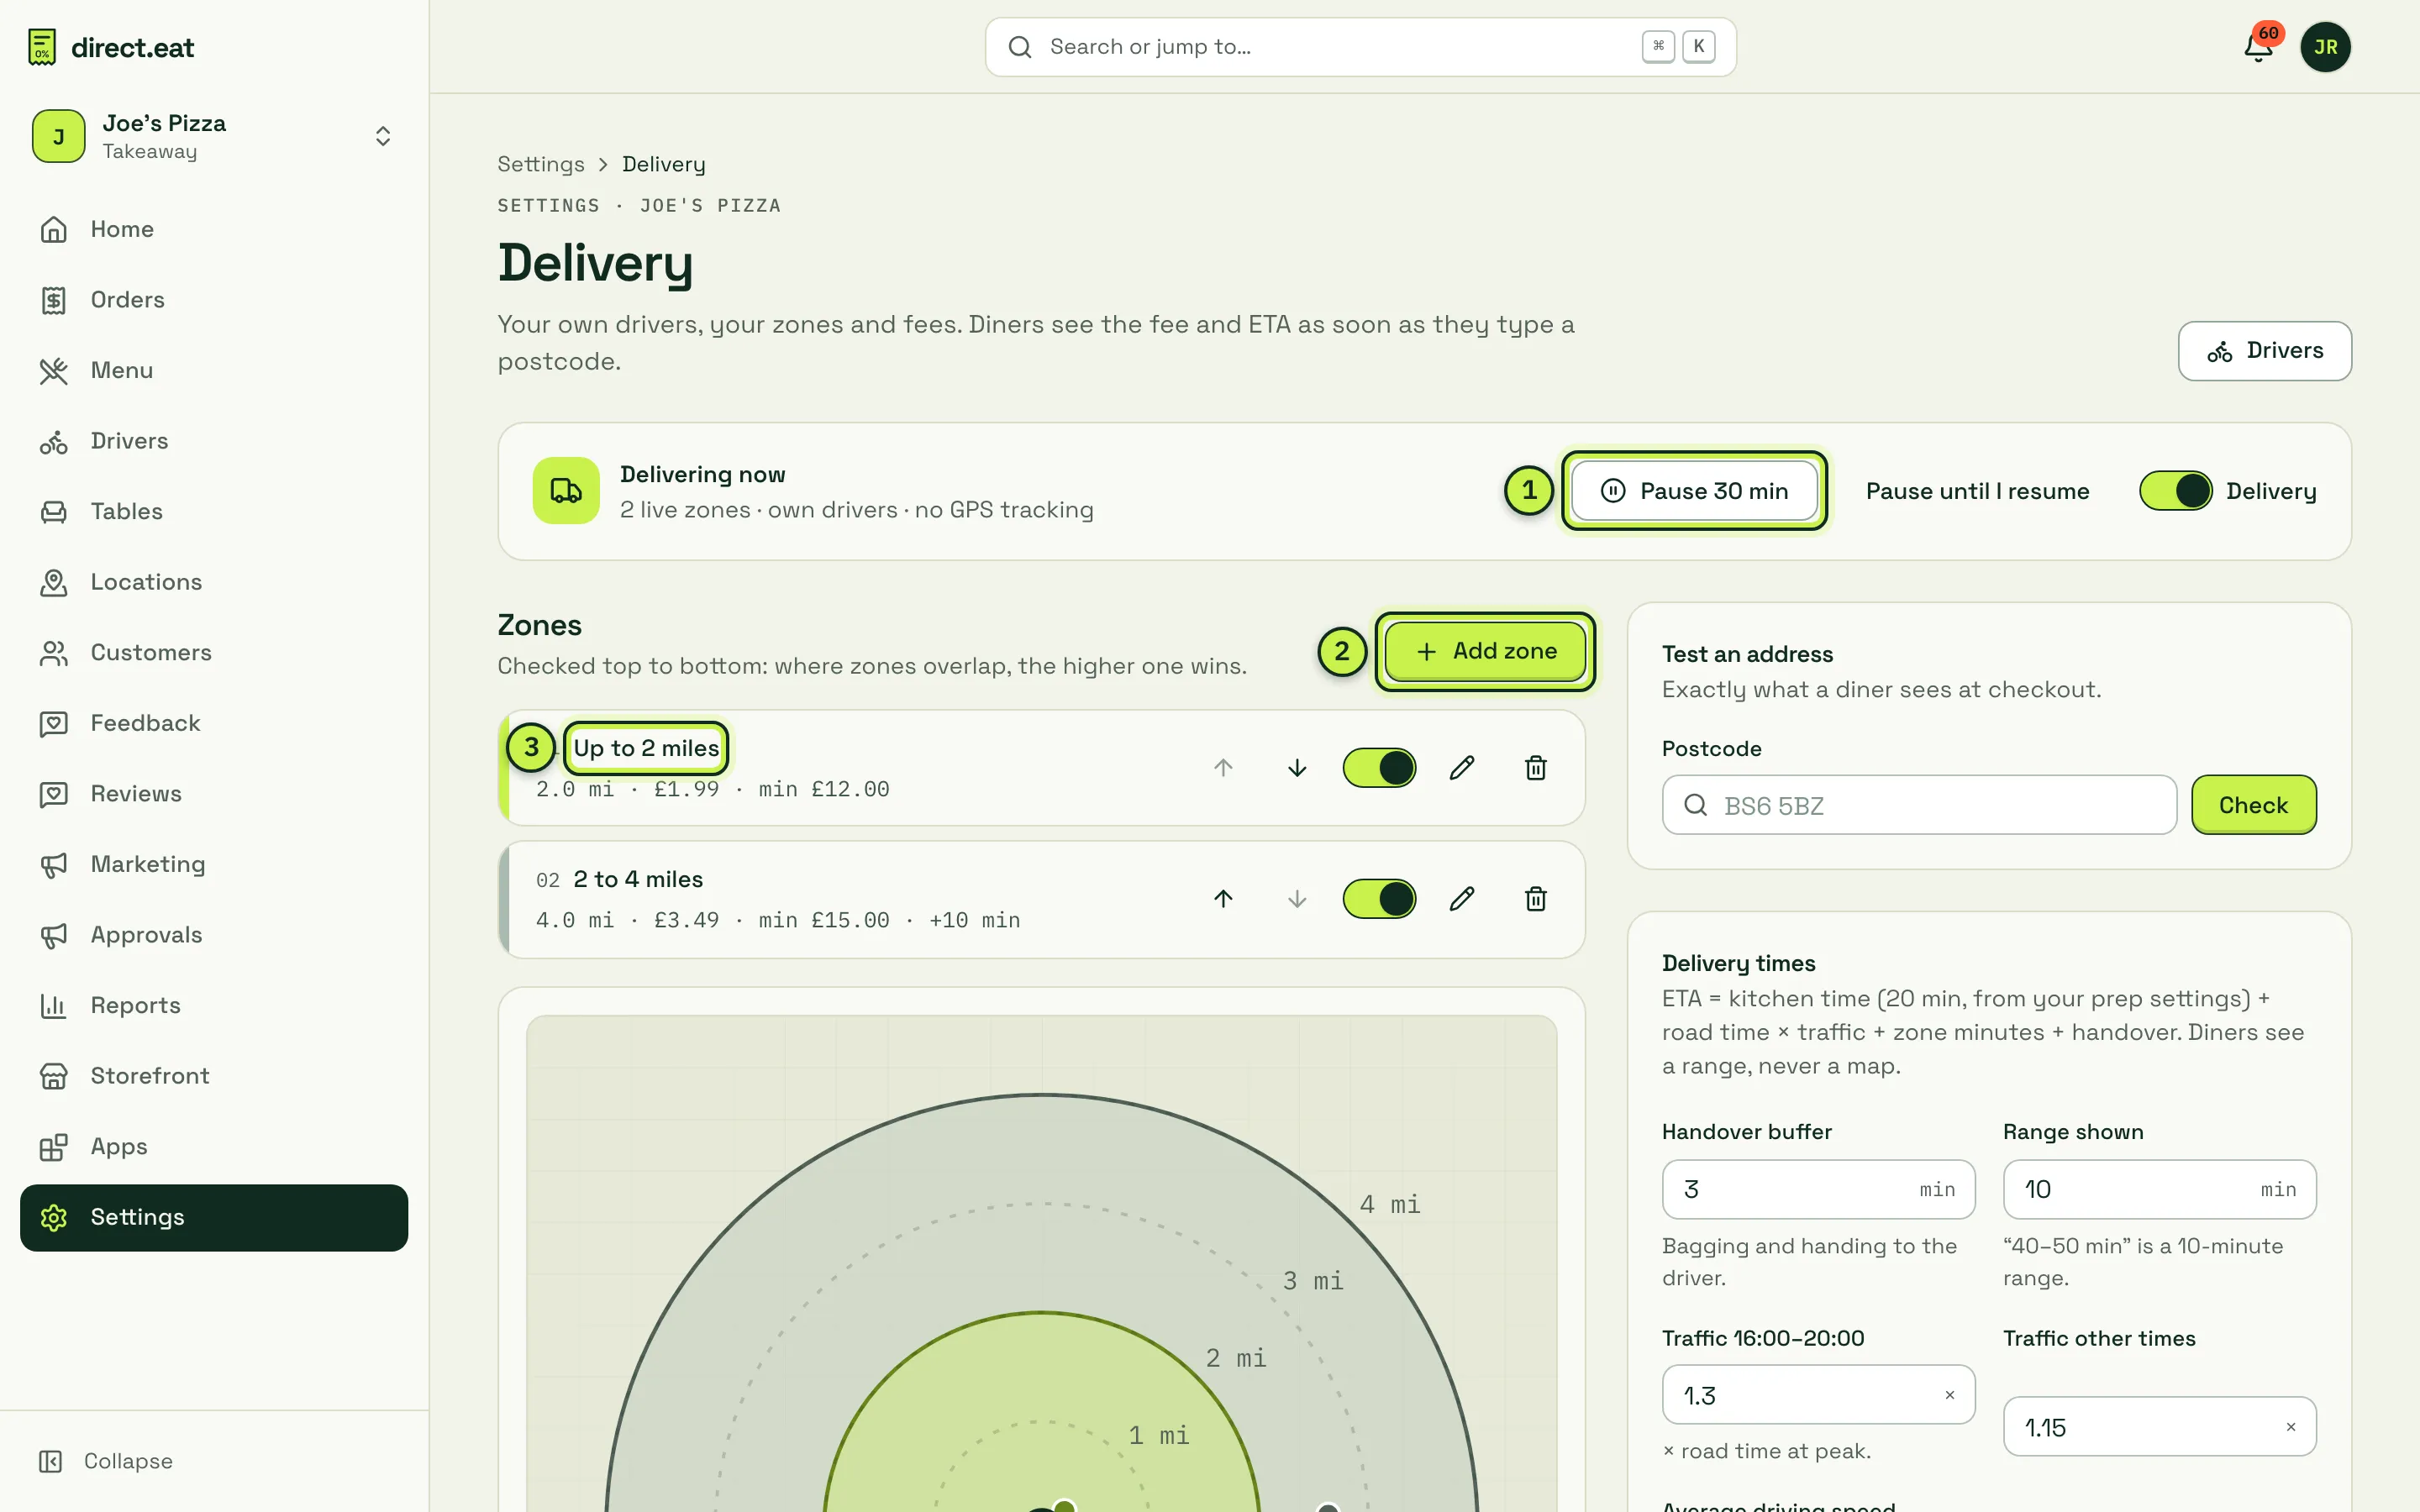
- Pause buttons: Pause 30 min or Pause until I resume stop delivery orders without touching collection. Handy when a driver doesn’t turn up.
- Add zone: create a new zone.
- Zone cards: each zone shows its distance, fee, minimum and any extra minutes, for example “2.0 mi · £1.99 · min £12.00”.
Zones are checked top to bottom. Where two zones overlap, the one higher in the list wins, so put your closest, cheapest zone first. Use the up and down arrows on a card to reorder.
-
Click Add zone.
-
Give the zone a Name (diners never see it), then pick a Zone type:
- Distance from shop: a circle around your shop, in miles. Choose As the crow flies (simple and predictable) or By road (estimated driving distance).
- Postcodes: paste a list of postcode districts or sectors (for example
BS6, BS7, BS3 4). Anything that isn’t a valid postcode shows as a red chip so you can fix it.
Draw on map is greyed out: it’s coming with the map editor.
-
Set the price:
- Fixed: one fee for the whole zone, for example £1.99.
- Distance: a base fee plus a charge per mile, with a cap.
-
Set the minimum order for this zone. The minimum is checked on the food total after discounts, and the diner sees exactly how much more to add (“Add £3.20 more for delivery to BS6”).
-
Optional: switch on free delivery over a basket value, add extra minutes for zones further out, and set delivery hours if a zone has different times.
-
Check the summary line at the bottom, then save.
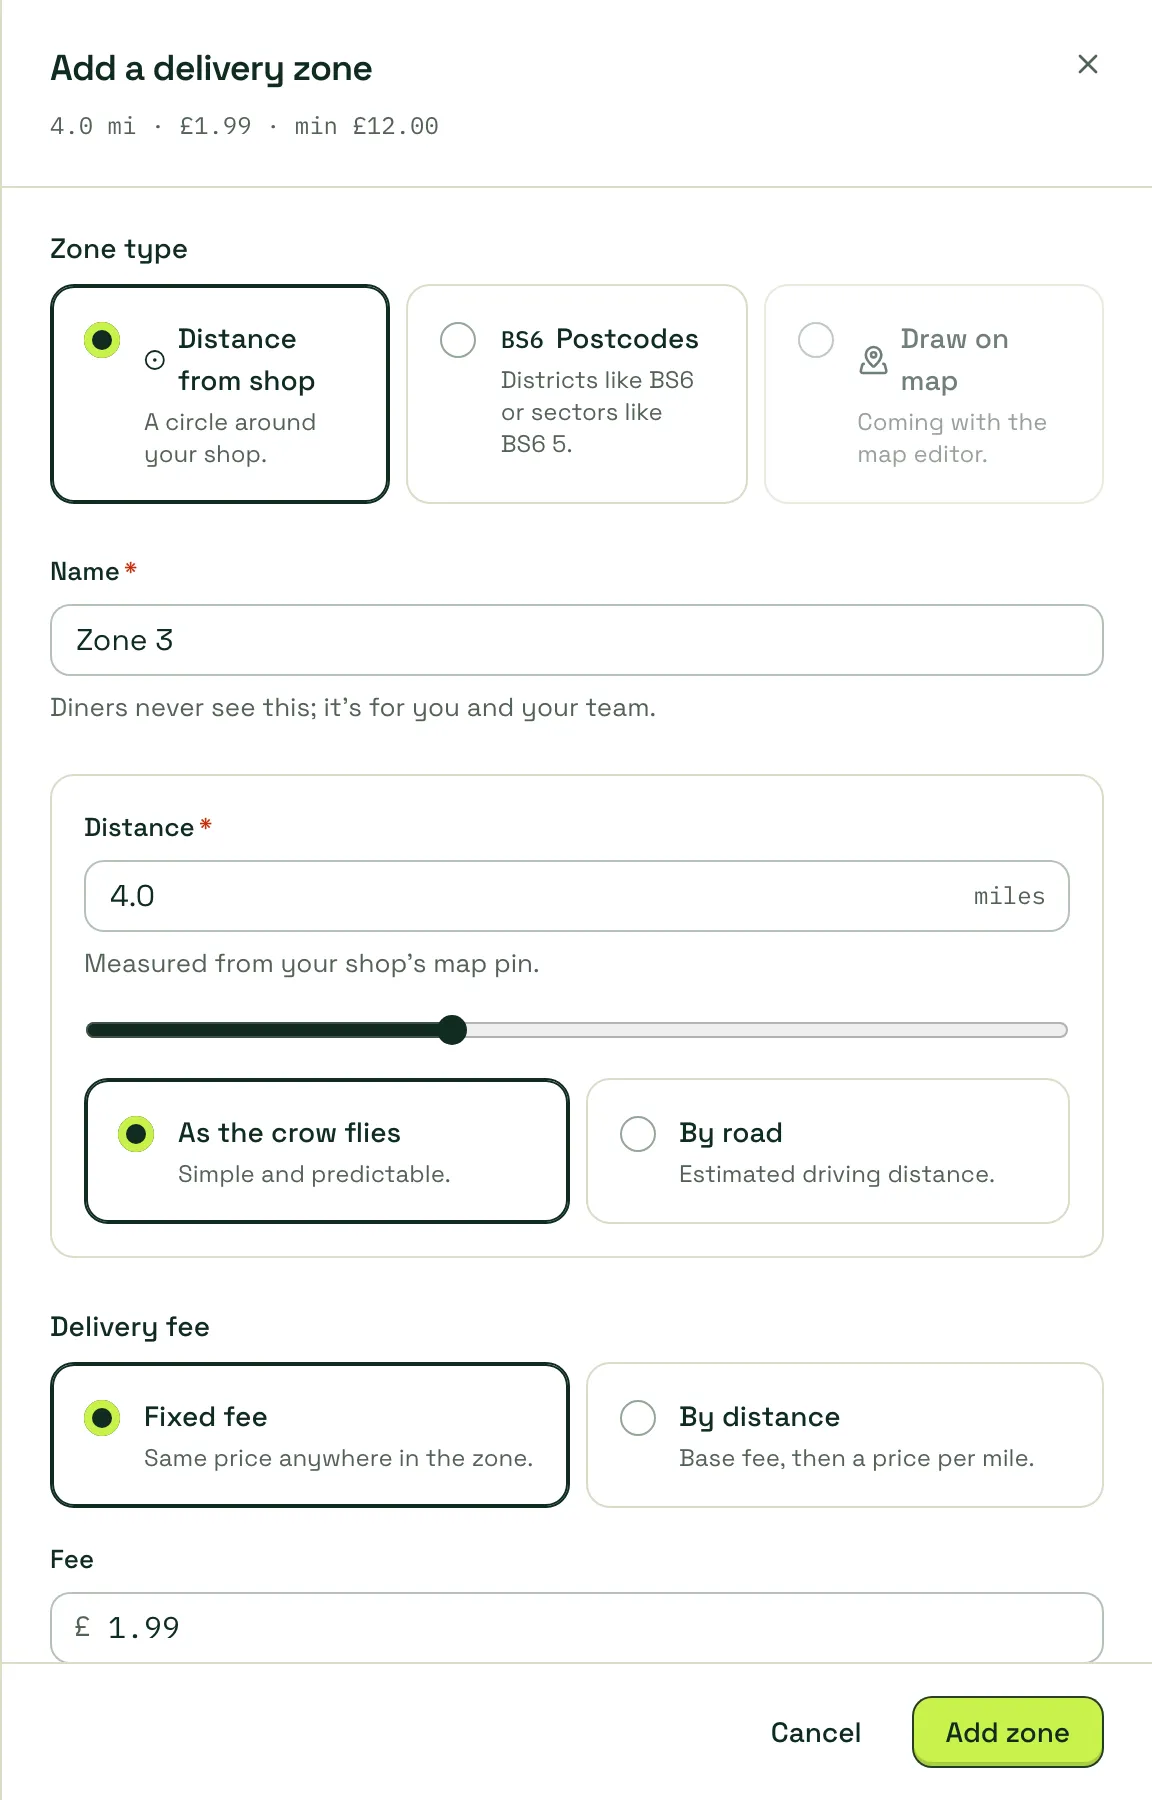
A simple starting point is two zones: up to 2 miles at £1.99 with a £12 minimum, then 2 to 4 miles at £3.49 with a £15 minimum and 10 extra minutes. Start there and adjust after your first week.
2. Test an address
Section titled “2. Test an address”Under the zones, Test an address runs exactly the same check as checkout. Type a postcode and click Check to see which zone wins, the fee, the minimum, any free-delivery threshold, the arrival range and the distance. Use Exact address (optional) to test one particular house.
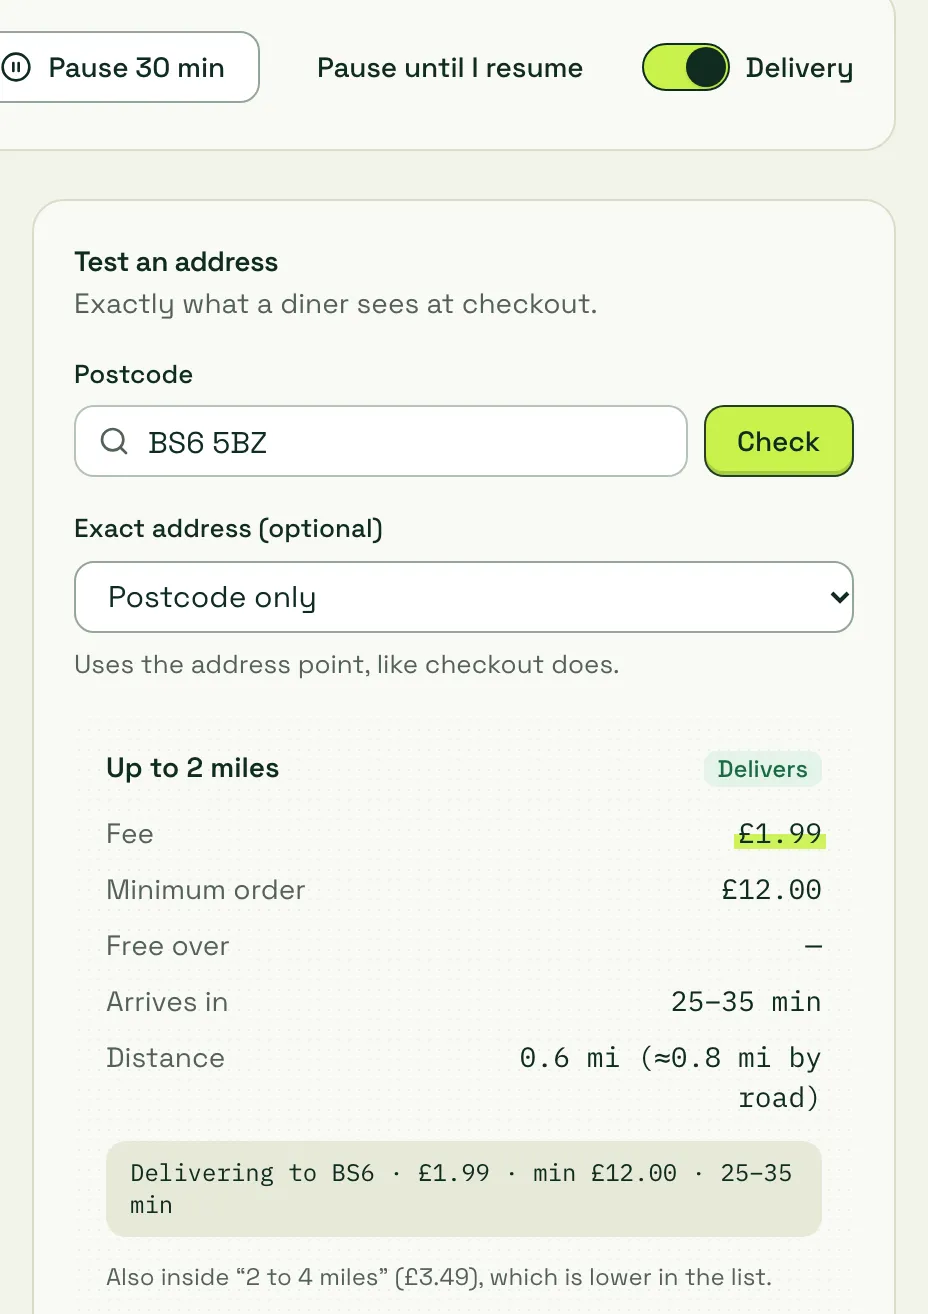
Test three or four real addresses: one round the corner, one at the edge of your area and one just outside it. If a postcode lands in the wrong zone, reorder your zones.
3. Check your delivery times
Section titled “3. Check your delivery times”Lower down the same page, Delivery times sets how the diner’s arrival range is worked out: your kitchen time, plus driving time (with a traffic factor for 16:00 to 20:00), plus any zone minutes, plus a Handover buffer for bagging. Diners see a range such as “35–45 min”, never a map.
Two switches here are worth a look:
- Show the driver’s first name: the tracking page says “Sam is on the way”.
- Allow safe-place drop-offs: only if the diner opts in, and never for alcohol or allergy orders.
Click Save delivery times when you’re done.
4. Add your drivers
Section titled “4. Add your drivers”Go to Drivers in the sidebar (shortcut g then d).
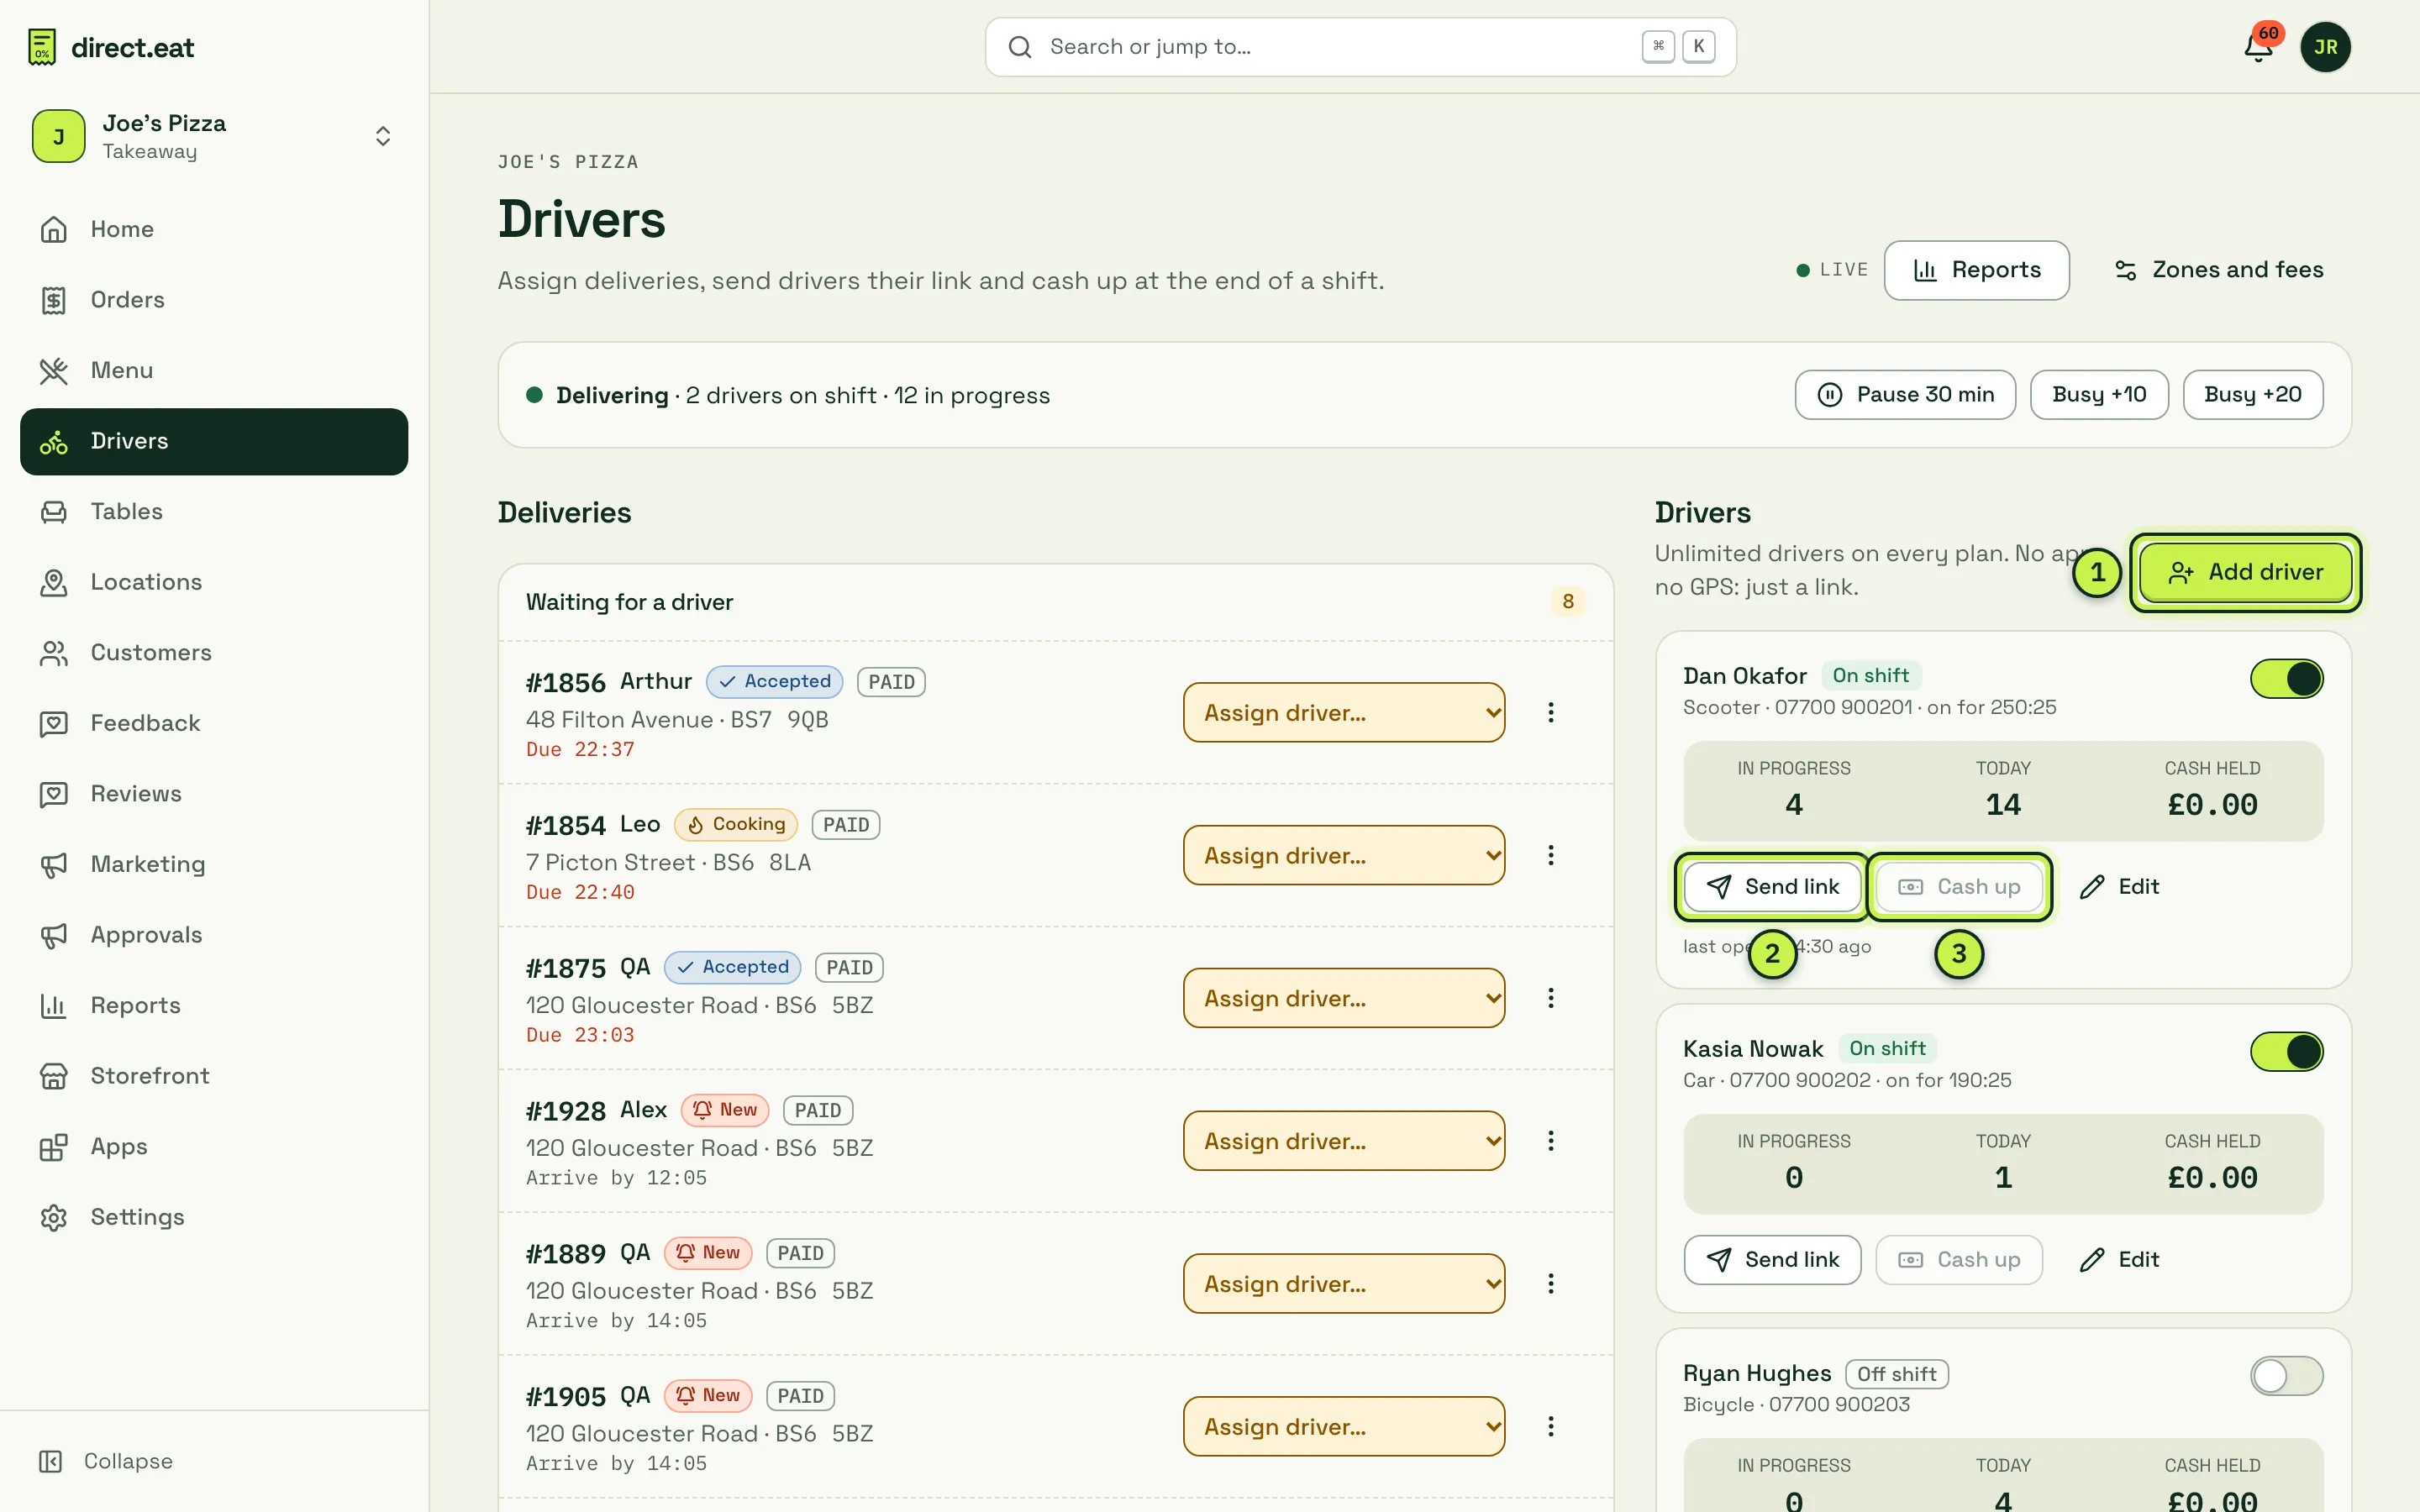
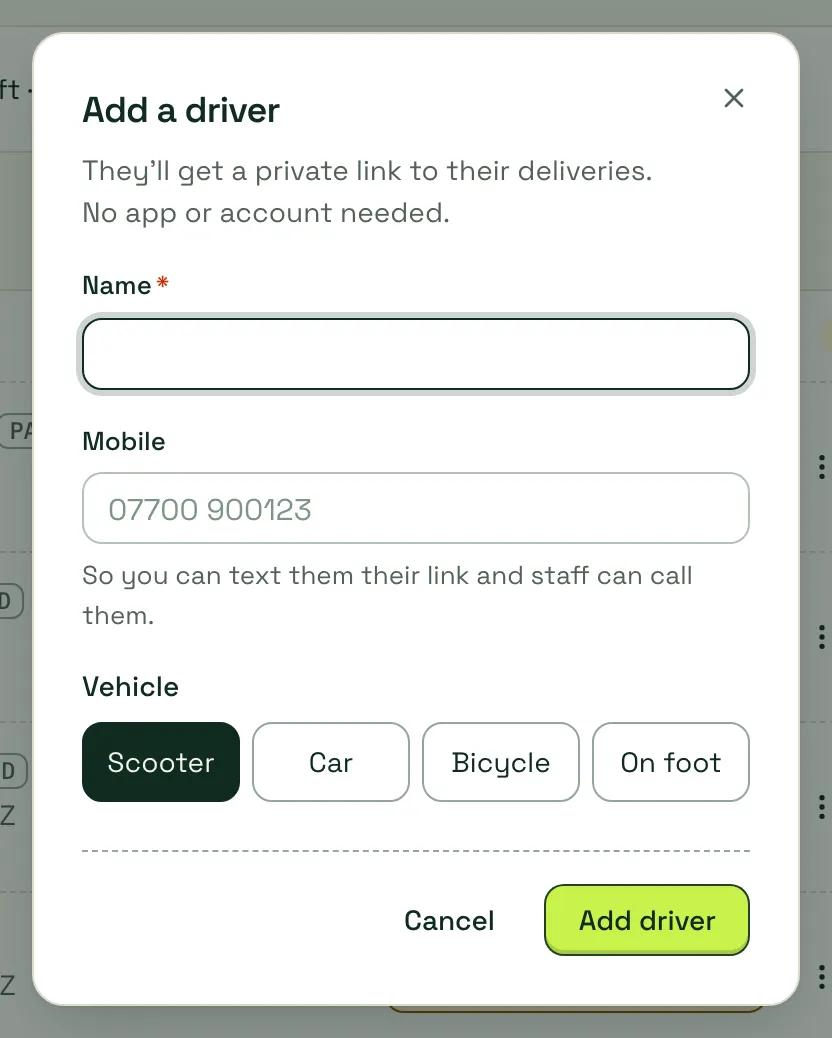
- Add driver: name, UK mobile number and vehicle.
- Send link: gives the driver their personal link to copy, text or send on WhatsApp.
- Cash up: at the end of a shift, compare the cash the driver should hand in with what they actually hand in.
-
Click Add driver, then fill in the name, mobile and vehicle (scooter, car or bicycle).
-
Save. The driver’s link appears straight away. Send it to them by Copy, Text or WhatsApp.
-
Ask the driver to open the link on their phone and add it to their home screen. There’s no app to install and no password.
What your driver sees
Section titled “What your driver sees”The driver’s link opens a simple view of their run: the next drop as a big card with the address and postcode, a Navigate button (Google Maps, Apple Maps or Waze), a button to call the customer, any allergy or ID-check warnings, and the cash to collect in bold (or PAID).
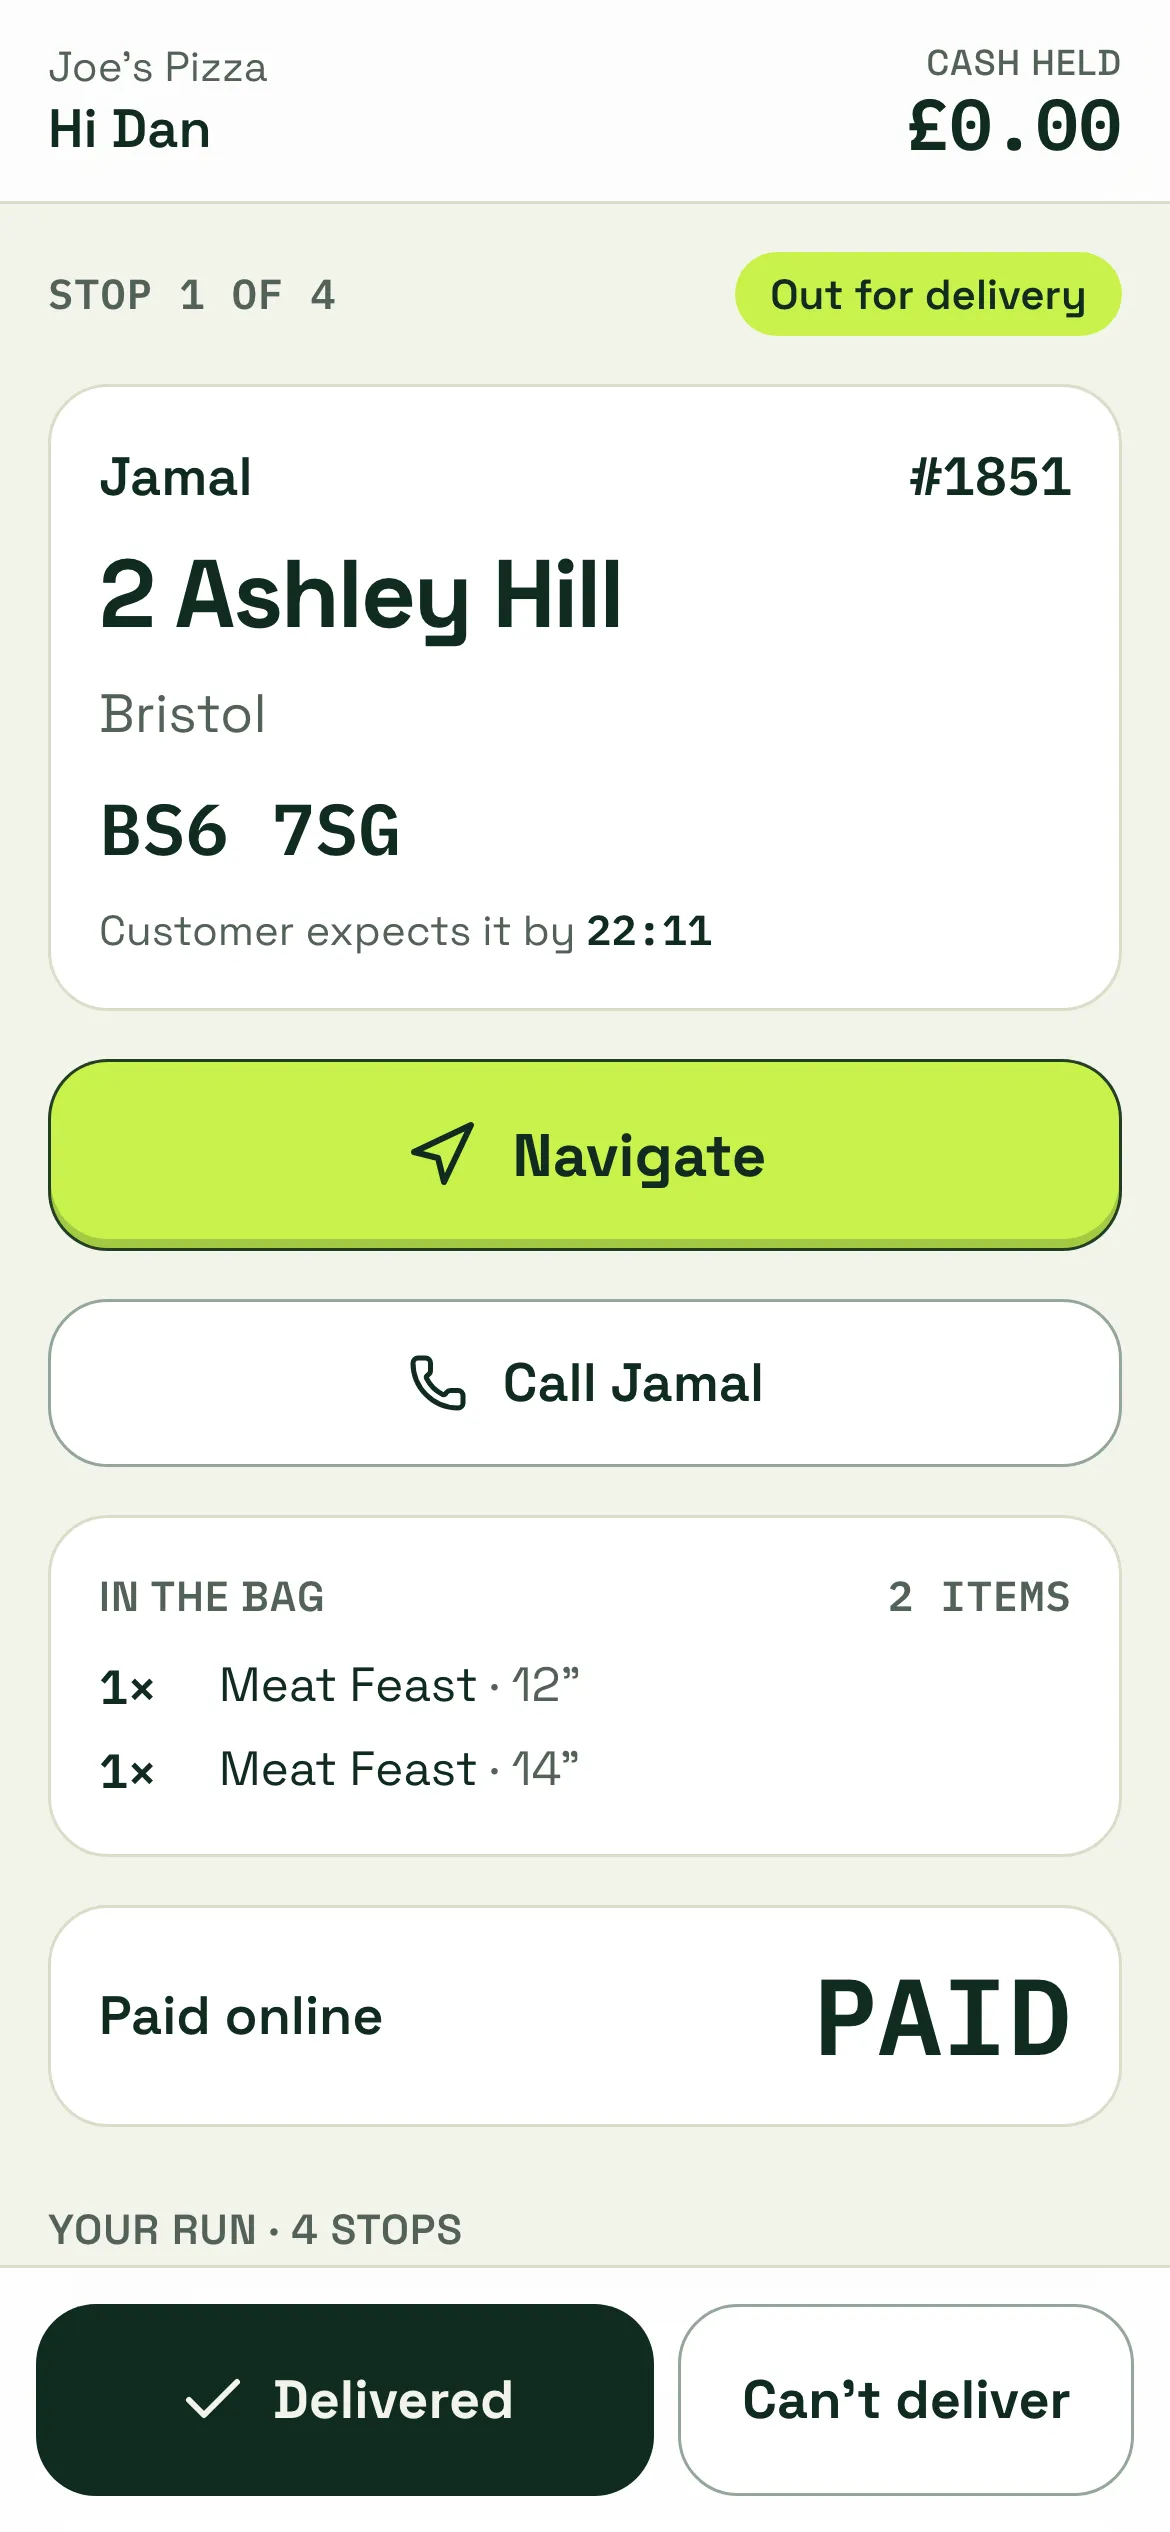
The driver taps “I’ve got it · Out for delivery” when they leave, and Delivered at the door. Those taps update the diner’s tracking page and send their notification. If signal drops, the taps are saved on the phone and sent when it comes back. The driver view never tracks location.
- Keep it small at first. Two zones and a sensible minimum are easier to run on your first Friday than five zones.
- Turn on shifts. Only drivers marked On shift are offered new deliveries when you assign them.
- Cash orders: the driver’s screen shows the change due, and the Cash up button records any difference with a note.
Next step
Section titled “Next step”9. Kitchen tablet and printer: make sure every order rings in the kitchen.
Related
Section titled “Related”Was this page helpful?