

Print routing, ticket templates and the print queue
Once a printer is paired, three tabs under Settings → Devices and printers control what it prints:
- Print routes: which ticket goes to which printer, for which orders and when.
- Ticket templates: what’s on each ticket, set with switches and a live preview.
- Print queue: every ticket sent in the last 30 days and anything that didn’t print.
Before you start
Section titled “Before you start”- Changing routes and templates needs the Configure printers, test print permission: owners, admins and managers. Staff can test print and reprint today. Kitchen tablets can reprint any ticket.
- Your first printer gets a route automatically: kitchen ticket, on accept, all orders. Many shops never need more.
Print routes
Section titled “Print routes”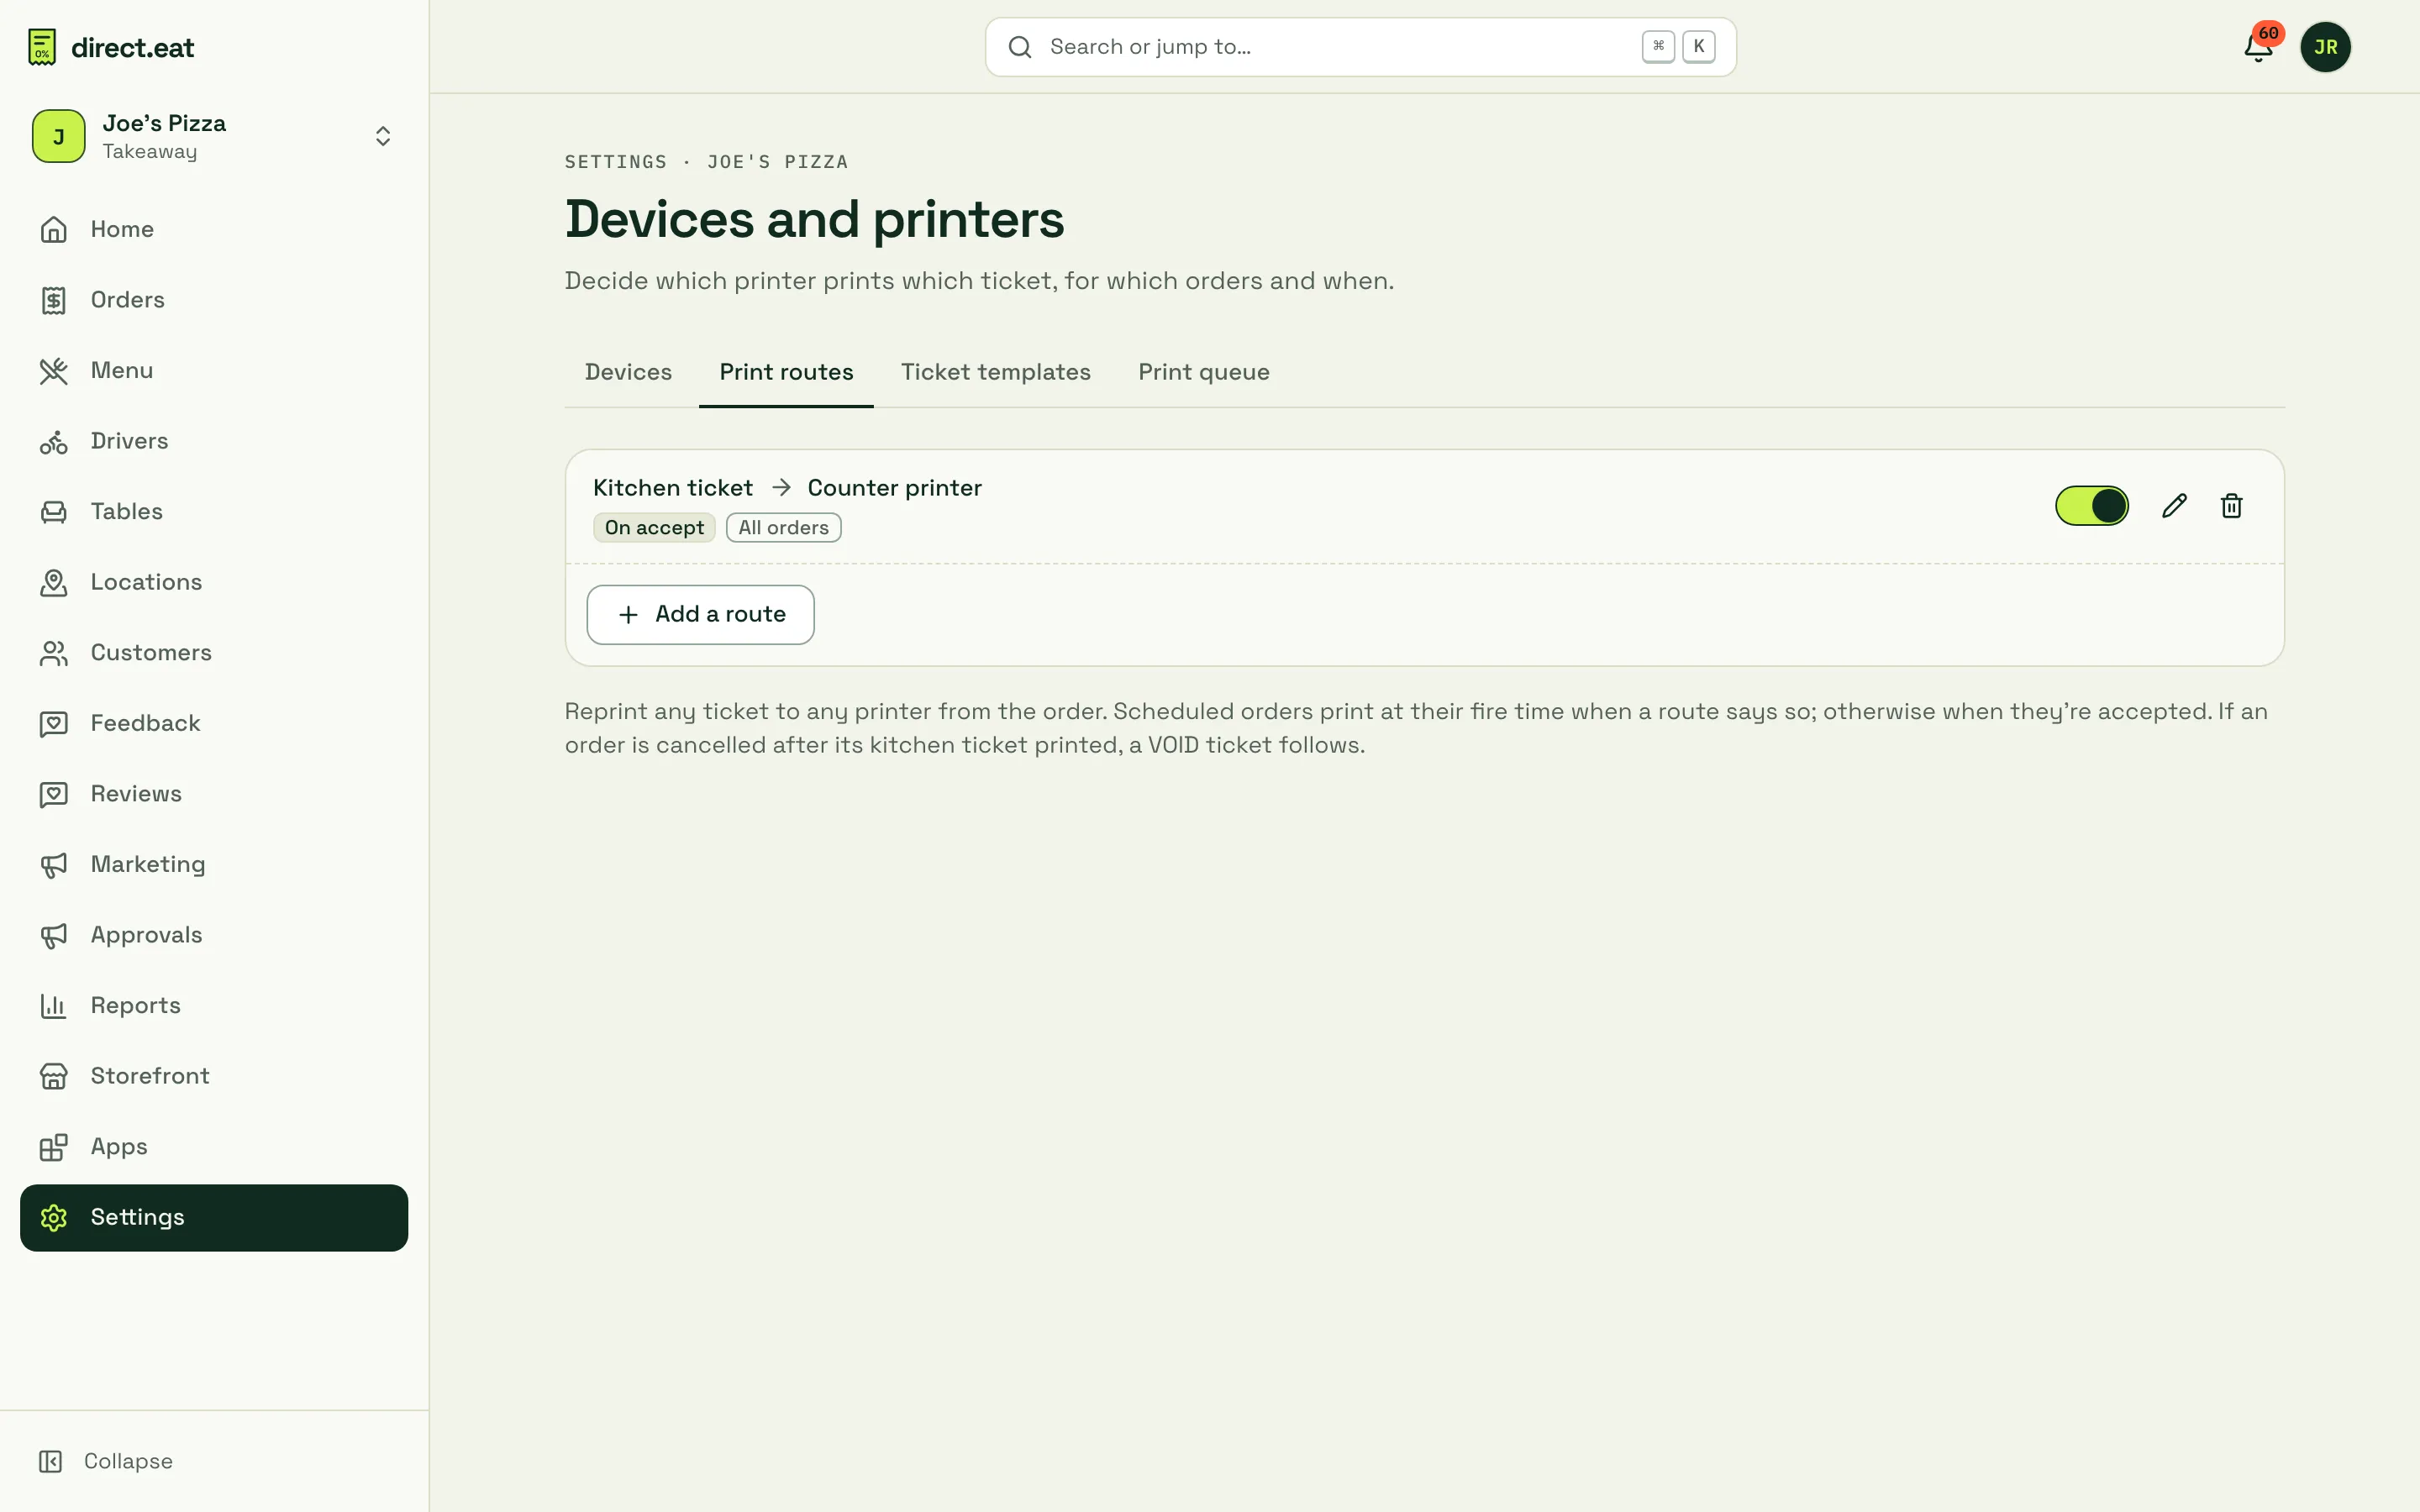
A route says: print this ticket on this printer, when this happens, for these orders and stations.
-
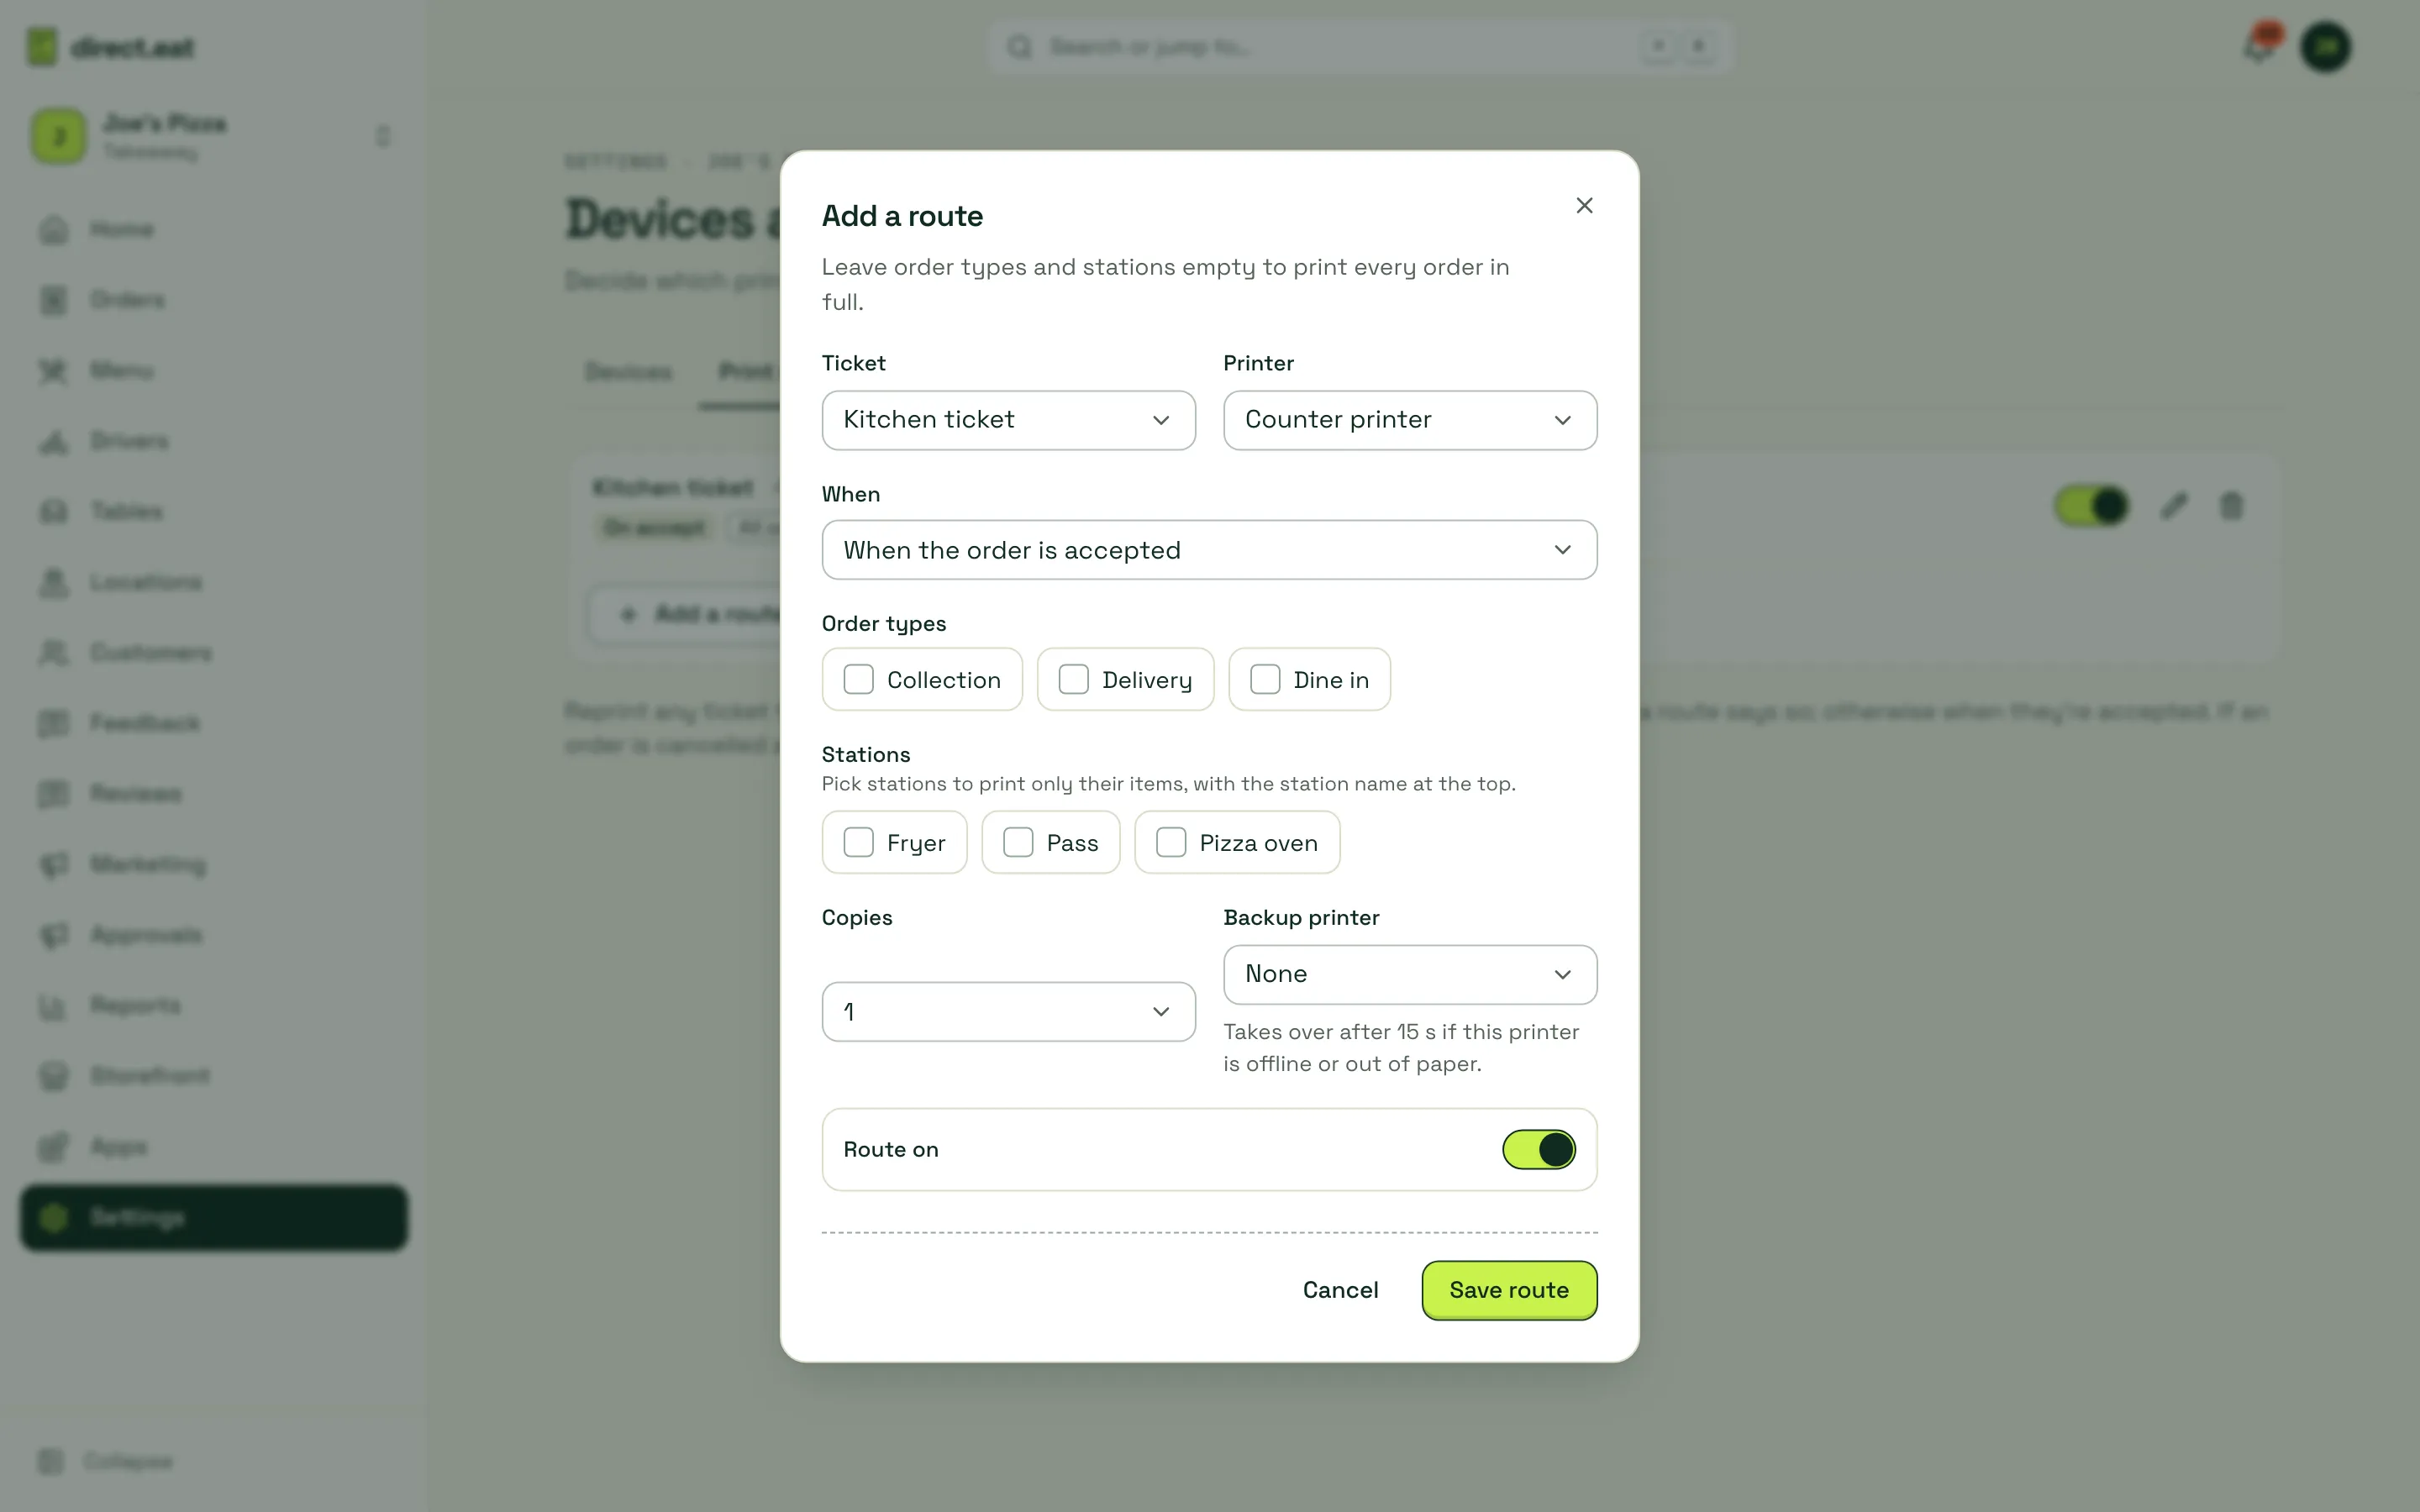
Click Add a route.
-
Choose the Ticket: Kitchen ticket, Customer receipt or Delivery label.
-
Choose the Printer, and optionally a Backup printer. The backup “takes over after 15 s if this printer is offline or out of paper”.
-
Choose When:
- When the order is accepted (shows as On accept). The usual choice.
- As soon as the order arrives (On arrival). Prints before anyone accepts, useful as a paper alarm.
- At fire time (scheduled orders): pre-orders print at their slot time minus prep time.
-
Pick Order types (Collection, Delivery, Dine in) and Stations, or leave both empty to print every order in full. “Pick stations to print only their items, with the station name at the top.”
-
Set Copies and save. Each route has a Route on switch so you can turn it off without deleting it.
Examples:
| You want | Routes |
|---|---|
| One kitchen ticket per order | Kitchen ticket → Kitchen printer → On accept → All orders |
| A receipt to staple to delivery bags | Customer receipt → Counter printer → On accept → Delivery |
| Pizzas on the oven printer, sides on the fryer printer | Kitchen ticket → Oven printer → On accept → Station: Pizza oven. Kitchen ticket → Fryer printer → On accept → Station: Fryer. |
| Bag labels for delivery | Delivery label → Label printer → On accept → Delivery |
Stations and which menu categories go to them are set in Orders → Kitchen stations. See the kitchen display.
Automatic tickets you don’t set up
Section titled “Automatic tickets you don’t set up”- REPRINT: any ticket reprinted from an order, from the kitchen app or the dashboard, is marked REPRINT at the top.
- VOID: if an order is cancelled after its kitchen ticket printed, a VOID ticket follows so nobody cooks it.
- AMENDED: if an order is changed after printing, an amended ticket prints.
- NOT YET ACCEPTED: part of the missed-order ladder. If nobody accepts a new order, a cloud printer prints the full ticket with a NOT YET ACCEPTED banner and a QR code to accept it.
Ticket templates
Section titled “Ticket templates”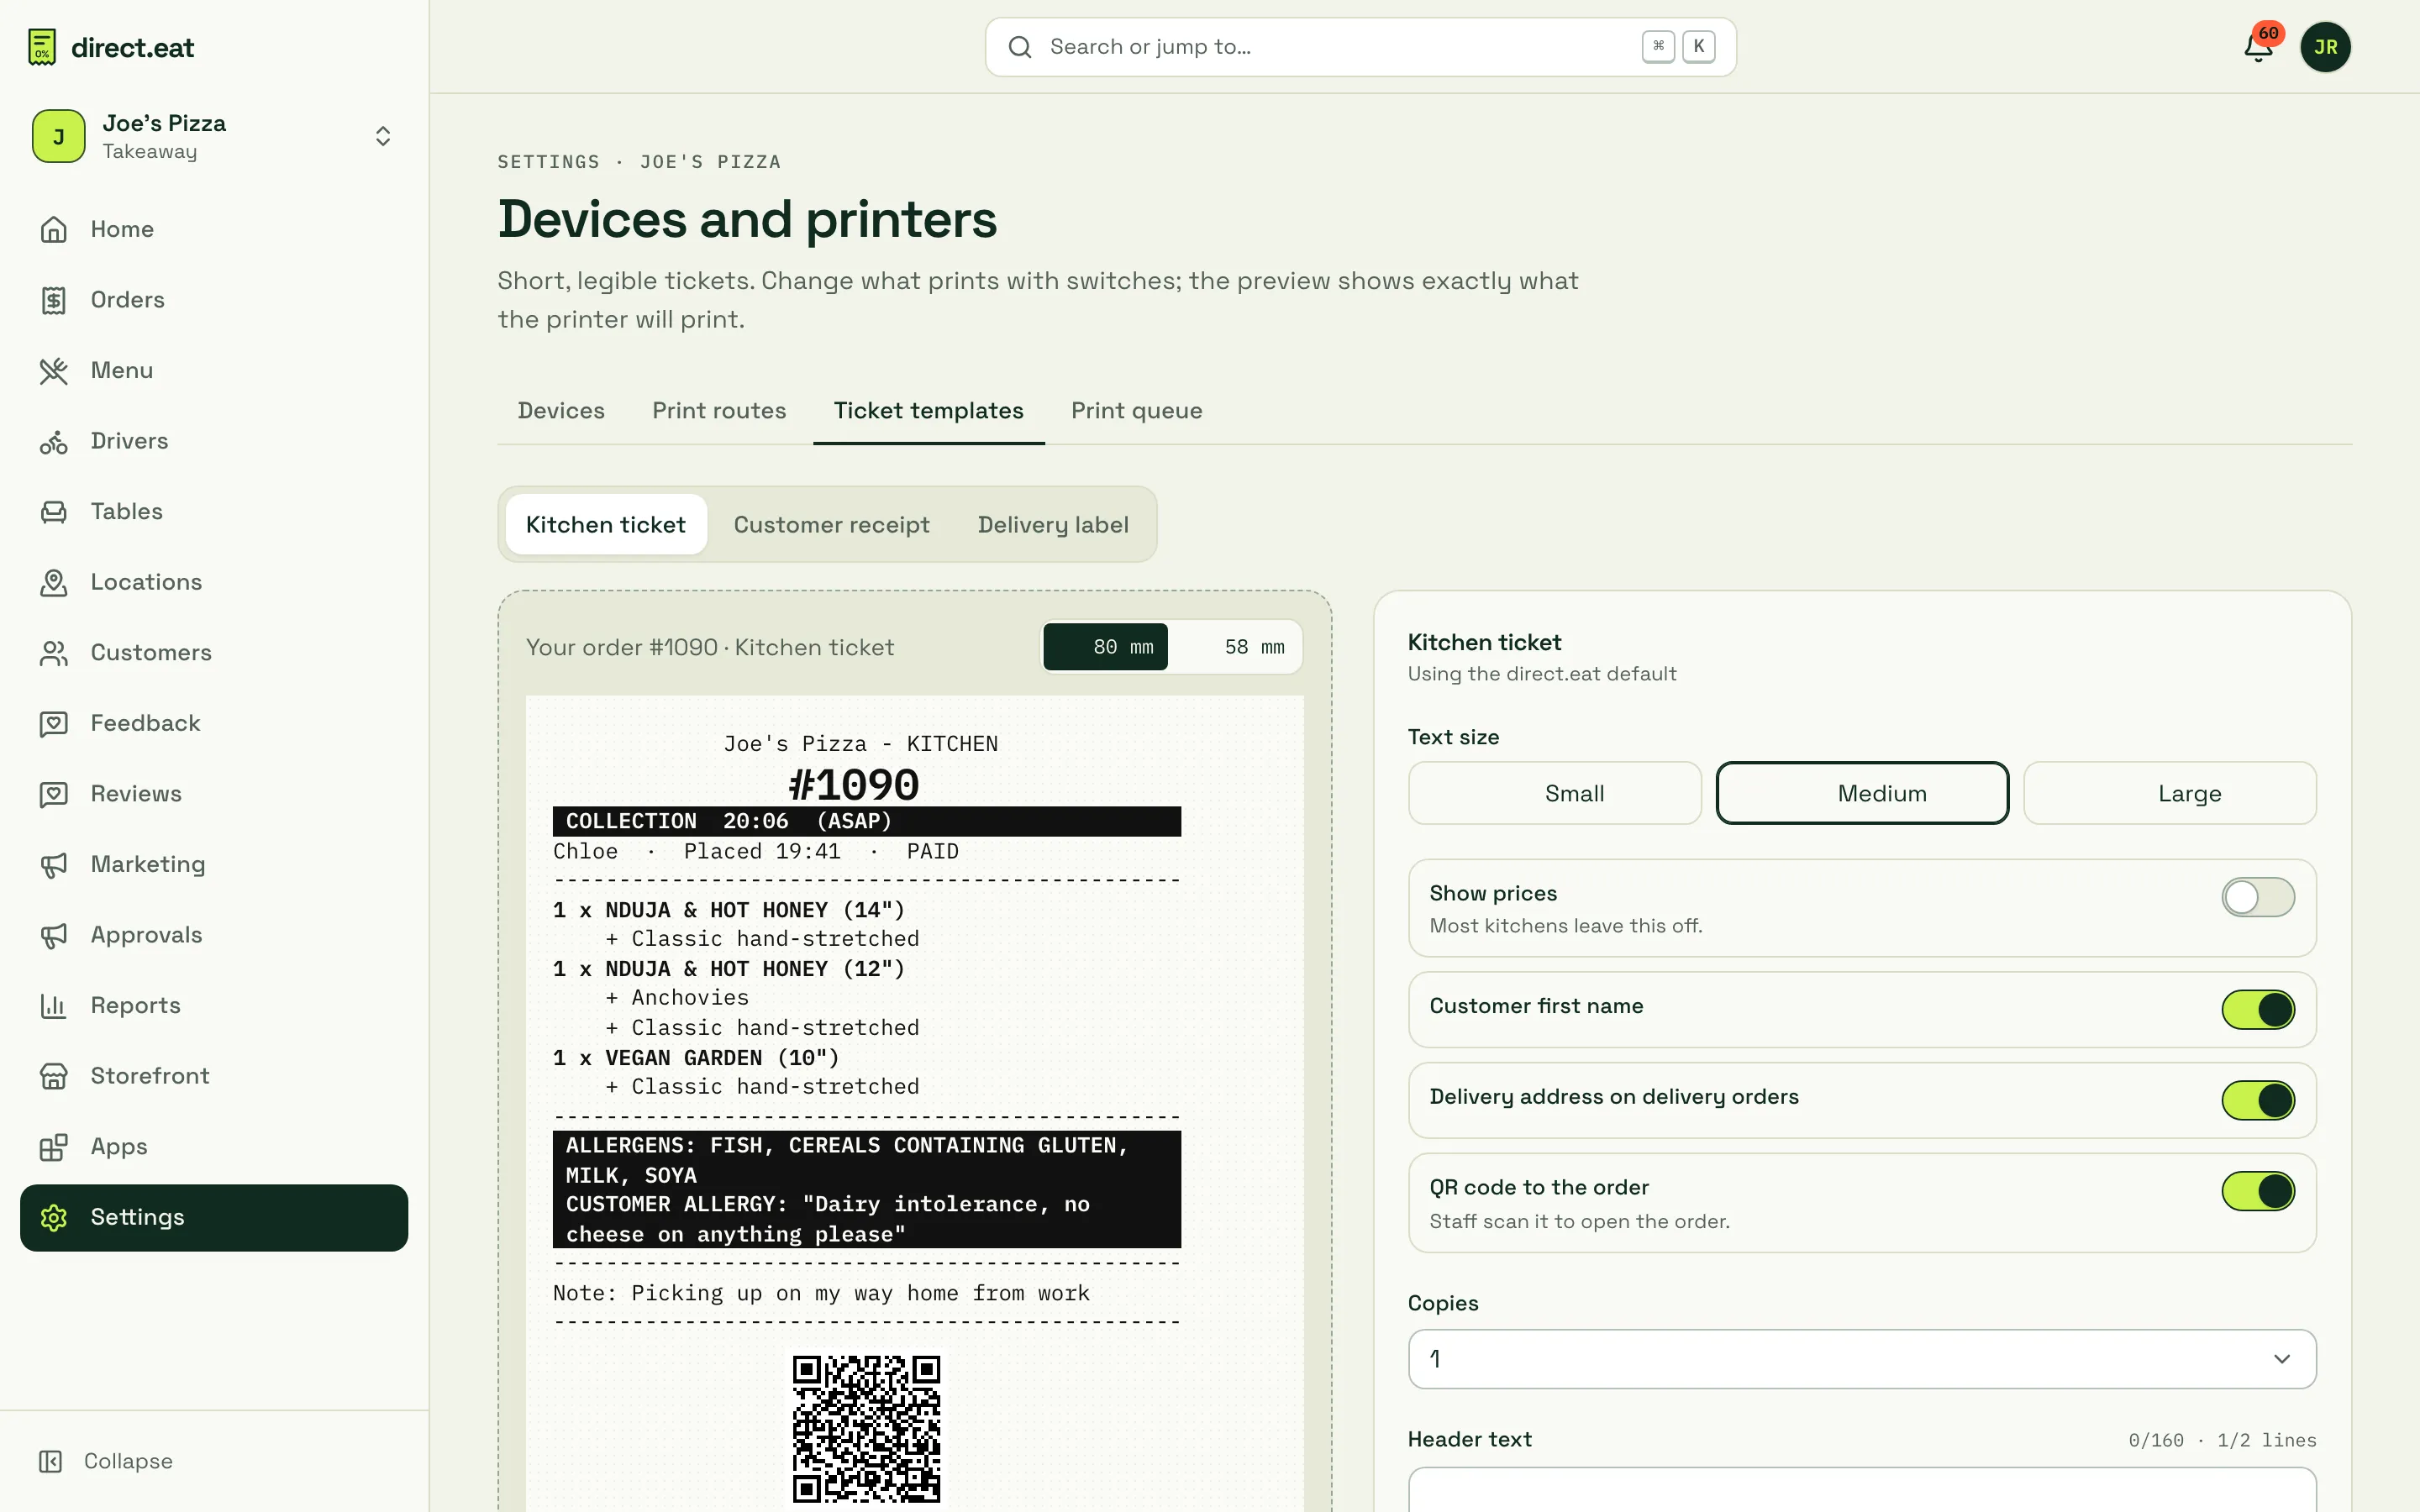
Pick the ticket type at the top. The preview shows exactly what the printer will print, using a real recent order (or a sample), at 80 mm or 58 mm.
Kitchen ticket: Text size (Small, Medium, Large), Show prices (“Most kitchens leave this off.”), Customer first name, Delivery address on delivery orders, QR code to the order (“Staff scan it to open the order.”), Copies, Header text (up to 2 lines) and Footer text (up to 3 lines). Allergens are always printed in a reversed block, with the customer’s allergy note in full.
Customer receipt: Shop name as a large header, Customer name, Allergen statement (“Required at hand-over for delivered and collected food.”), QR code to order again, header and footer. Receipts are simplified VAT receipts with VAT by rate.
Delivery label: Labels per order (one per bag, numbered “Bag 1 of 2”), Delivery address, Items in the bag and a “Contains” allergen line per item.
Click Save template. Each save is a new version, and the template you saved is used from the next ticket. To check it on paper first, choose a printer under Test on and click Print test: it prints your unsaved settings.
The print queue
Section titled “The print queue”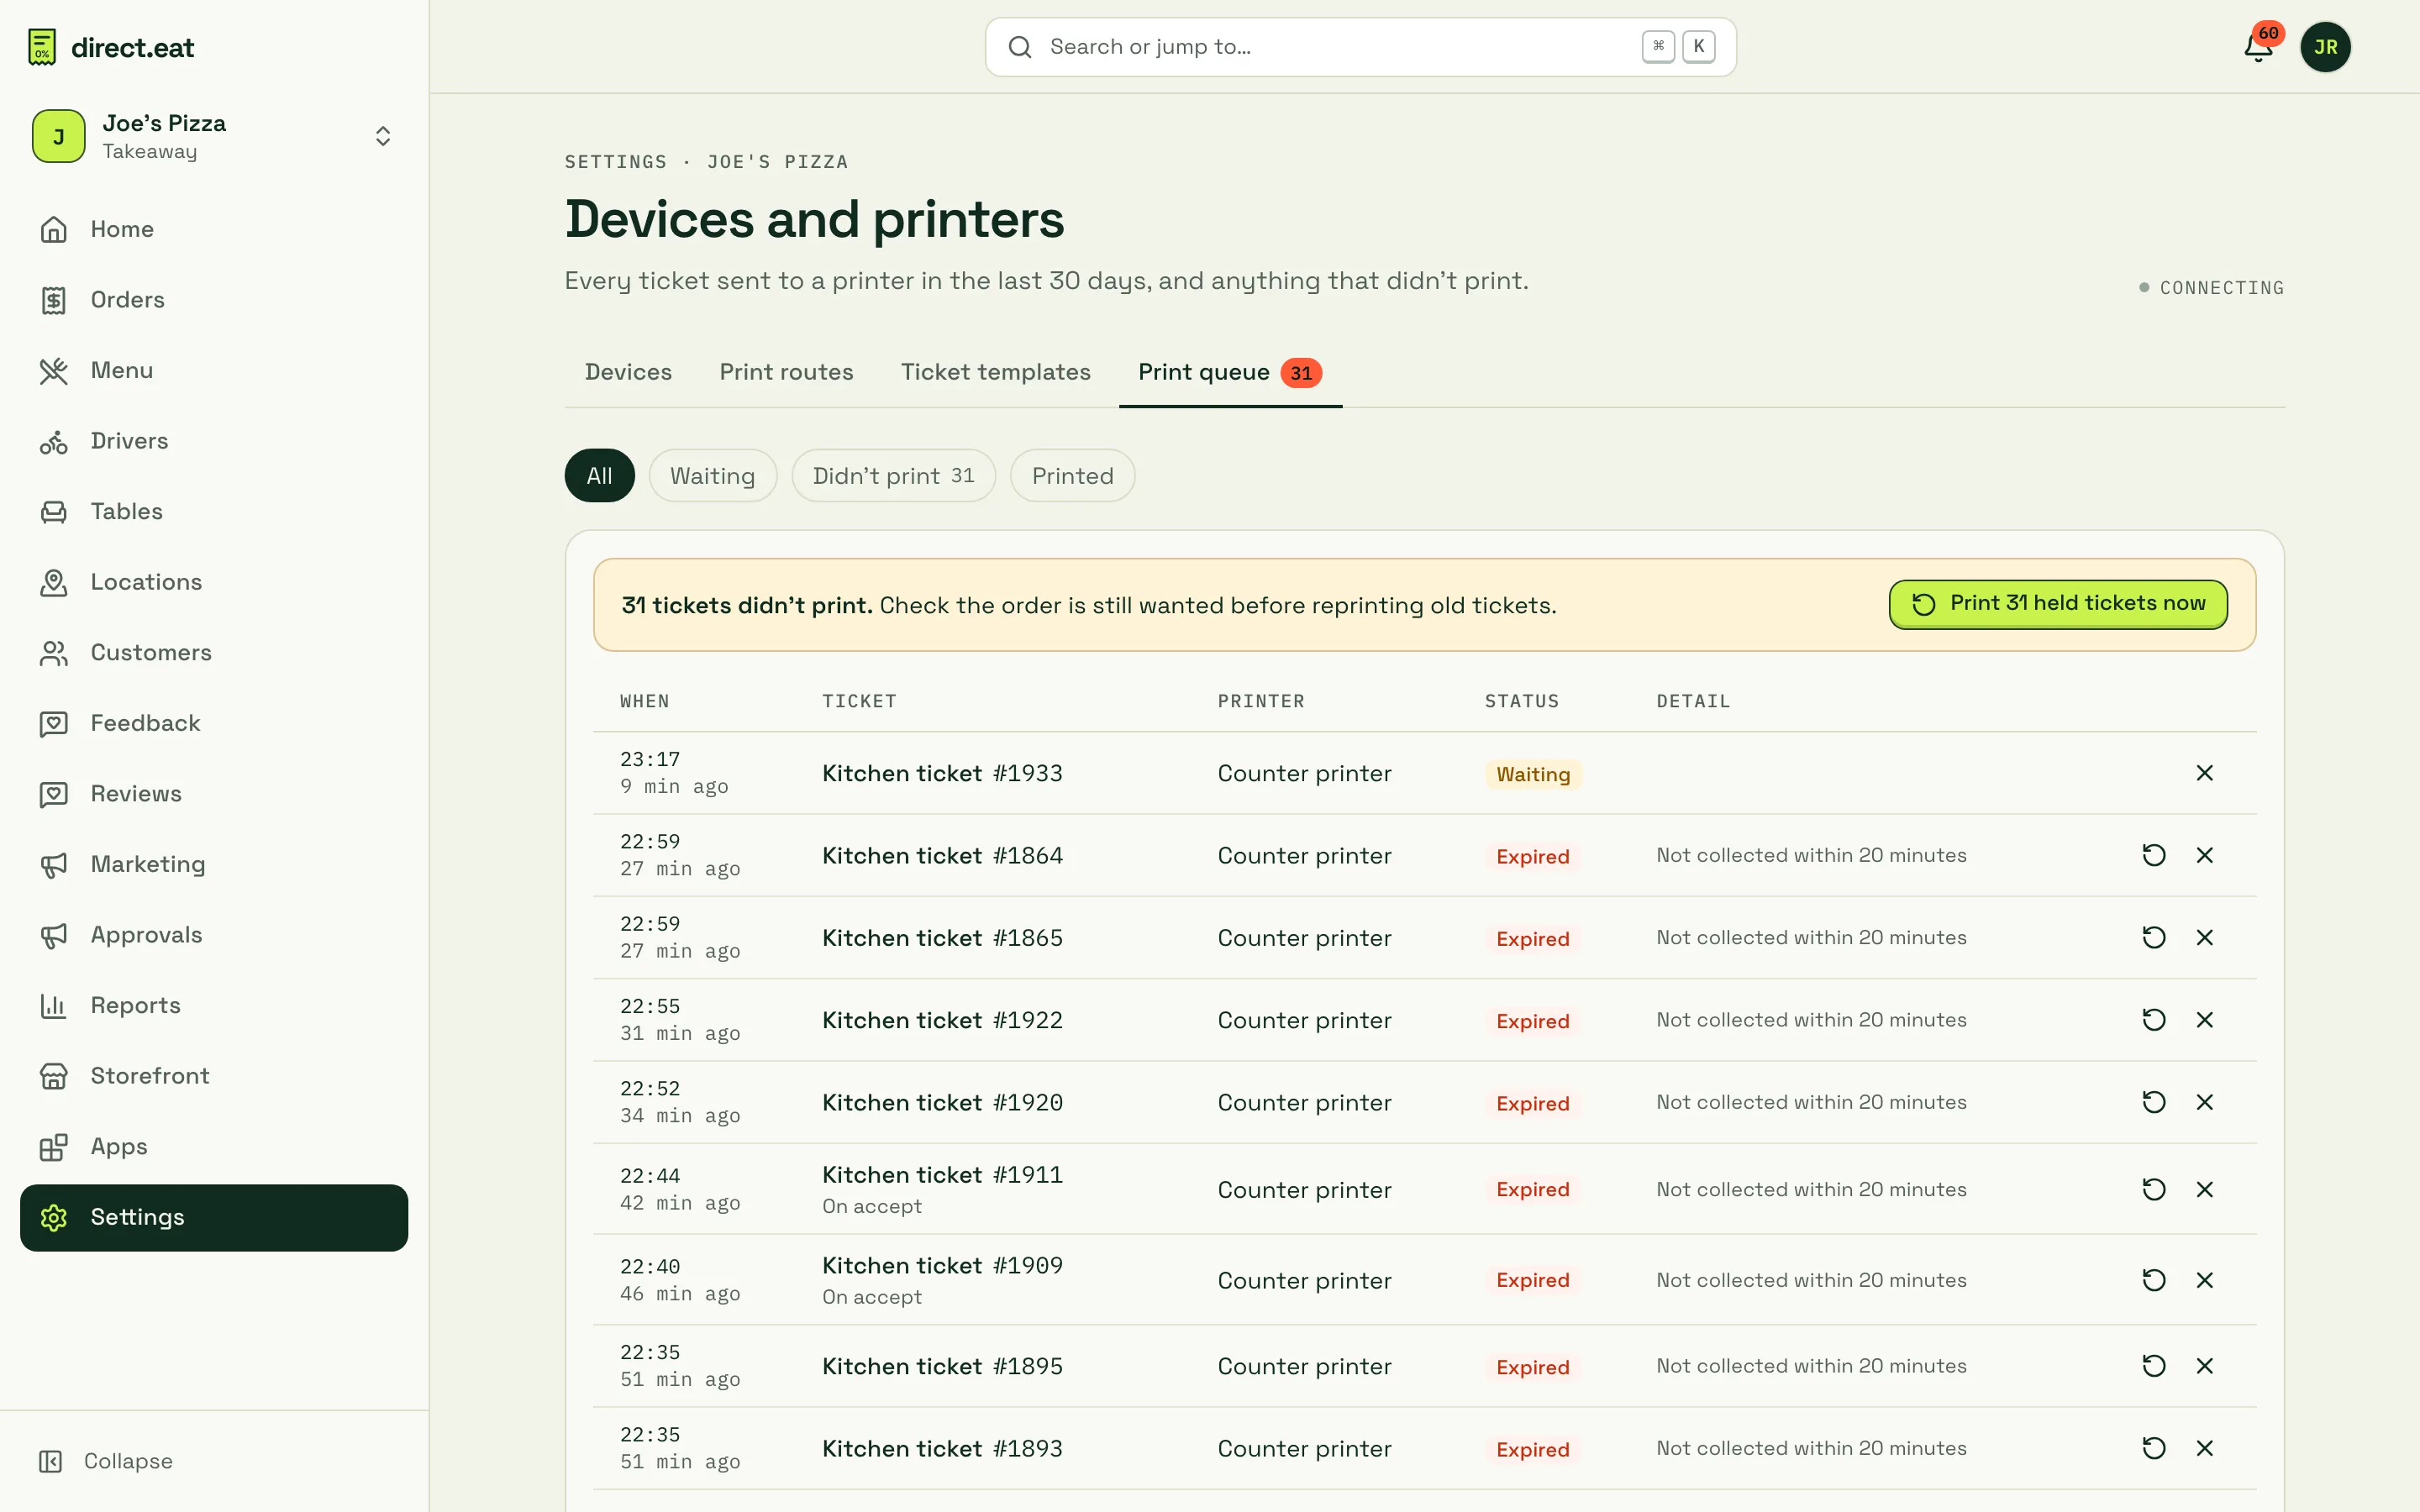
Every ticket sent to a printer in the last 30 days, newest first. Filter by All, Waiting, Didn’t print and Printed.
- Waiting: queued, or sent and not yet confirmed by the printer.
- Didn’t print: it failed, or it waited 20 minutes and was held.
- Printed: the printer confirmed it.
Tickets wait while a printer is out of paper, has its cover open or is offline, and print as soon as it’s back. After 20 minutes they’re held rather than printed late without warning, because a ticket printing 40 minutes late causes more confusion than it solves.
When tickets are held, a bar says how many “didn’t print” with a Print N held tickets now button. Check with the kitchen first, then press it. The kitchen app shows the same prompt: “n tickets didn’t print · Print them now”. You can also Reprint or Cancel a single job from its row.
Related
Section titled “Related”Was this page helpful?