

Delivery zones, fees and ETAs
Delivery on direct.eat is for your own drivers. You decide where you deliver, what it costs and how long it takes. There’s no commission on delivery orders, no small-order surcharge and no live GPS tracking of your drivers. Diners see the fee and an arrival window as soon as they type their postcode.
This page covers zones, fees and delivery times. For drivers, dispatch and cash, see Drivers and dispatch. If you’re setting up for the first time, the quick version is in Set up delivery.
Before you start
Section titled “Before you start”- You need the owner, admin or manager role (the “change shop settings” permission) to edit zones. Staff are sent back from this page, but they can still assign drivers on the Drivers page. See Roles and permissions.
- Delivery is included on every plan. You can have up to 20 zones per shop.
- Know your prices: a fee and a minimum order for each area, and whether you want free delivery over a basket value.
The Delivery settings page
Section titled “The Delivery settings page”Go to Settings → Delivery (or Zones and fees on the Drivers page).
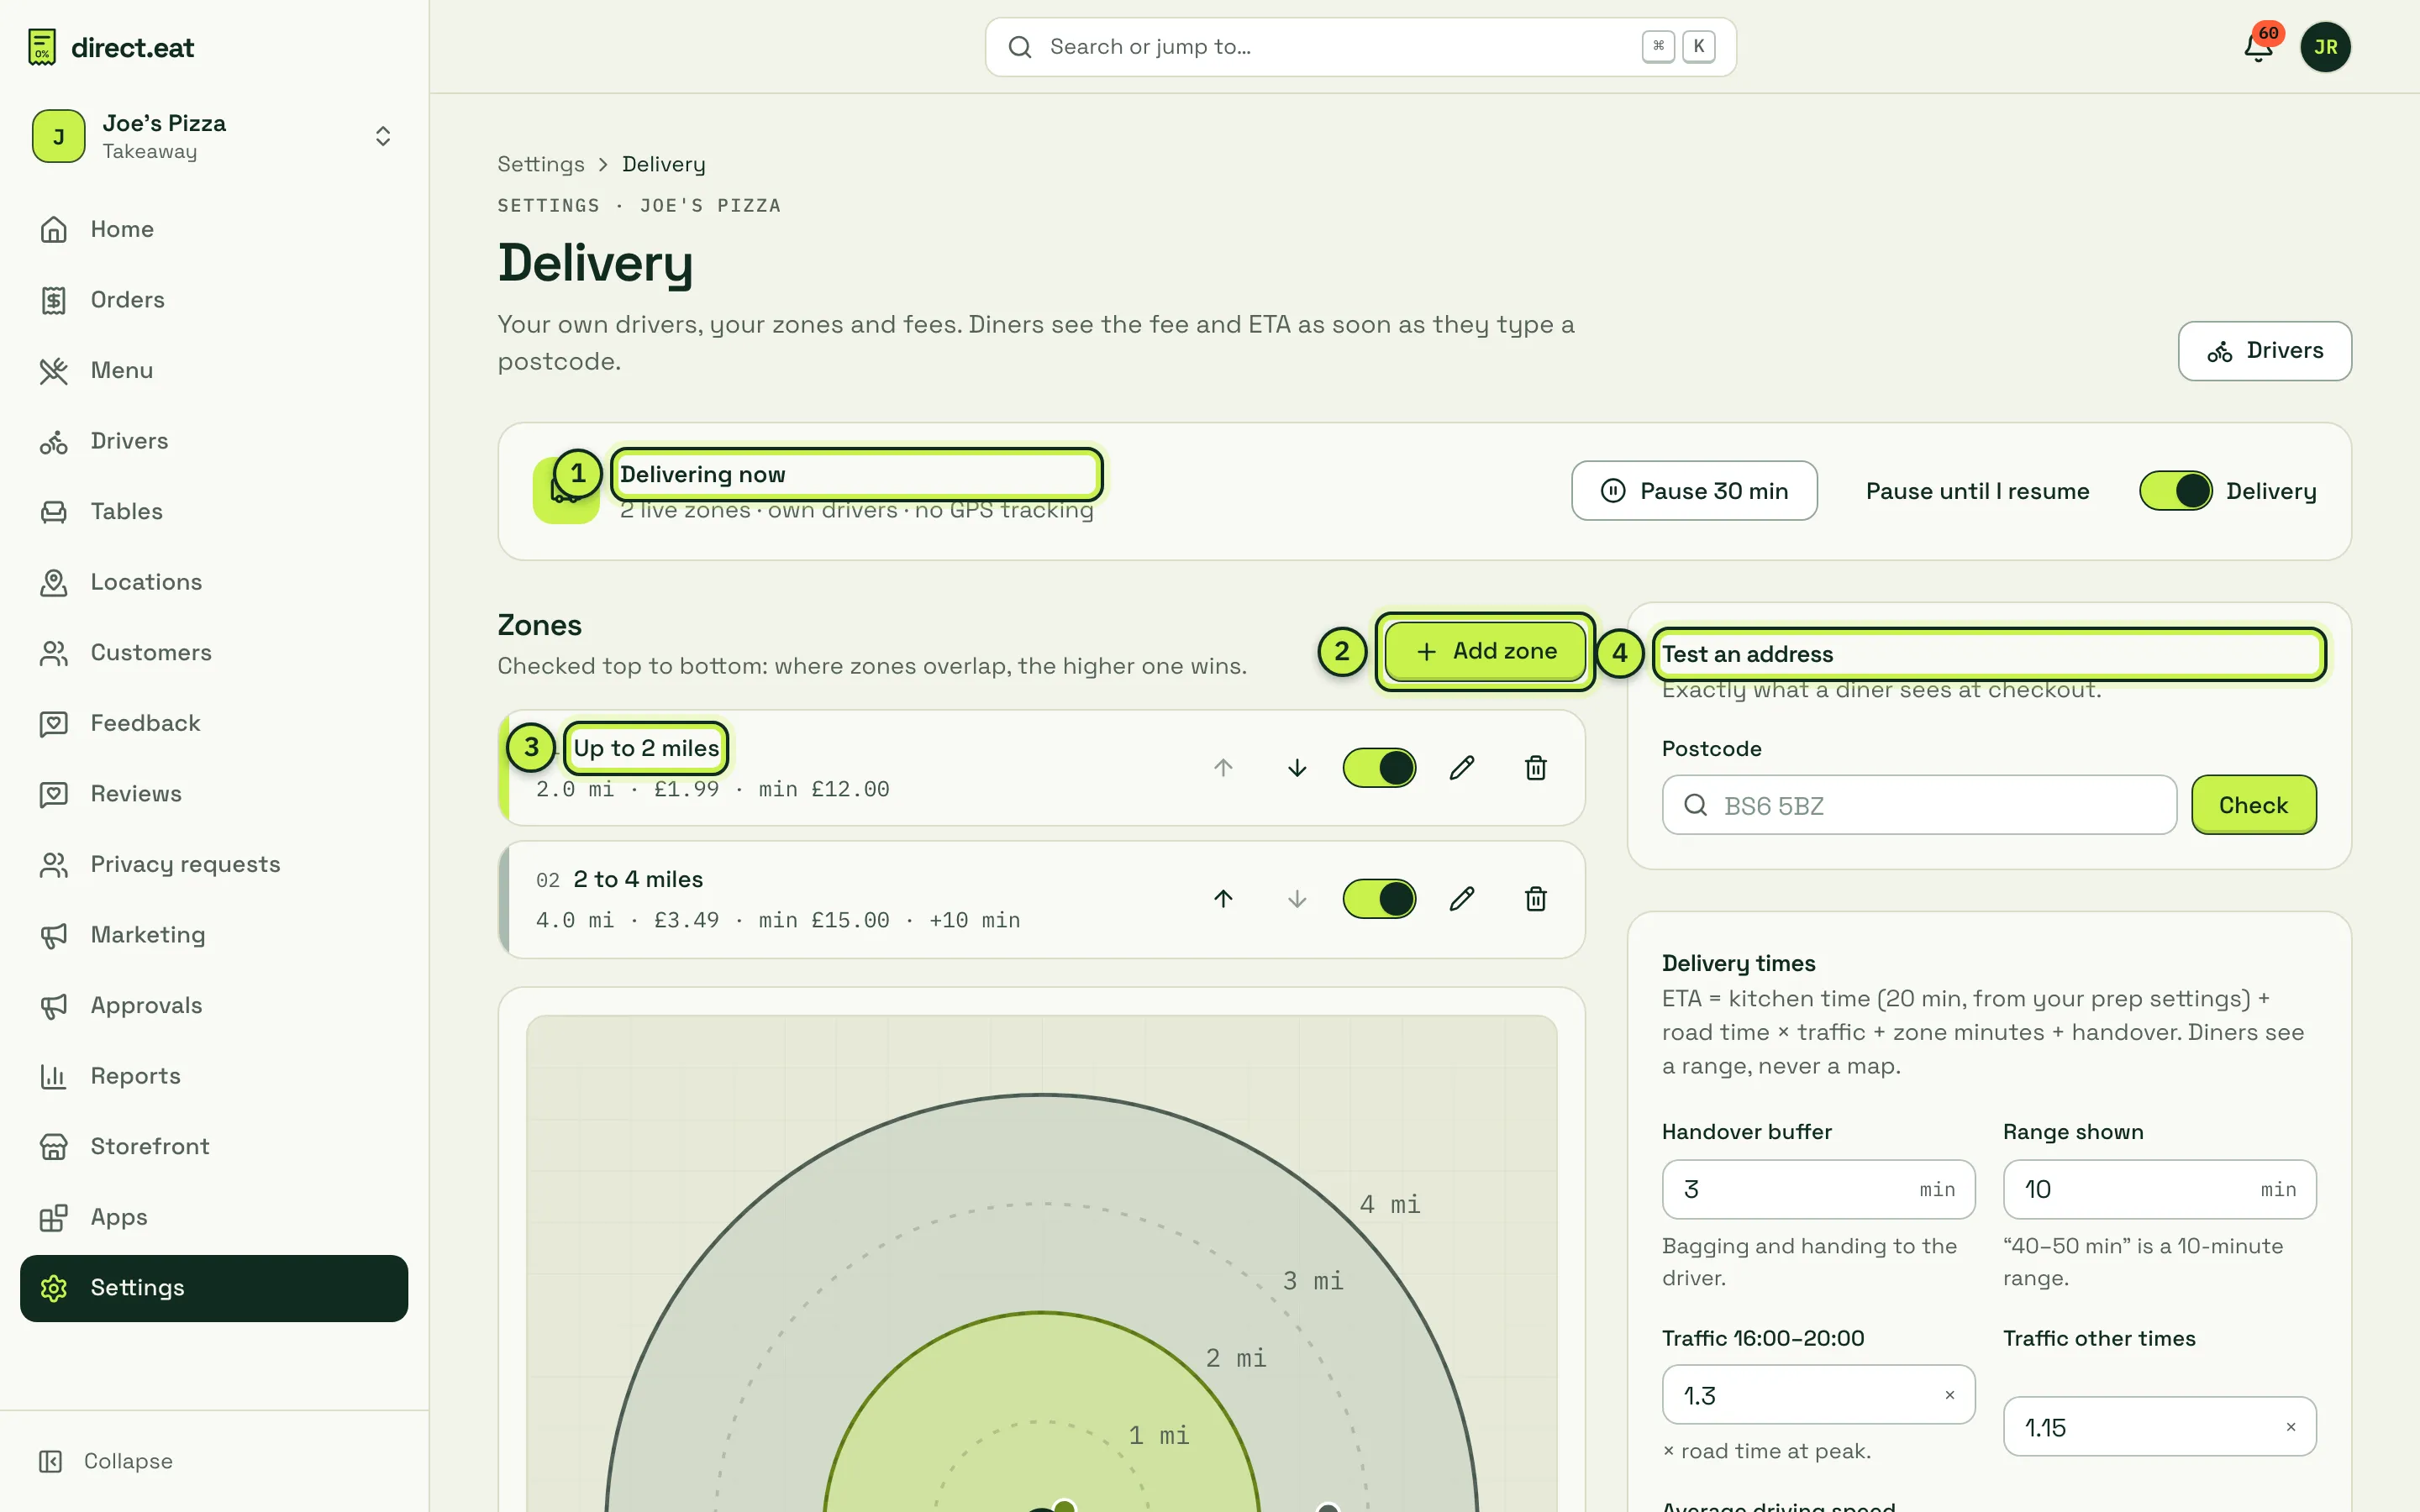
- Delivery status: whether you’re delivering now, how many zones are live, with Pause 30 min, Pause until I resume and the Delivery on/off switch. Pausing stops delivery orders only; collection carries on.
- Add zone: create a new zone.
- Zone cards: one per zone, with its distance or postcodes, fee, minimum and any extra minutes, for example “2.0 mi · £1.99 · min £12.00”. Each card has up and down arrows, a live switch, edit and delete.
- Test an address: check any postcode against your zones, exactly as checkout does.
How zones are matched
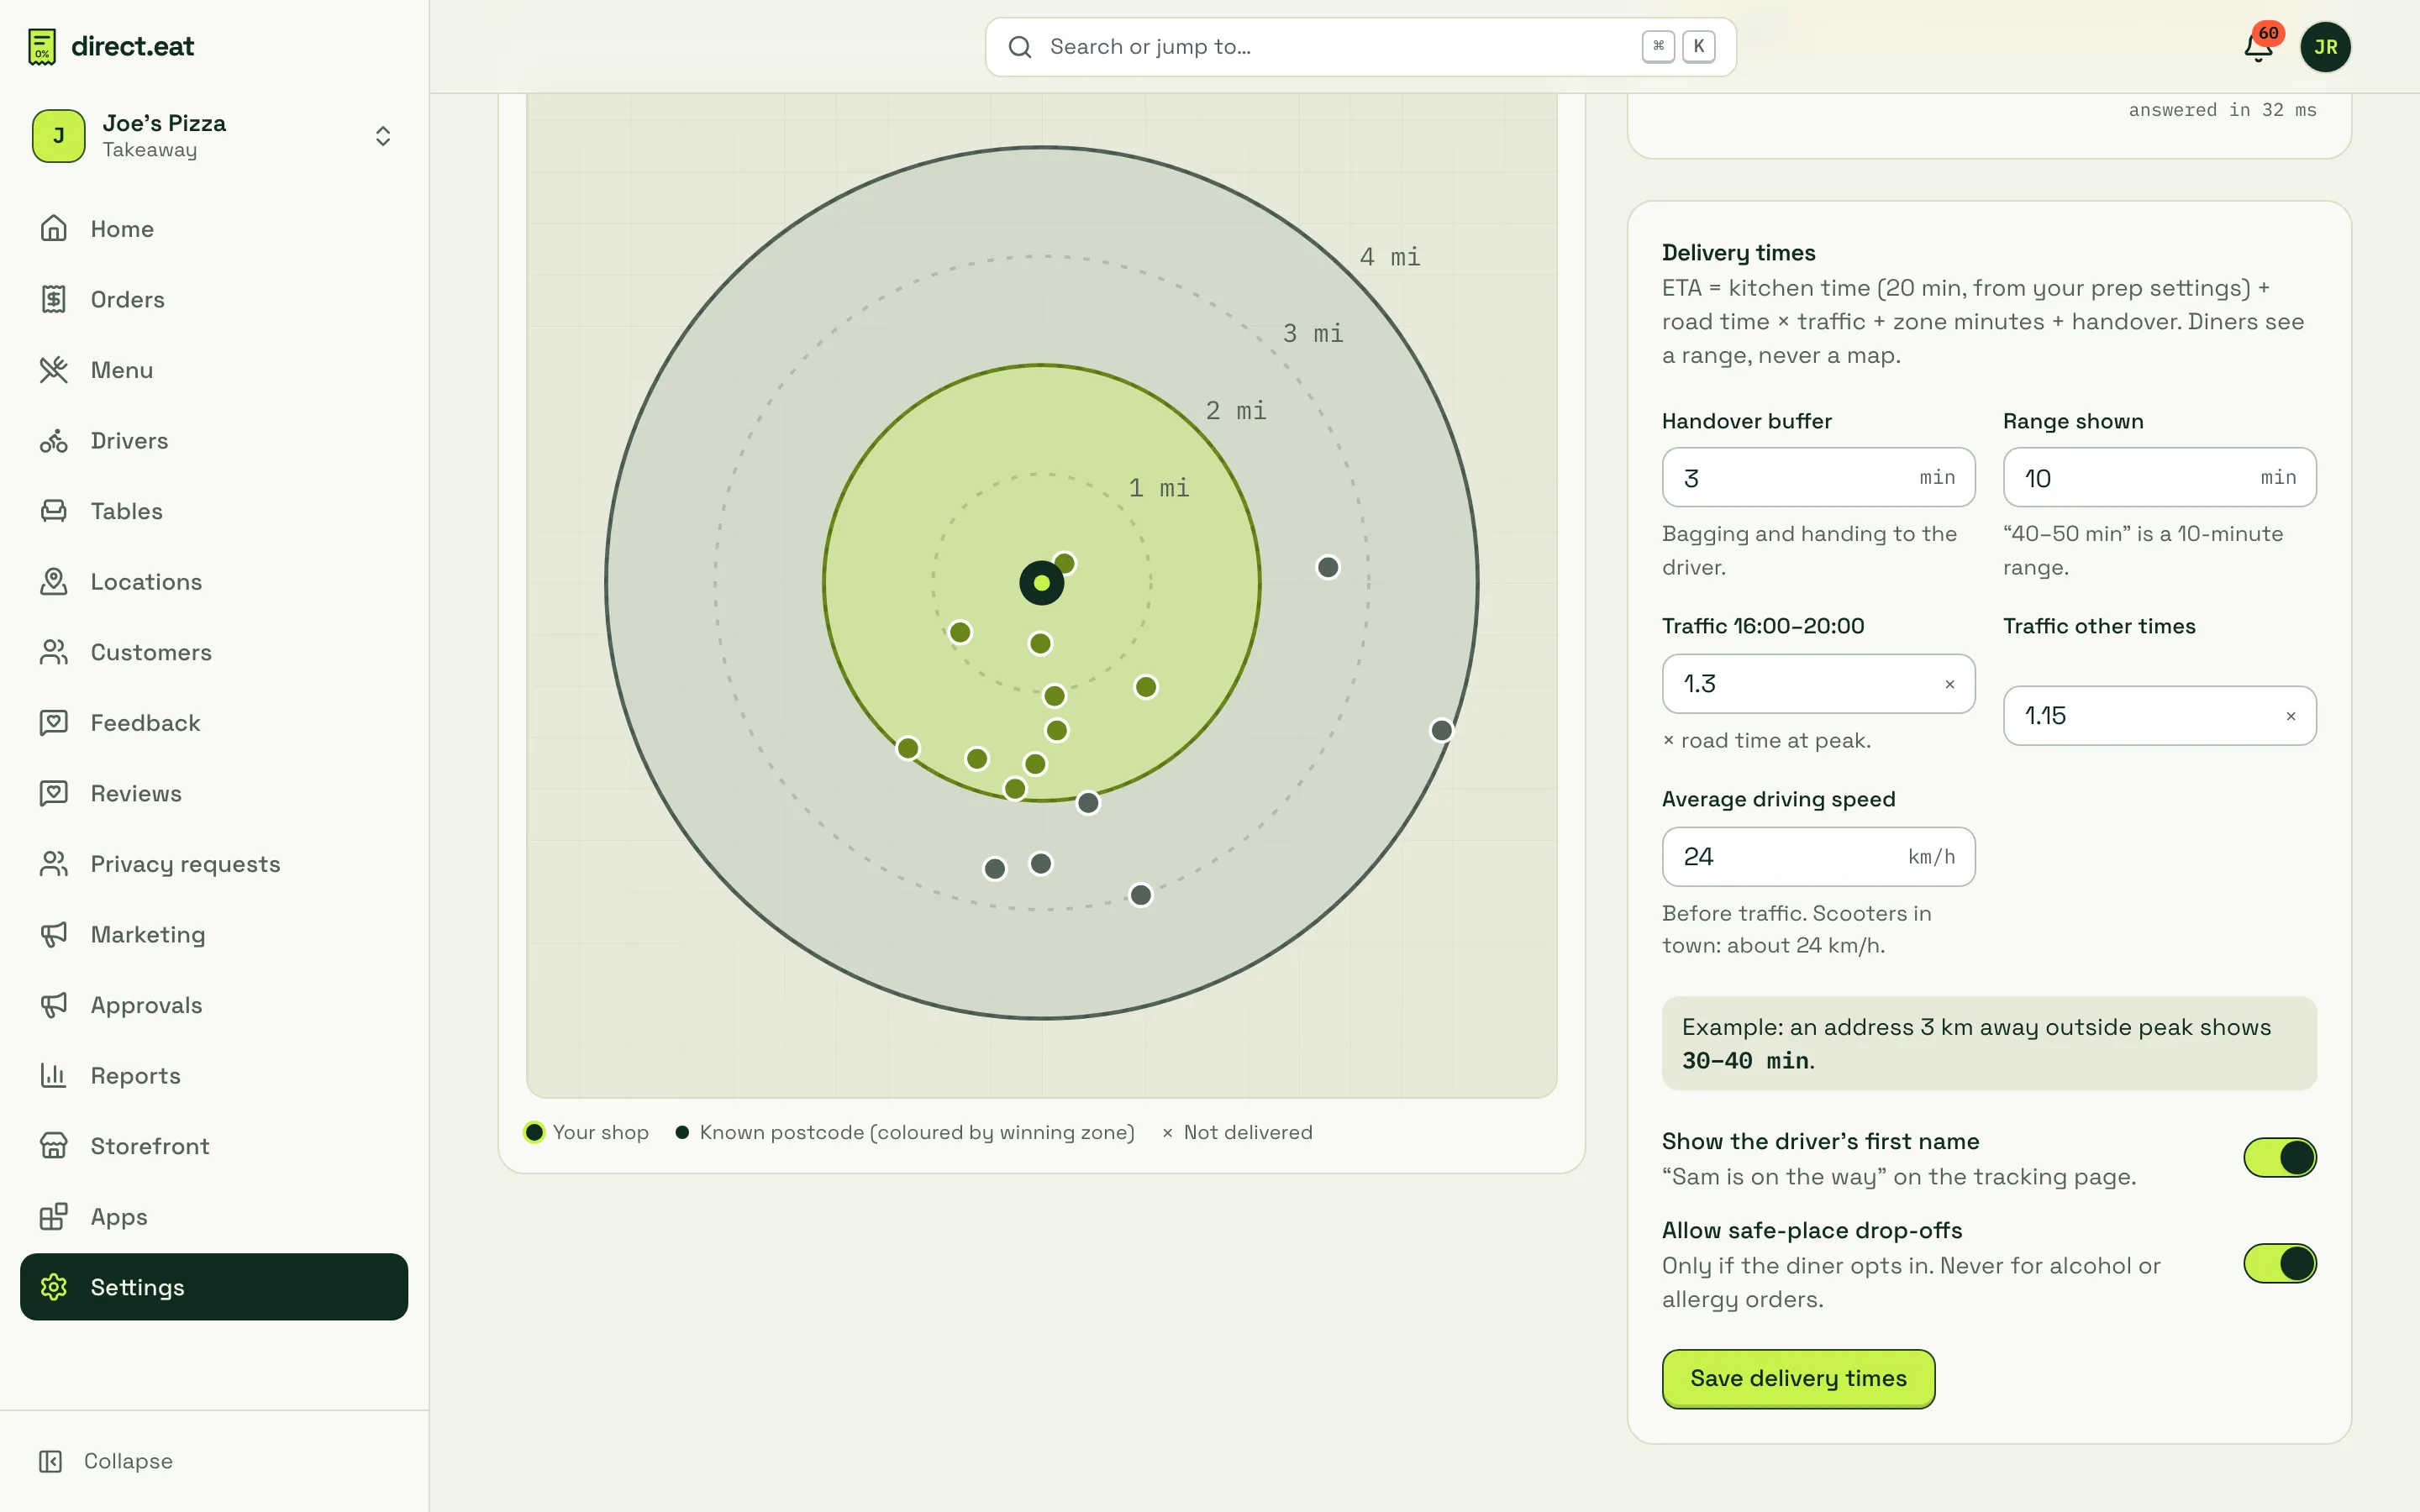
Section titled “How zones are matched”Zones are checked top to bottom: where two zones overlap, the higher one wins. Put your closest, cheapest zone first and use the arrows to reorder. If a zone is hidden by one above it (for example a bigger radius above a smaller one, or the same district in two zones), the page shows an overlap warning.
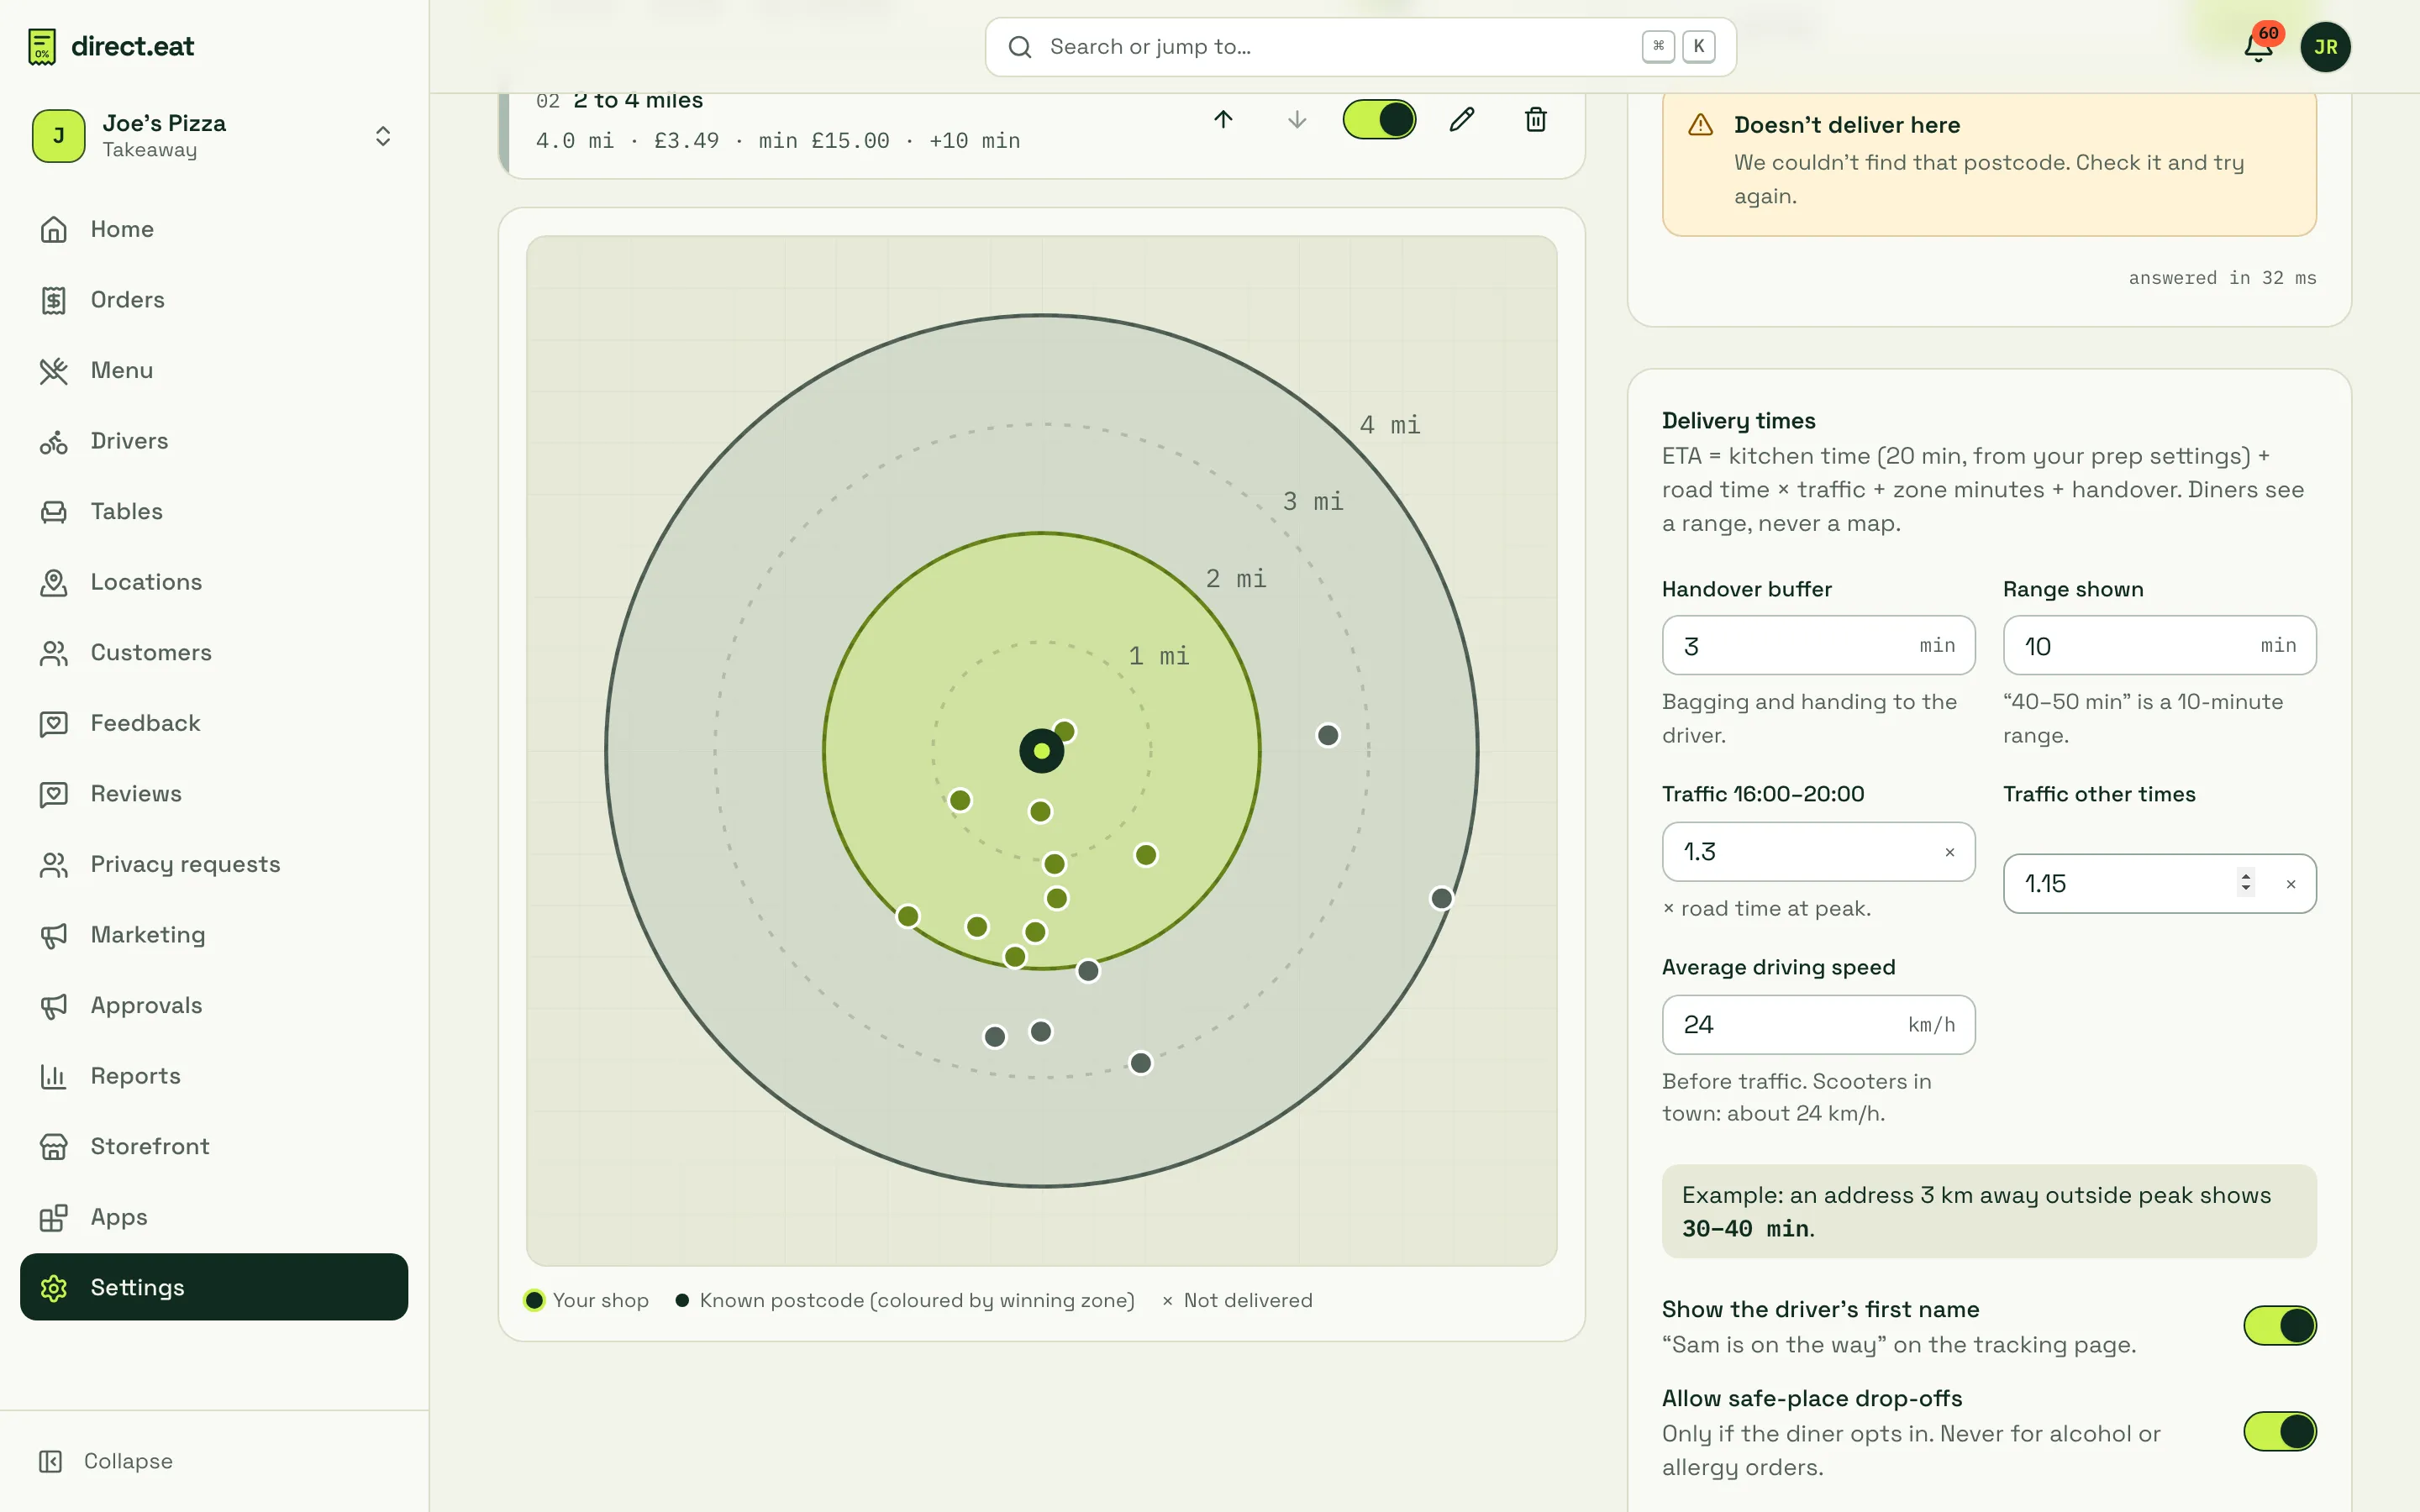
Under the list, a map-free diagram draws your distance zones to scale around your shop, with mile rings, and plots known postcodes coloured by the zone that wins them. Postcodes you don’t deliver to are marked as not delivered.
Add or edit a zone
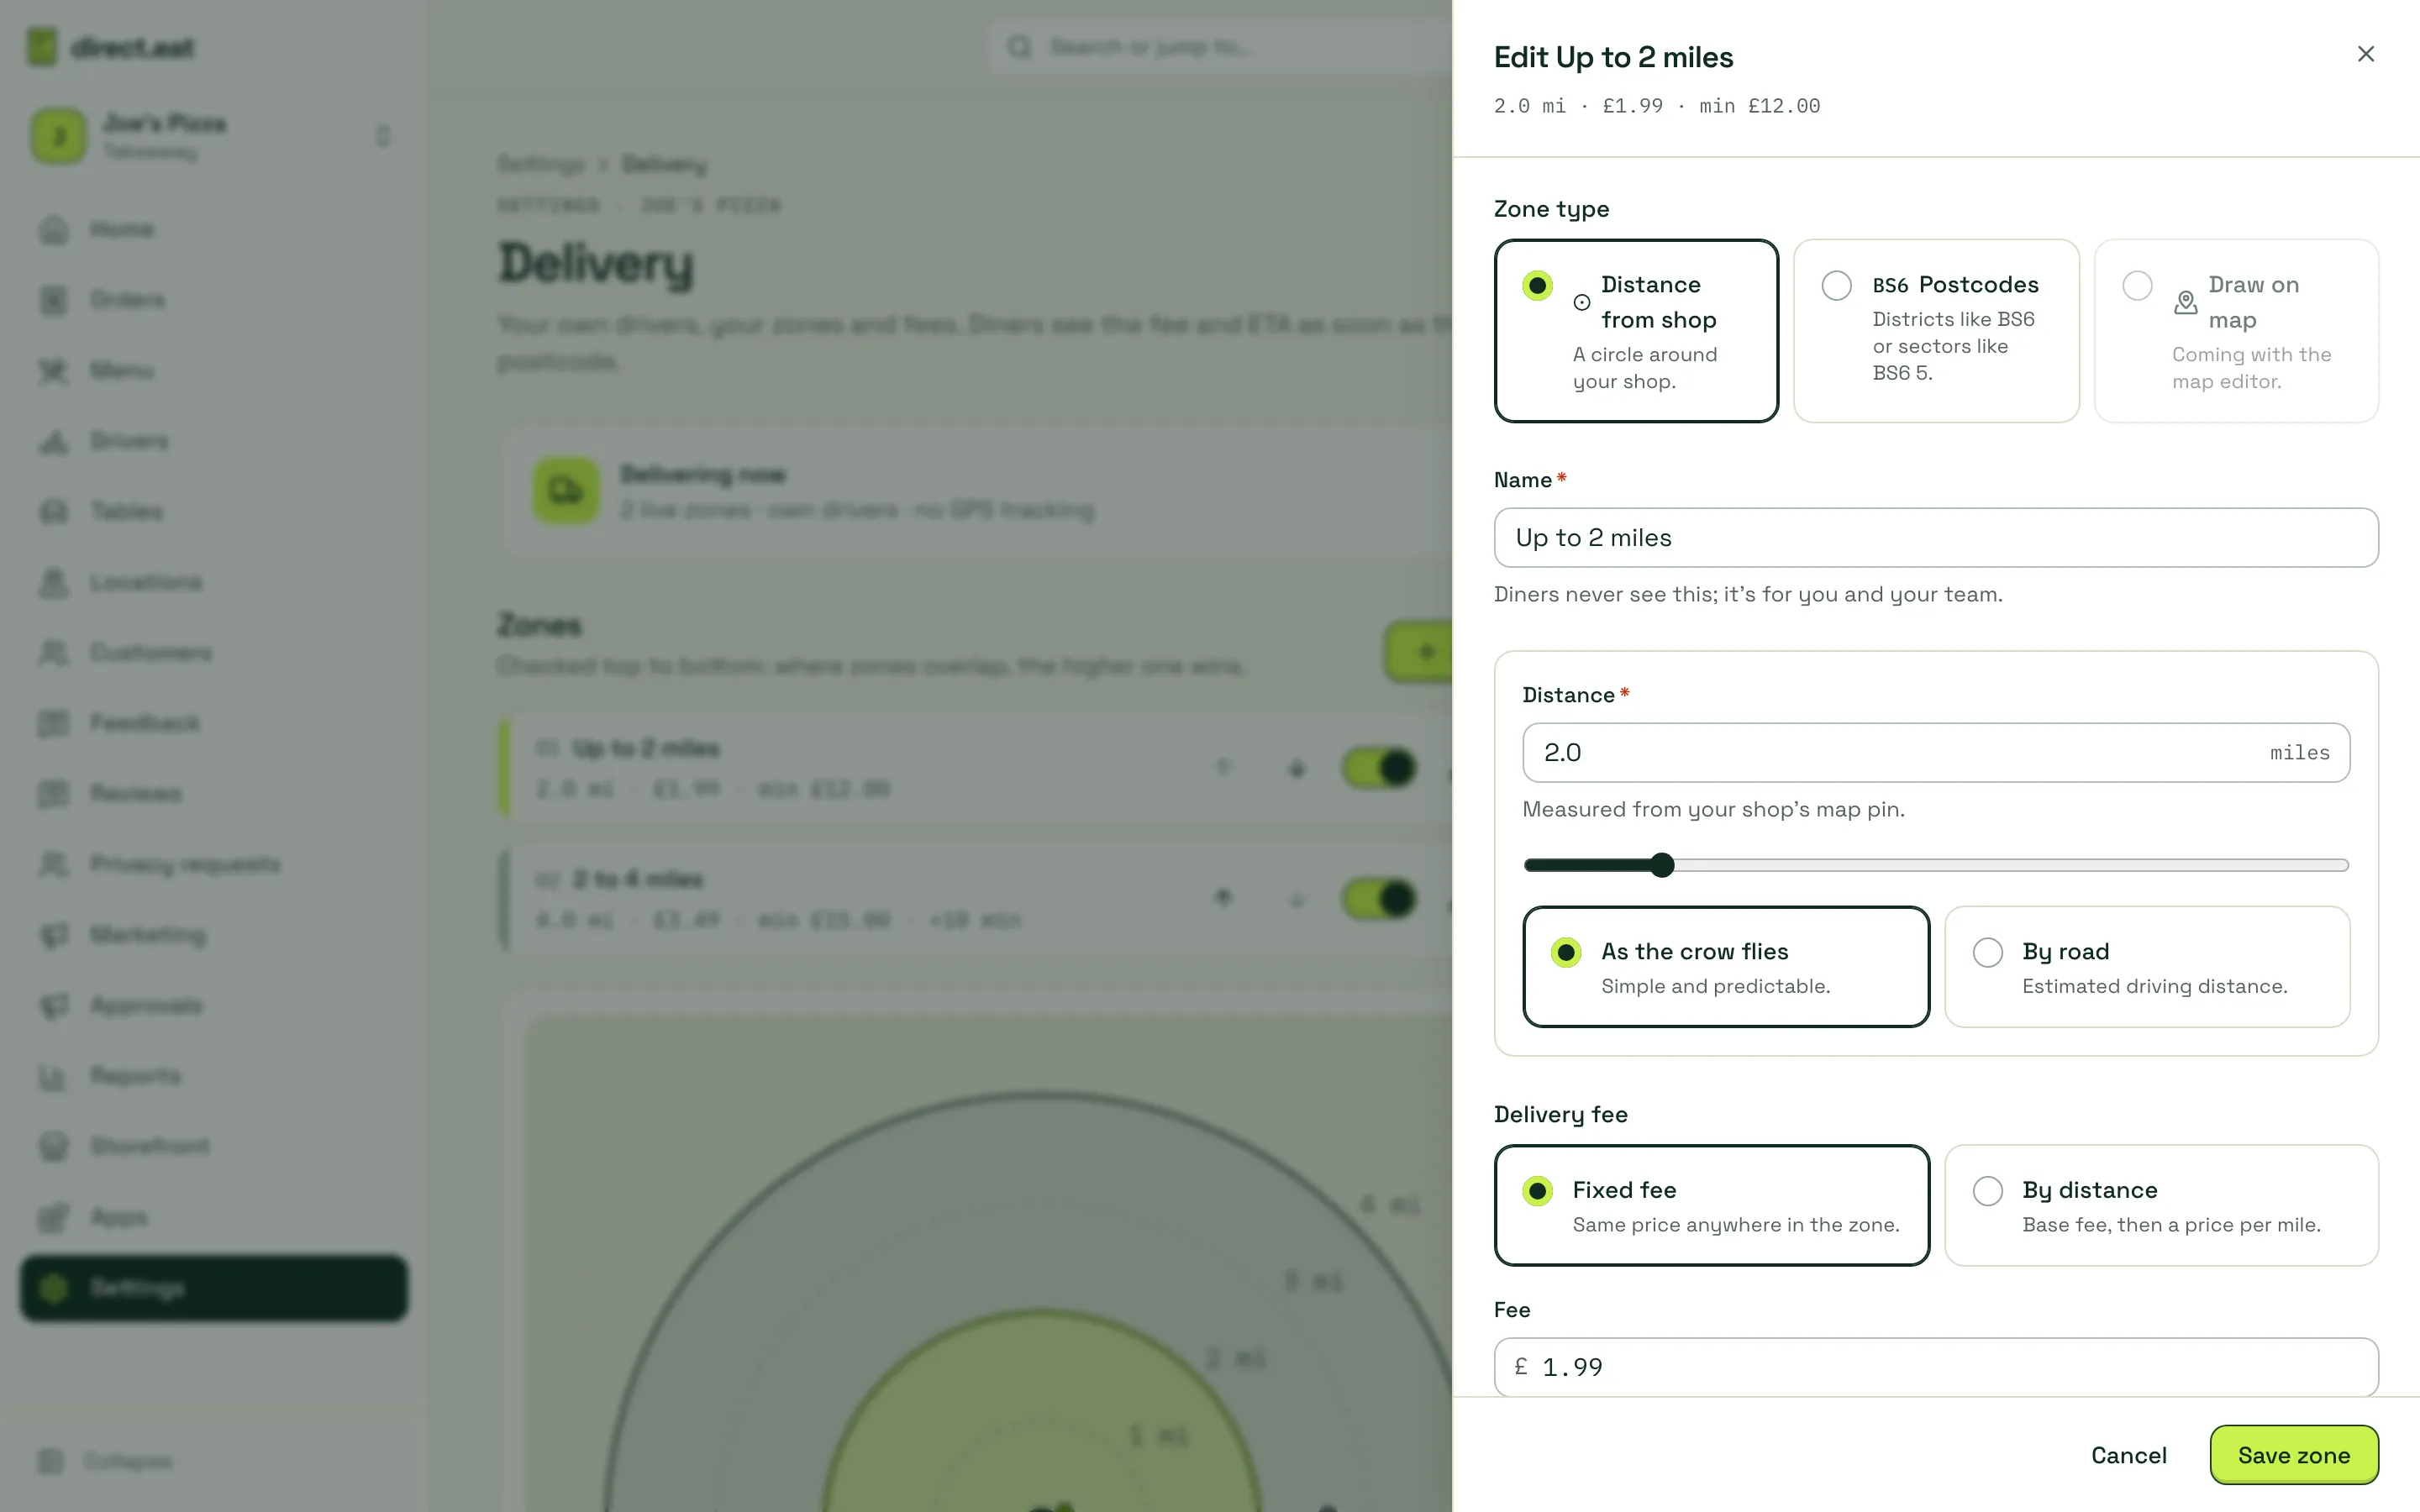
Section titled “Add or edit a zone”- Click Add zone, or the pencil on an existing zone.
- Choose the Zone type:
- Distance from shop: a circle around your shop, measured from your shop’s map pin.
- Postcodes: a list of postcode districts (like BS6) or sectors (like BS6 5).
- Draw on map: coming with the map editor.
- Give it a Name. Diners never see this; it’s for you and your team.
- Set the area:
- For distance, set the Distance in miles and choose As the crow flies (simple and predictable) or By road (estimated driving distance).
- For postcodes, paste a list such as
BS6, BS7, BS3 1and press Enter. Each becomes a chip. Anything that isn’t a valid district or sector shows in red so you can fix it.
- Set the Delivery fee: Fixed fee (same price anywhere in the zone; £0 means free) or By distance (a Base fee covering the first part of the trip, then a price per mile, charged per started half mile, with an optional Cap).
- Set the Minimum order. It’s checked against the item total after discounts. There are no small-order fees: below the minimum, the diner is told how much more to add.
- Optional: Extra minutes added to the arrival time for this zone, Free delivery over a basket value, and Delivery hours for this zone (if this zone only runs at certain times).
- Leave Zone is live on, then click Save zone (or Add zone for a new one).
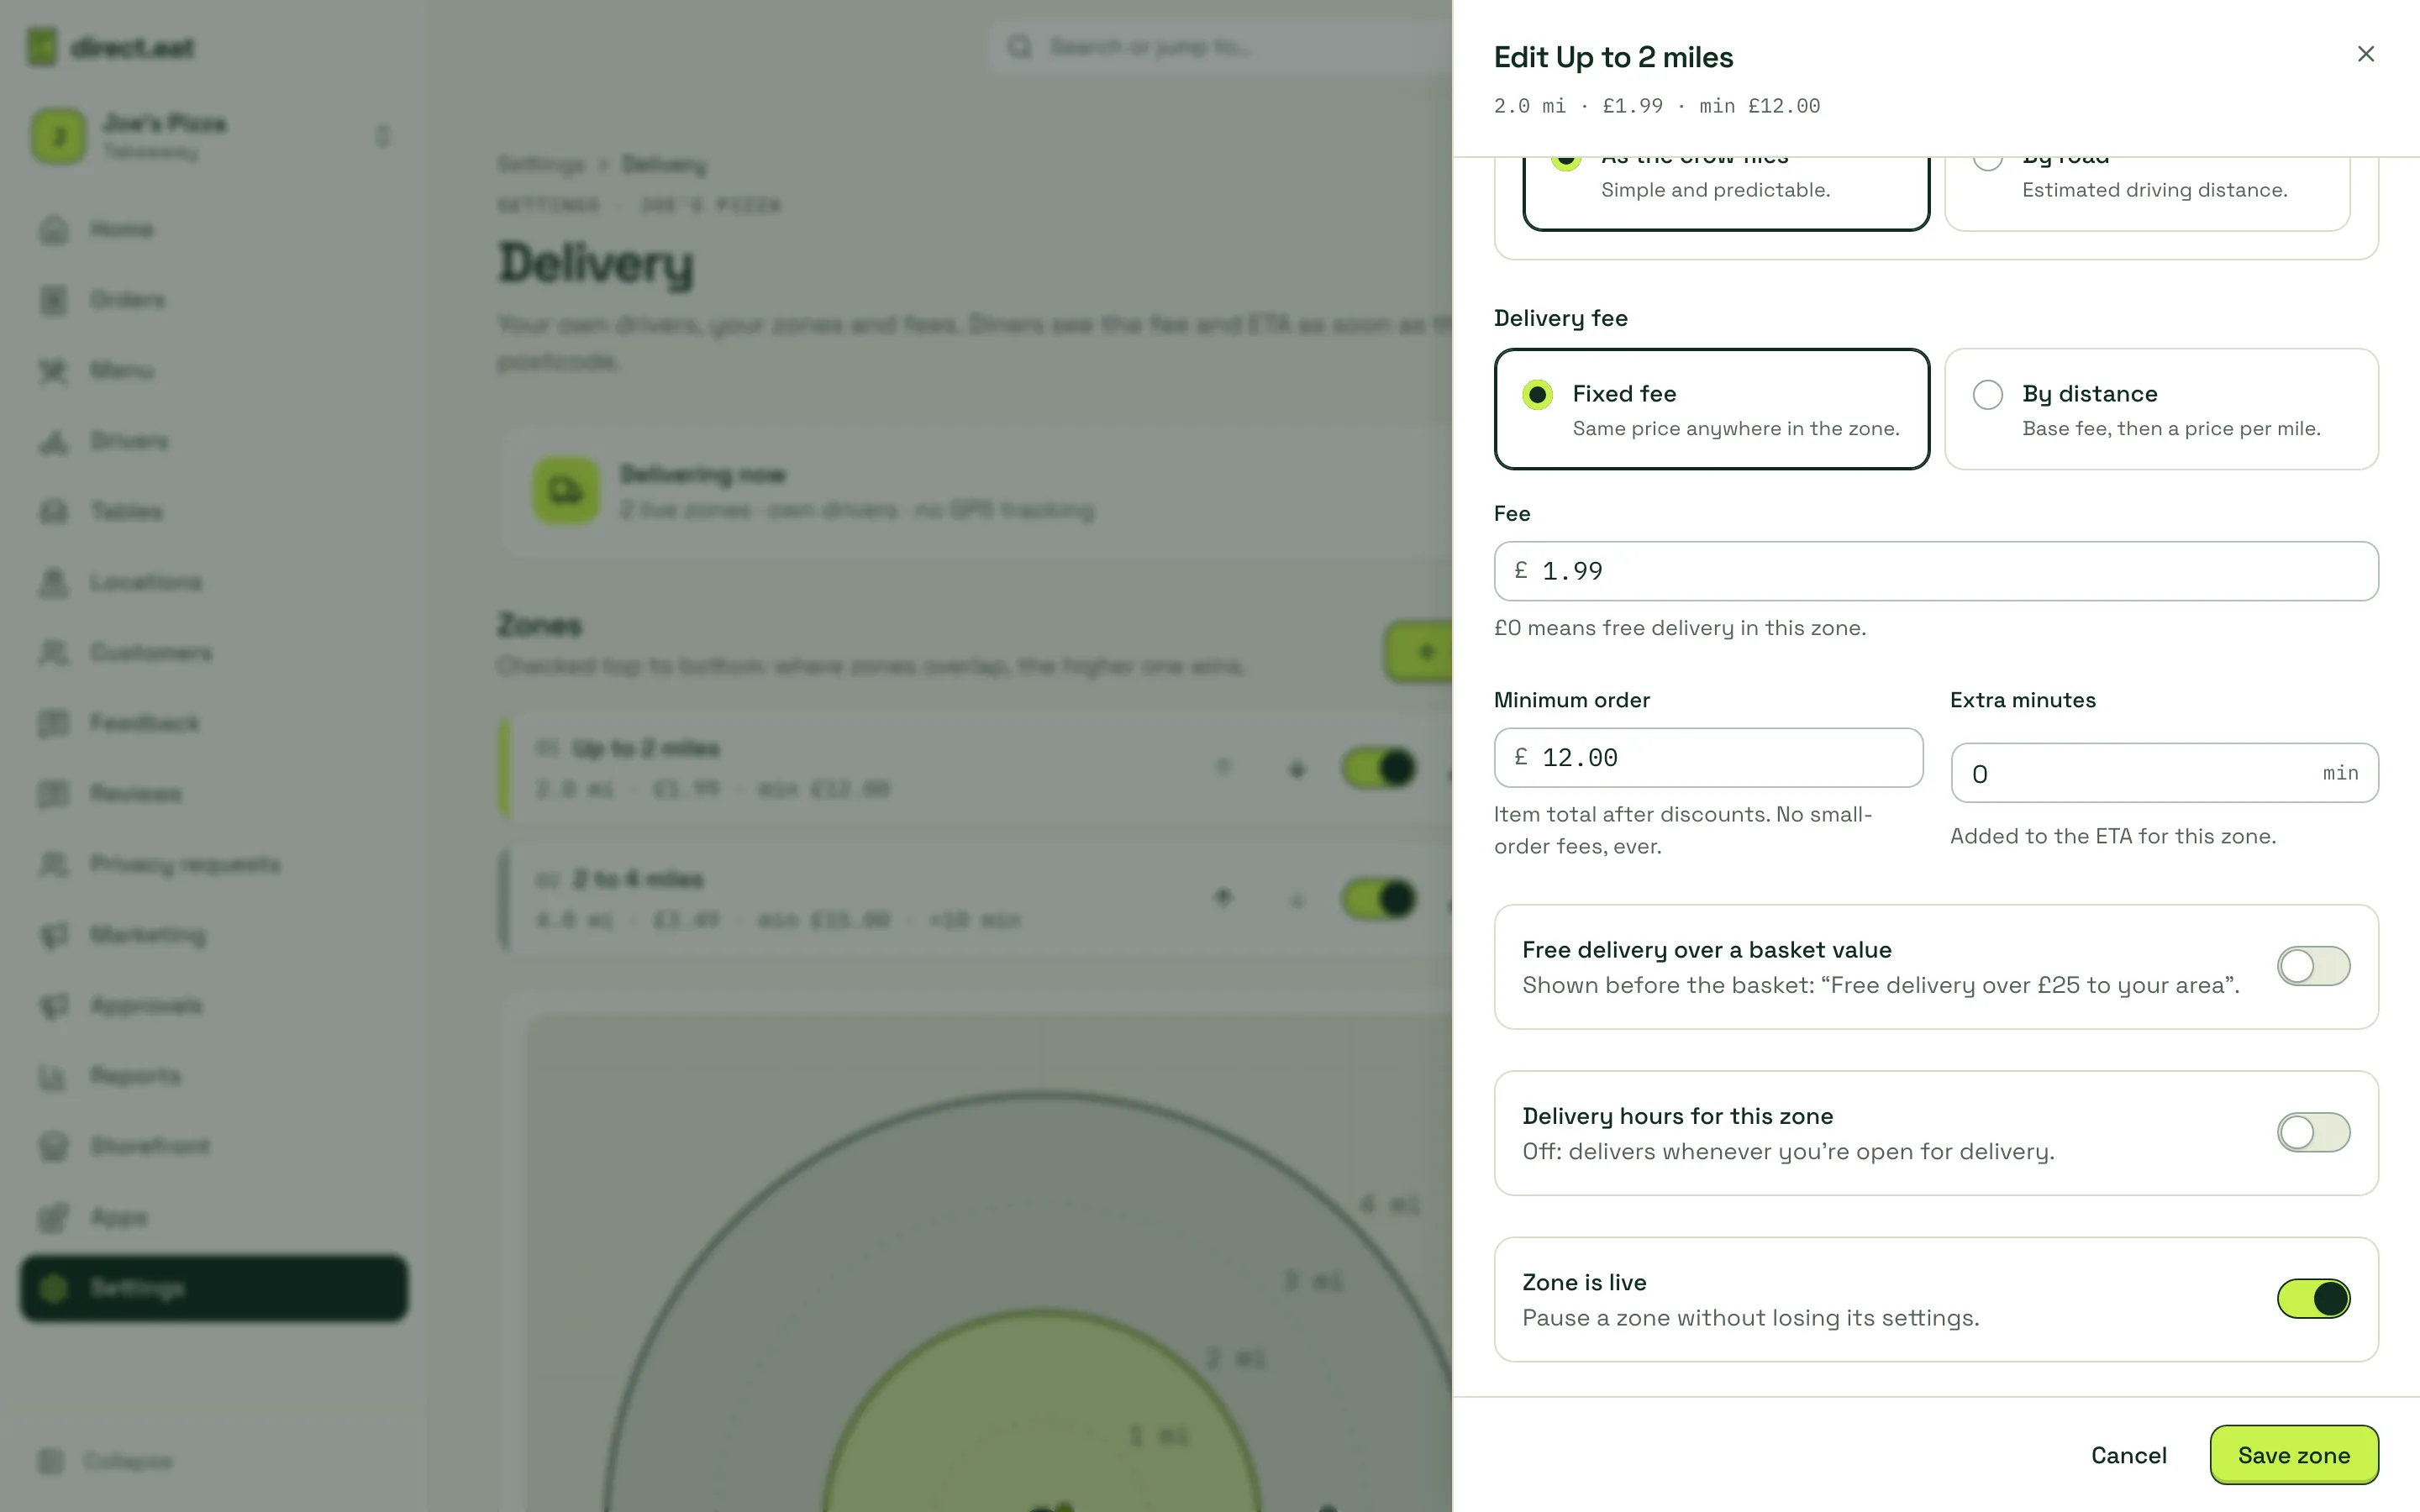
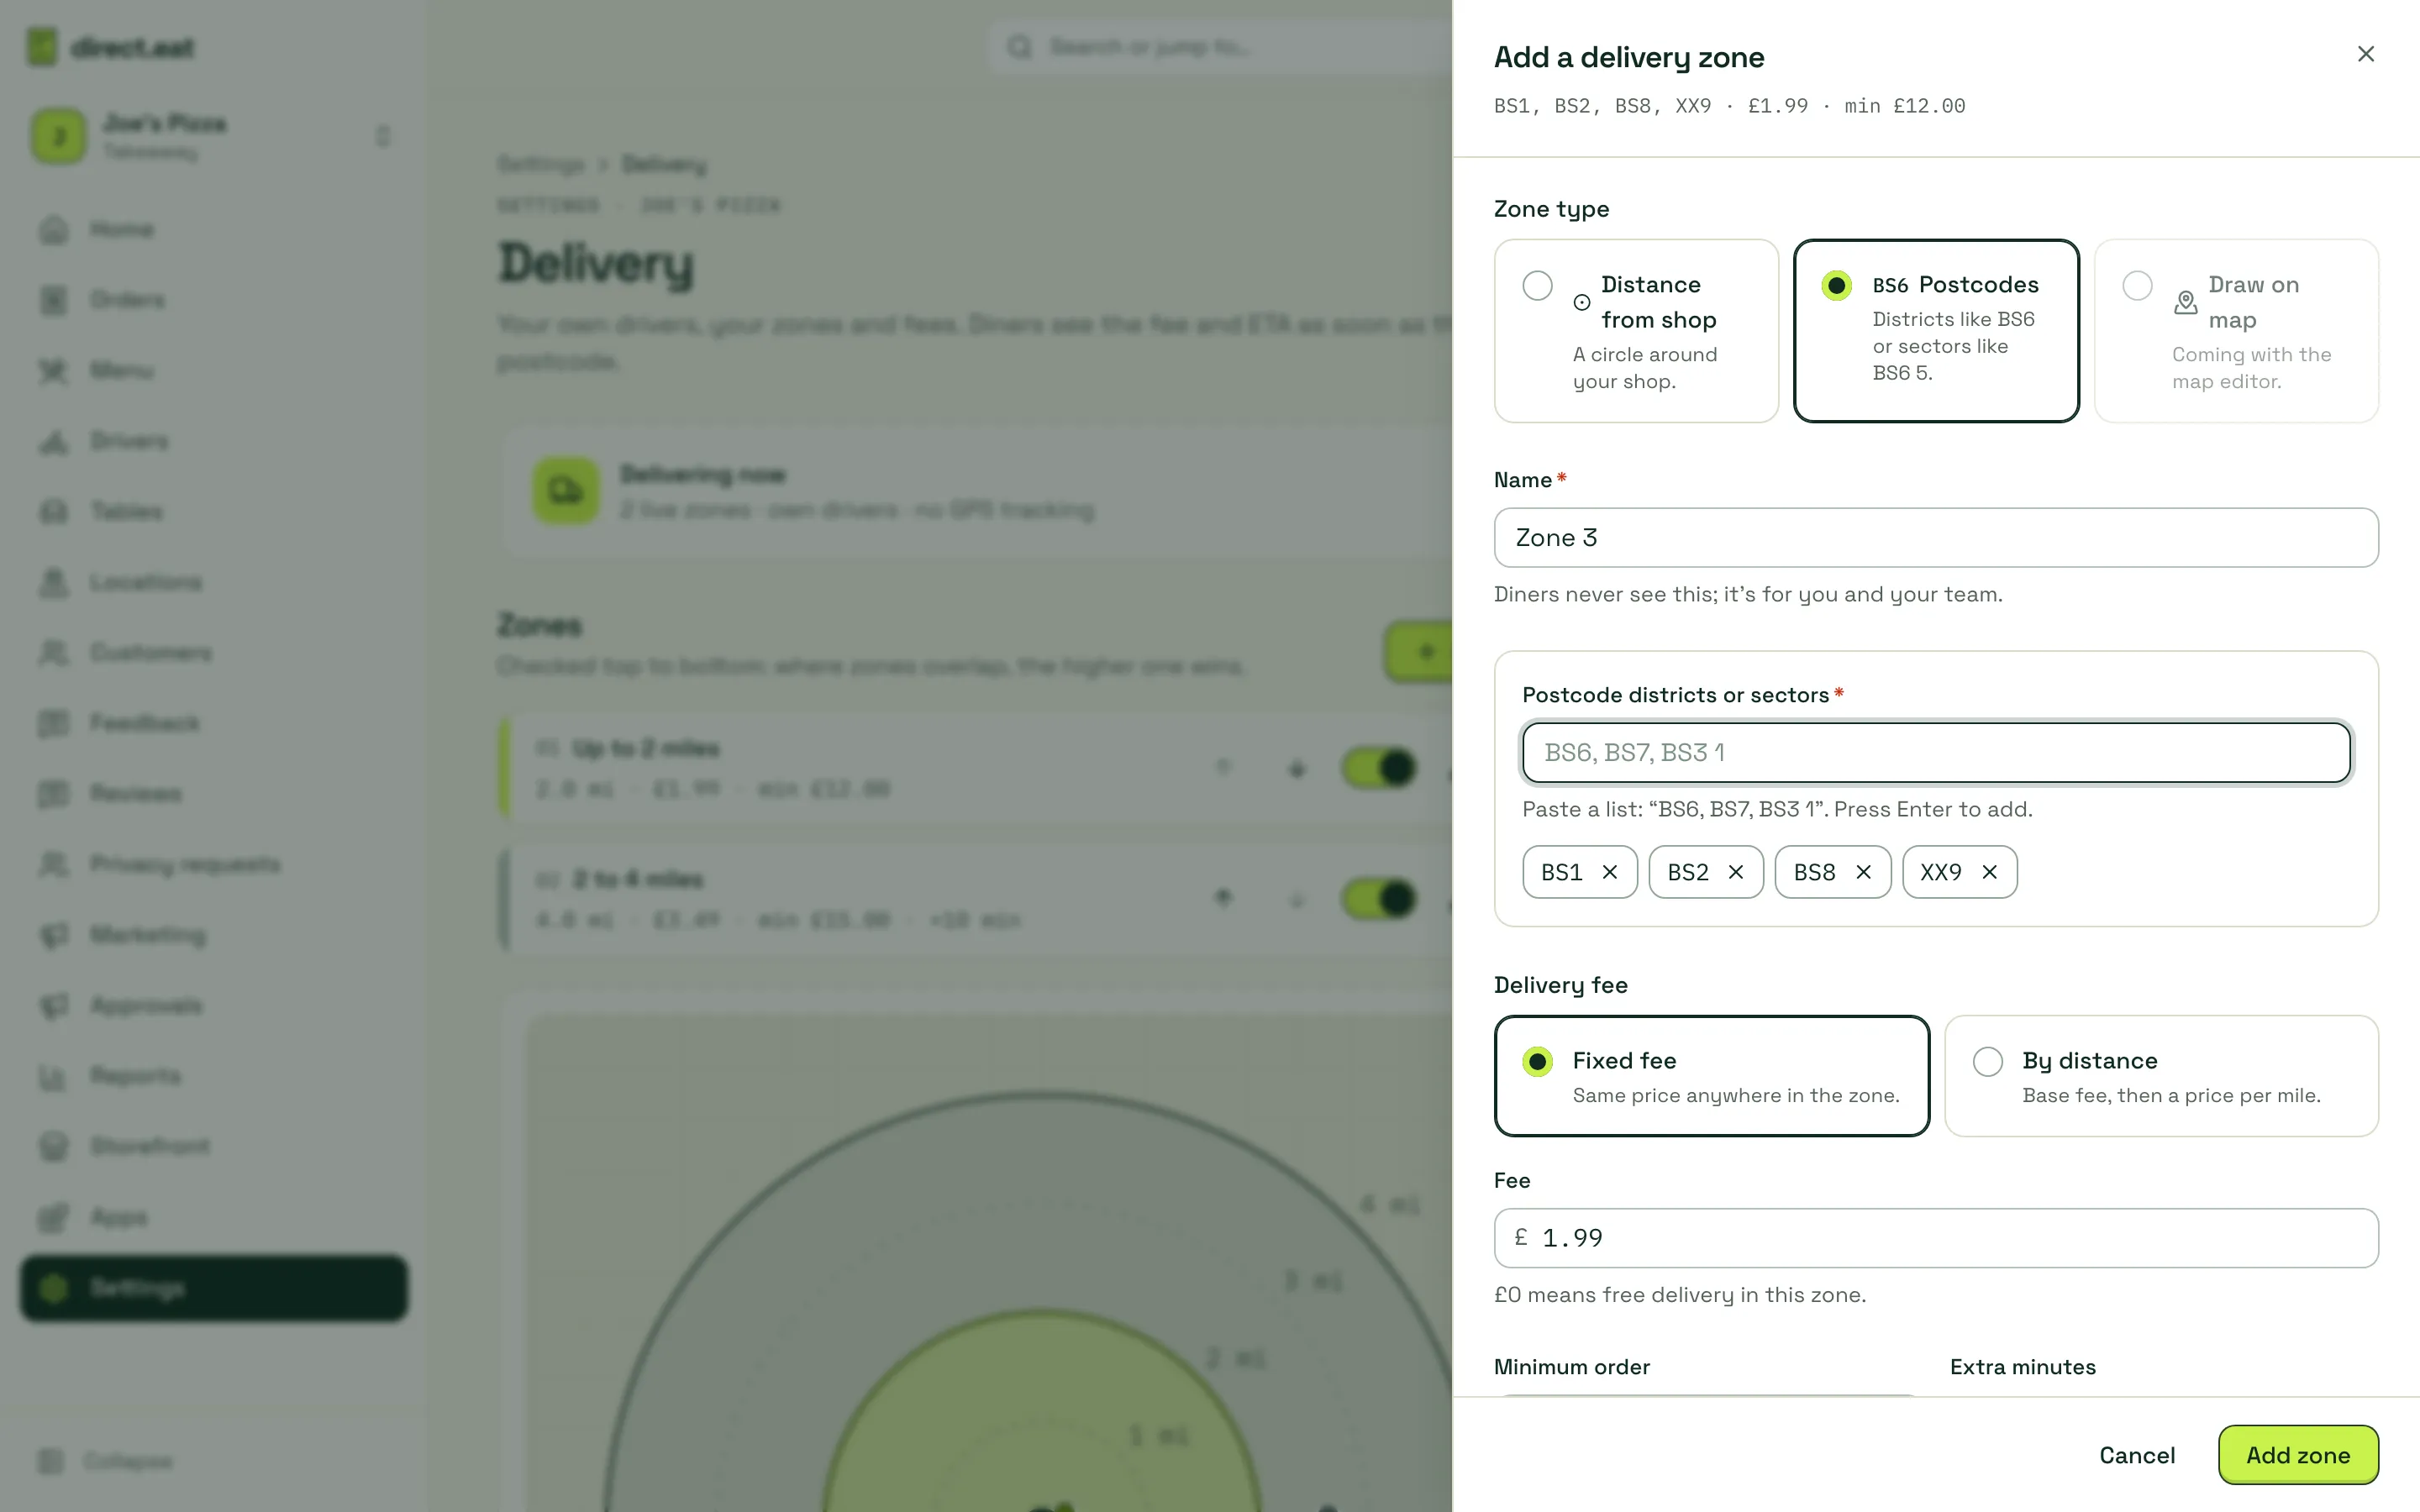
The summary line at the top of the editor updates as you type, for example “BS1, BS2, BS8 · £1.99 · min £12.00”.
To pause one zone without losing its settings, switch it off on its card. To stop all delivery for a while, use Pause 30 min or Pause until I resume.
Free delivery over a basket value
Section titled “Free delivery over a basket value”Turn on Free delivery over a basket value in a zone and set the amount. Diners see it before they reach the basket (“Free delivery over £25 to your area”), the basket shows how close they are, and the fee drops to £0 once they pass it. Promotions can also give free delivery: see Offers and promotions.
Test an address
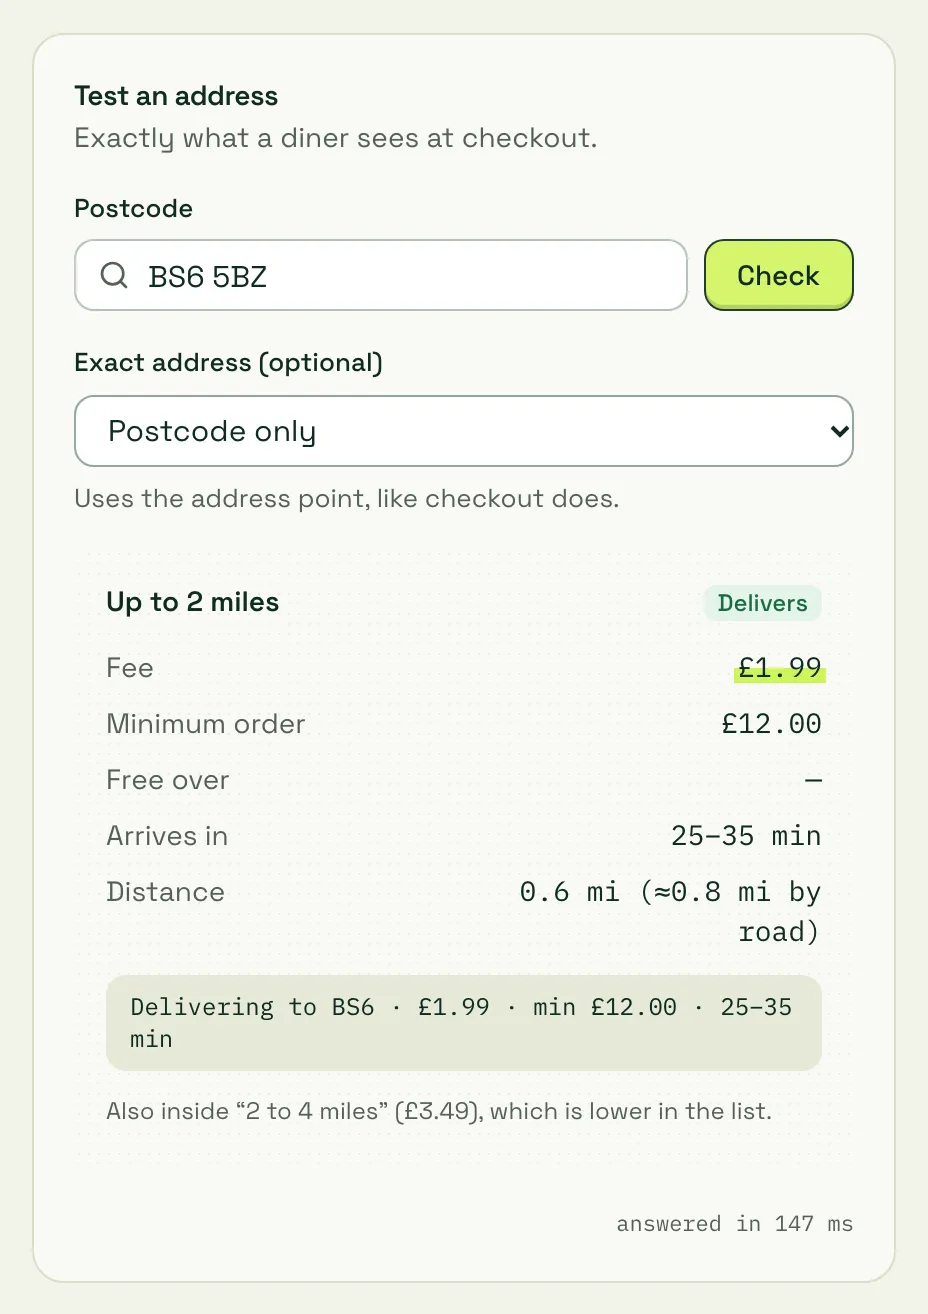
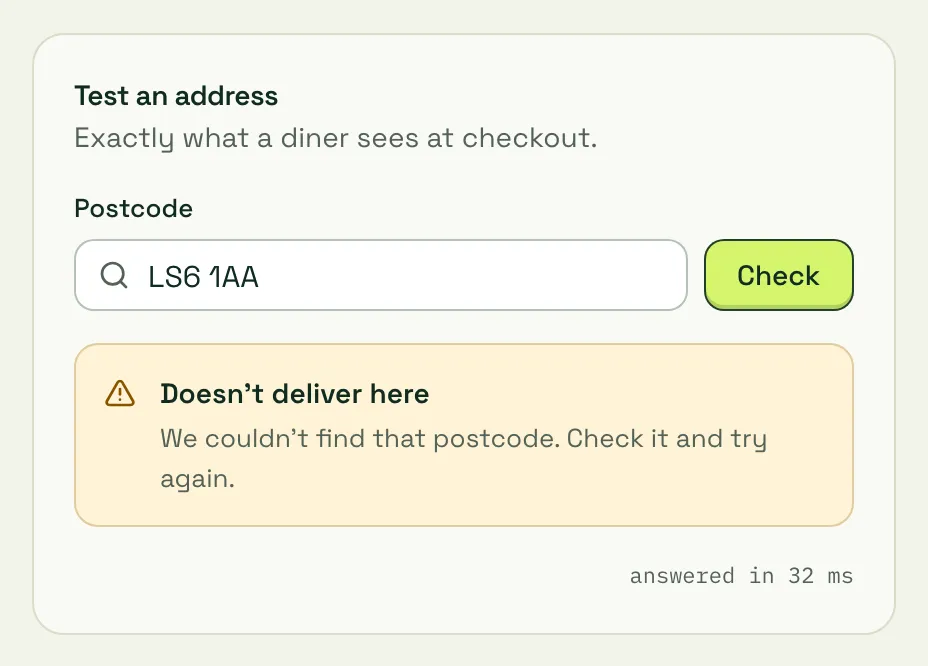
Section titled “Test an address”Type a postcode in Test an address and click Check. You see the same answer a diner would see at checkout: the zone, fee, minimum, distance and arrival window, any other zones that also cover it, or Doesn’t deliver here. If the postcode has several addresses, you can pick the exact one.
UK address lookup
Section titled “UK address lookup”At checkout, diners type their postcode first. That decides the zone, fee and minimum straight away, before they type anything else. They then pick their address from a list for that postcode, add notes for the driver and, if you allow it, opt in to a safe-place drop-off. The fee is priced from the chosen address’s location, never from a dropped pin. See what diners see in Order food.
Delivery times (ETAs)
Section titled “Delivery times (ETAs)”Diners never see a map. They see a time range, such as “35–45 min” at checkout and “arriving 18:35–18:45” on the tracking page. The range is worked out as:
kitchen time (from your prep settings) + road time × traffic + the zone’s extra minutes + handover.
| Setting | What it does |
|---|---|
| Handover buffer | Minutes for bagging and handing to the driver. |
| Range shown | Width of the window diners see. 10 minutes gives “40–50 min”. |
| Traffic 16:00–20:00 | Multiplies road time at peak (default 1.3). |
| Traffic other times | Multiplies road time off-peak (default 1.15). |
| Average driving speed | Before traffic. Scooters in town are about 24 km/h. |
| Show the driver’s first name | “Sam is on the way” on the tracking page. |
| Allow safe-place drop-offs | Only if the diner opts in. Never for alcohol or allergy orders. |
Click Save delivery times. The example line (“an address 3 km away outside peak shows 30–40 min”) updates as you change things.
Road distance is currently estimated from the straight-line distance (× 1.35). When you’re busy, the Busy +10 and Busy +20 buttons on the Drivers page add time to every delivery ETA.
What diners see
Section titled “What diners see”- On the menu: a Delivery chip with your lowest fee.
- At checkout: the fee for their zone, the free-delivery threshold if any, and a clear We don’t deliver to that address with Collect instead if they’re outside every zone.
- In the basket: the minimum order shortfall (“Add £3.20 more for delivery to BS6”) and free-delivery progress.
Related
Section titled “Related”Was this page helpful?