

Get started
This is the whole path from “I’ve just heard of direct.eat” to “we took 60 orders on Friday and kept every penny of them”. It’s written for the owner or manager of a UK takeaway, café, restaurant, pub kitchen or food truck who is setting the shop up themselves. No technical knowledge needed.
Work through it in order. Each step has its own page with screenshots of the real screens.
What you need before you start
Section titled “What you need before you start”Gather these first and the setup goes in one sitting:
- Your menu. A printed menu you can photograph, a PDF, your current website or ordering page, or a GloriaFood account if you’re moving from GloriaFood. A spreadsheet works too.
- Your allergen information for every dish: what each one contains and may contain. You confirm the 14 UK allergens for each item before it can go on sale.
- Your logo as a PNG, JPG or WebP, at least 256 px. A transparent PNG looks best. A nice wide food photo for the top of your page is a bonus.
- For Stripe (card payments): photo ID (passport or driving licence), your bank sort code and account number, your Companies House number if you’re a limited company, and the home address of the person in charge.
- Your opening hours, including split shifts, last orders and any holiday closures you already know about.
- Your legal trading name and shop address. Consumer law says diners must see who they’re buying from.
- A phone or tablet for the kitchen (Android tablet, Sunmi, iPad or phone), and ideally a receipt printer as a backup.
You don’t need a card to start. Your 14-day free trial starts with your first real order, and always ends within 30 days of signing up, so aim to finish setup in your first week.
The 14 steps
Section titled “The 14 steps”Times are rough estimates for one person setting up a 40-item takeaway menu; yours will differ. Steps 1 to 7 happen inside the setup wizard, which keeps track of where you are and shows the minutes left.
| # | Step | What you do | Rough time |
|---|---|---|---|
| 1 | Create your account | Name, email, password and shop name. You get your web address straight away. | 2 min |
| 2 | Setup wizard | Pick your business type, check the preset, add your address, phone and legal name. | 3 to 5 min |
| 3 | Import your menu | Photo, PDF, link, text, GloriaFood or spreadsheet. Check what we read. | 5 to 15 min |
| 4 | Allergens | Confirm the 14 allergens for every item. Nothing goes on sale until you do. | 5 to 15 min |
| 5 | Branding | Theme, brand colour, logo and cover photo. | 5 min |
| 6 | Payments | Connect Stripe so diners can pay by card, Apple Pay and Google Pay. | 8 to 10 min, plus Stripe’s review |
| 7 | Hours, prep times and slots | Opening hours, holidays, prep time, collection slots and capacity. | 5 to 10 min |
| 8 | Delivery | Only if you deliver with your own drivers: zones, fees, minimums. | 10 min (optional) |
| 9 | Kitchen tablet and printer | Pair the device that rings when an order lands. | 10 min |
| 10 | Staff and roles | Invite your team with the right permissions. | 5 min |
| 11 | Test order | Press Go live, then straight away order from your own phone and take it through to collected, before you share the link. A draft shop shows a “Coming soon” page, so there’s nothing to order until it’s live. | 5 min |
| 12 | Go live and share your link | Once the test order works, get your link in front of customers: QR codes, Google, bag inserts. | 10 min |
| 13 | Your first Friday night | What to watch during your first busy service. | One service |
| 14 | First week checklist | The small fixes that make week two smoother. | 15 min over the week |
Total (estimate): about 45 to 60 minutes of hands-on time to be ready to take orders (steps 1 to 7, 9, 11 and 12), or 75 to 90 minutes if you also set up delivery and invite staff. The biggest variables are the size of your menu and how long you spend on allergens. Stripe’s identity check runs on Stripe’s side and its length varies; you can carry on with everything else while it runs.
How the wizard tracks your progress
Section titled “How the wizard tracks your progress”As soon as you sign up you land in the setup wizard. The row of pills along the top shows the seven wizard steps plus Go live. A tick means done. You can jump to any step, press Skip for now on most of them and come back later, and close the browser at any point: your progress is saved.
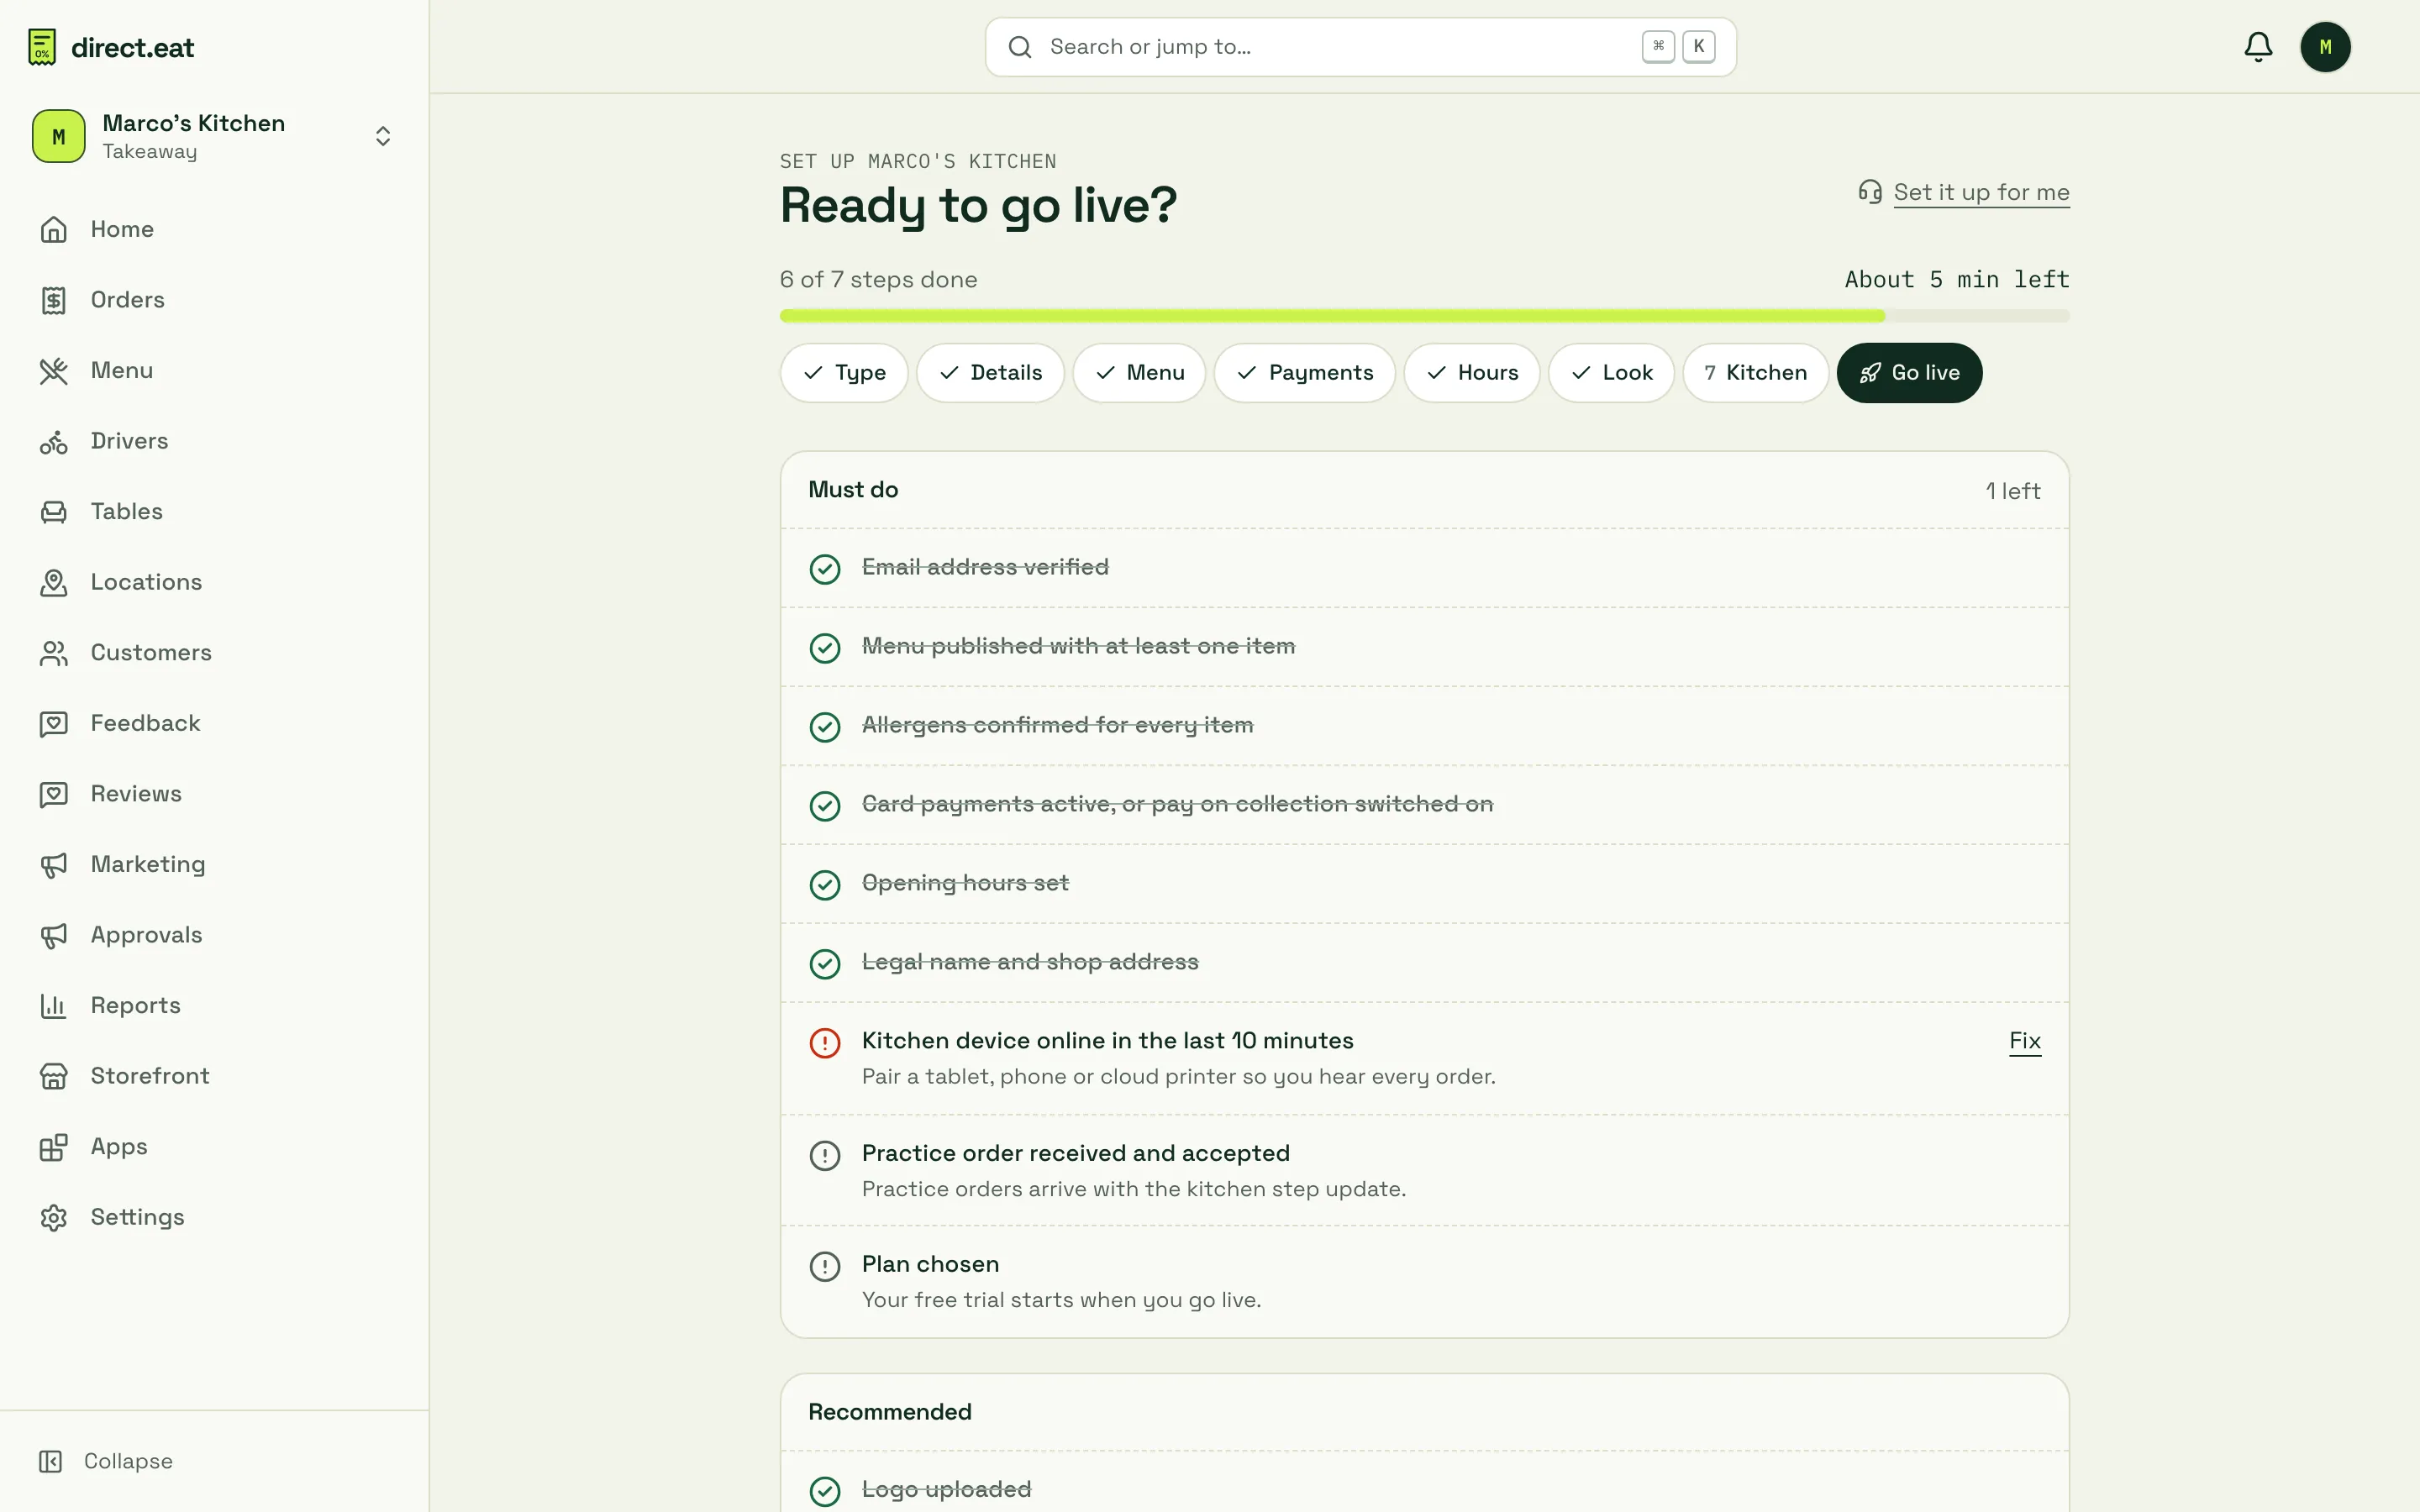
The Go live step is a checklist. The Must do items have to be green before the Go live button works:
- Email address verified
- Menu published with at least one item
- Allergens confirmed for every item
- Card payments active, or pay on collection switched on
- Opening hours set
- Legal name and shop address
- Kitchen device online in the last 10 minutes
The Recommended items (logo uploaded, a second alert path such as a printer, staff invited) don’t block you, but do them anyway.
Pick up where you left off
Section titled “Pick up where you left off”Was this page helpful?